> ## Documentation Index
> Fetch the complete documentation index at: https://docs.decoart.com/llms.txt
> Use this file to discover all available pages before exploring further.
# Braintree Overview
## Overview
DASH uses PayPal Braintree to securely store customer card information and charge cards against orders and invoices. There are four main features worth noting:
* **Card Vaulting** - accounting can enter a customer's card details in DASH; the card itself is stored securely in Braintree, never in DASH.
* **Charging** - accounting can charge a customer card for an order or invoice. Once a transaction settles, an AR payment is created automatically.
* **Settlement** - Braintree processes the authorized transaction over a few days to confirm it is legitimate and the card details are valid. DASH checks for settled transactions on a regular (hourly) schedule and converts them into AR payments when applicable.
* **Refunds** - a settled transaction can be partially or fully refunded, which automatically creates a debit memo.
## Managing Customer Cards
### Viewing and Editing Customer Cards
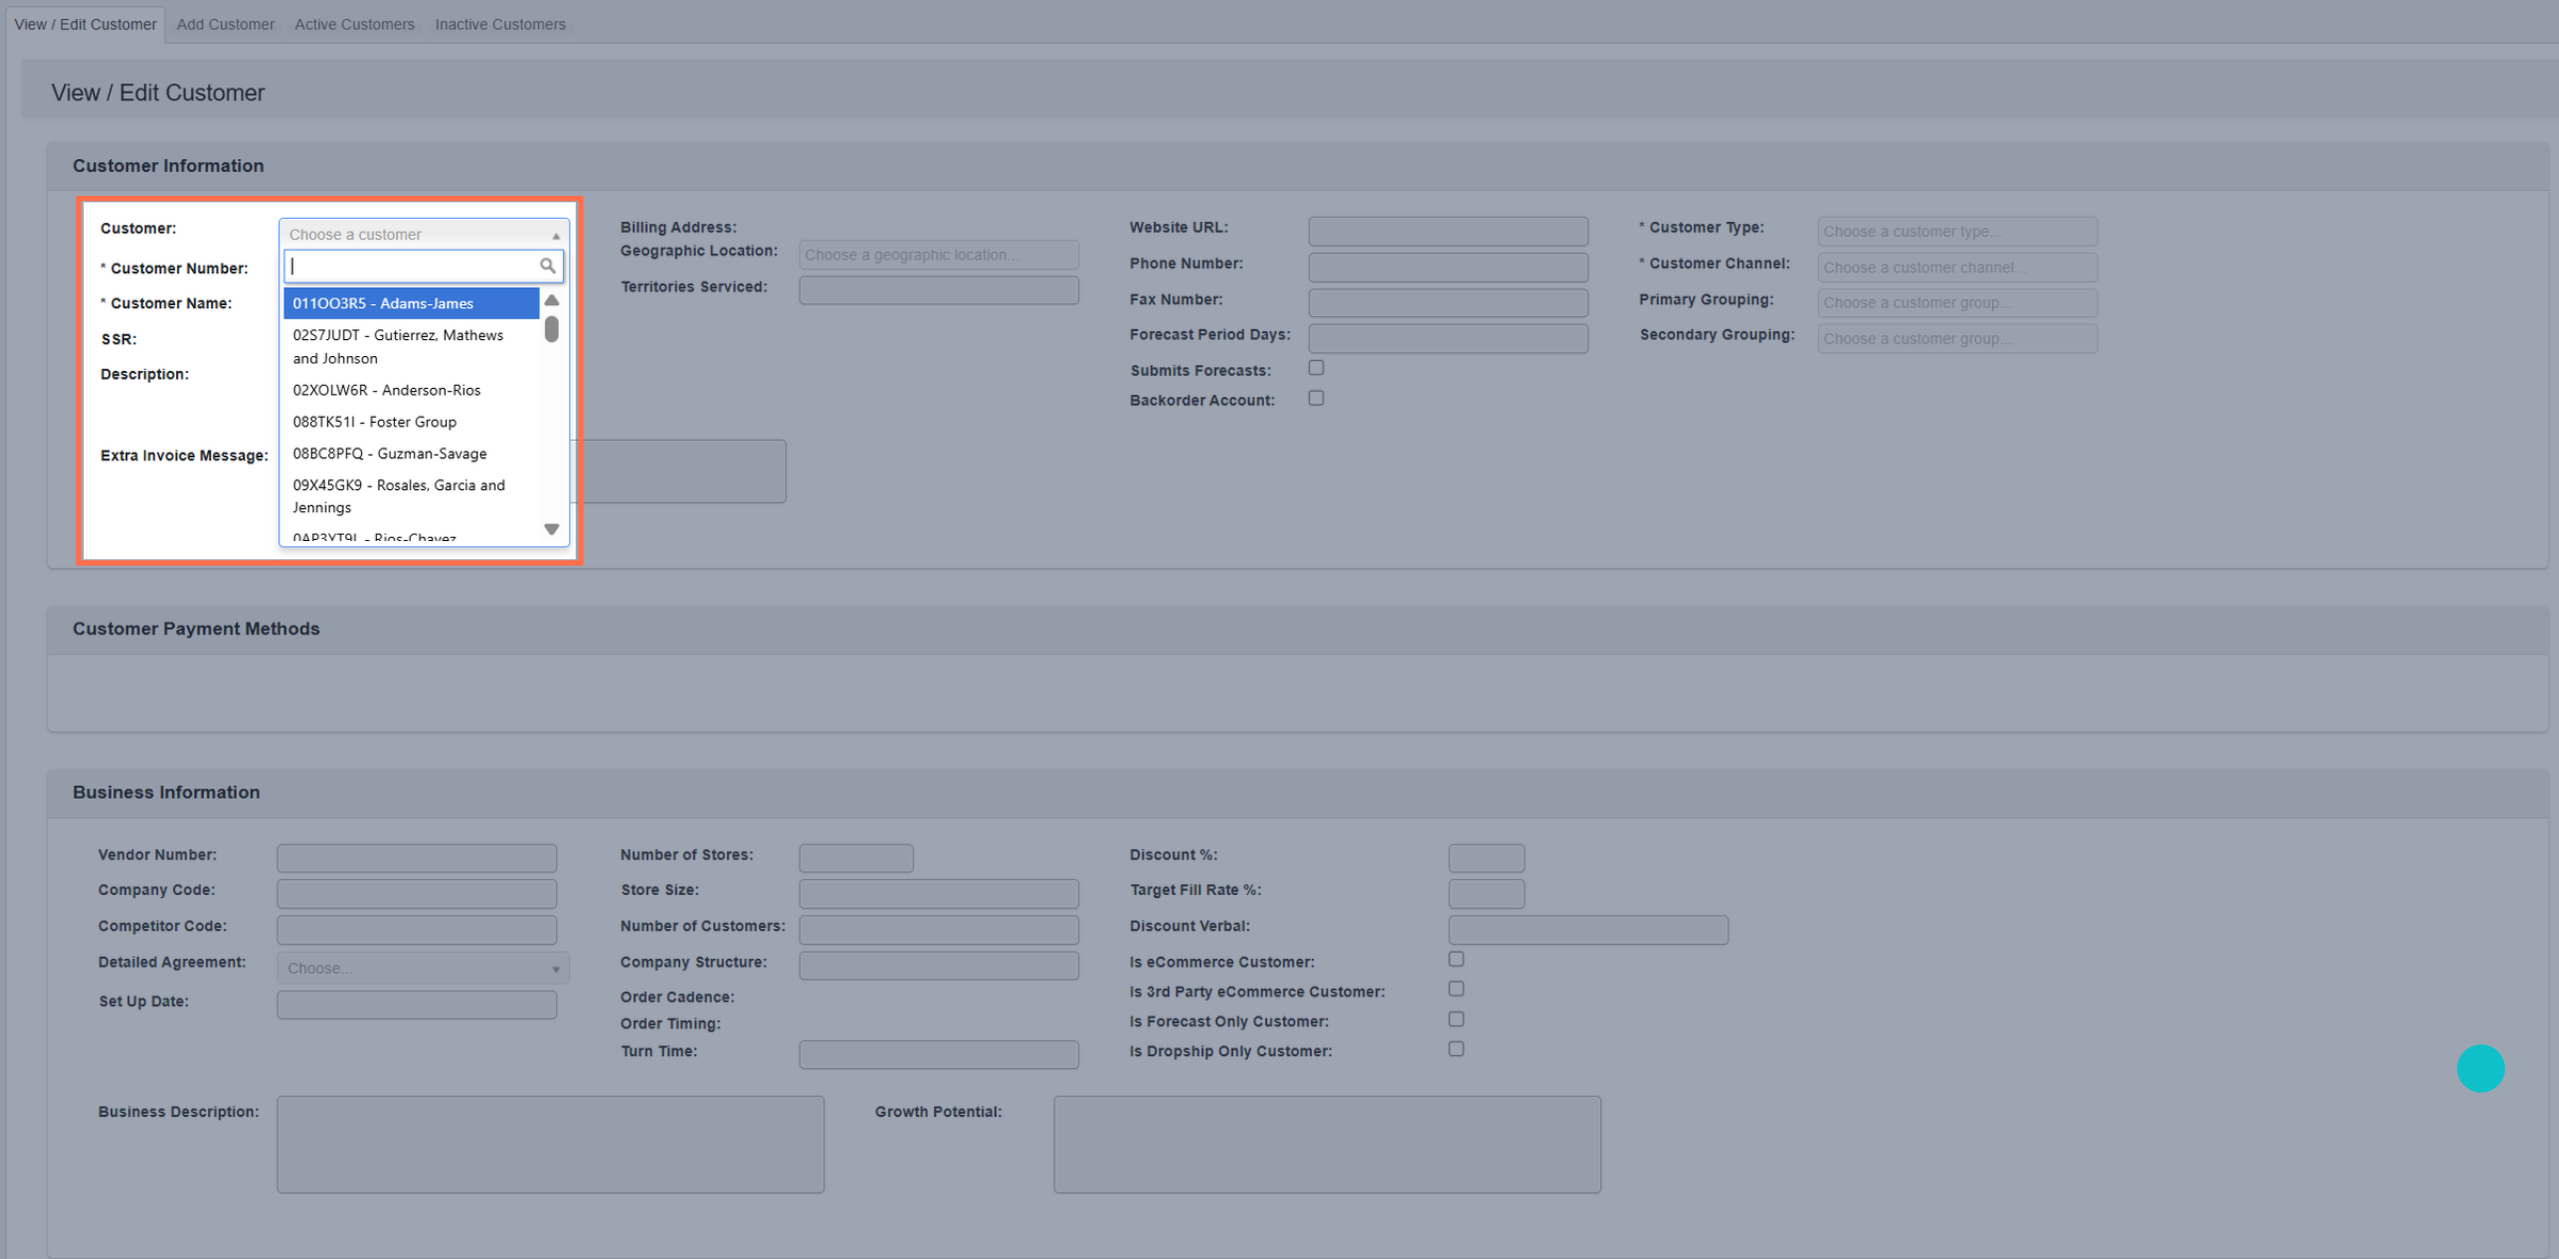
1. From the Customer Information → Manage Customers submodule, click the `View / Edit Customer` tab.
2. Click the dropdown menu next to the Customer field.
3. Enter the customer number or name you're looking for, then click to select it.
 4. View the customer's saved cards.
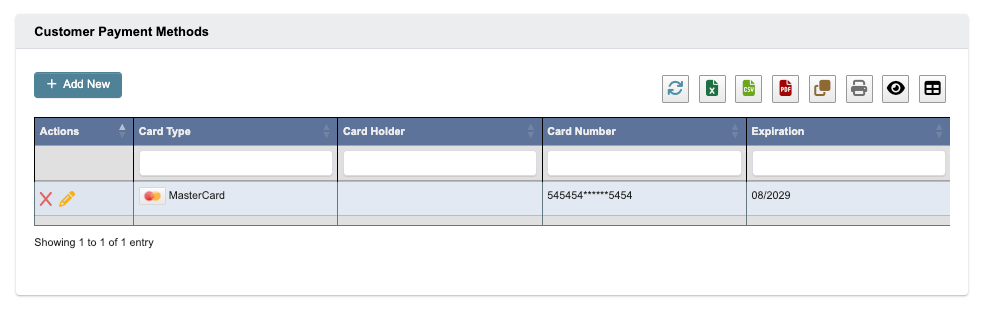 5. To delete a card, click the red 'X' button on that card, then confirm the deletion.
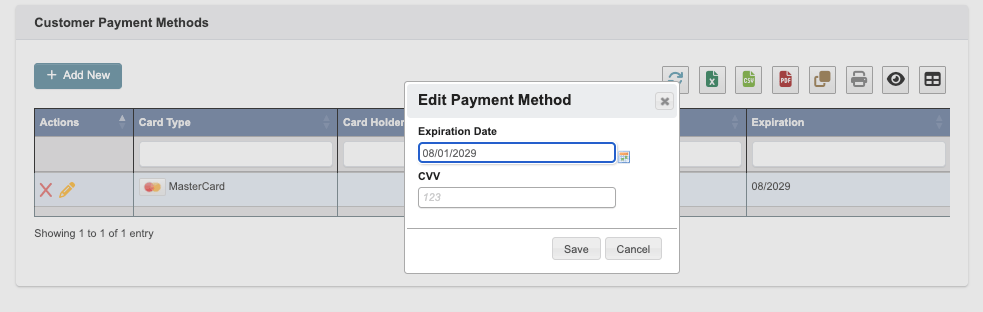
6. To edit a card, click the yellow pencil button. Update the expiration date and CVV, then click 'Save'.
5. To delete a card, click the red 'X' button on that card, then confirm the deletion.
6. To edit a card, click the yellow pencil button. Update the expiration date and CVV, then click 'Save'.
 ### Adding a New Card
1. Click the edit button and scroll down to the 'Customer Payment Methods' section.
2. Click '+ Add New'.
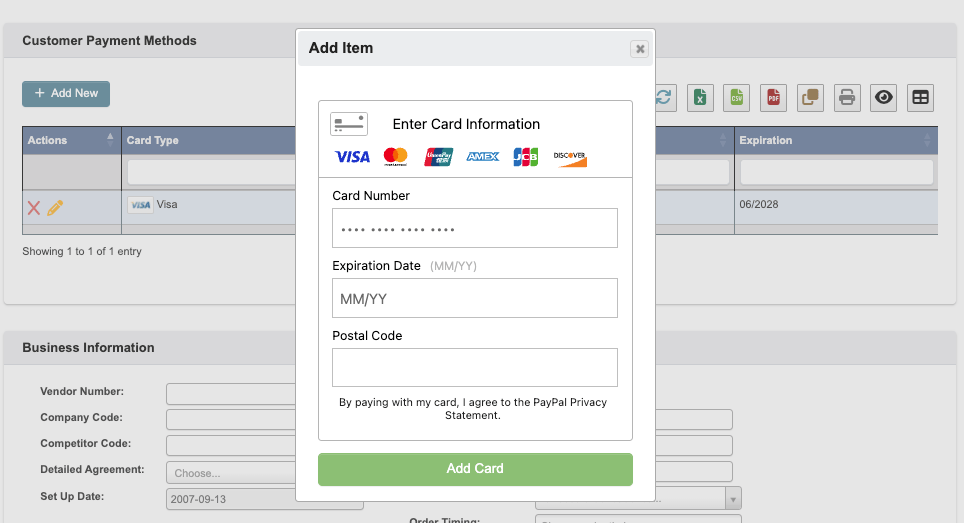
3. Fill out the card information and click 'Add Card'. The card is stored in Braintree and linked to the customer account.
### Adding a New Card
1. Click the edit button and scroll down to the 'Customer Payment Methods' section.
2. Click '+ Add New'.
3. Fill out the card information and click 'Add Card'. The card is stored in Braintree and linked to the customer account.
 ## Charging a Customer Card
### From an Order
1. Navigate to Order Processing → Manage Orders → View / Edit Order and search for the order you want to charge.
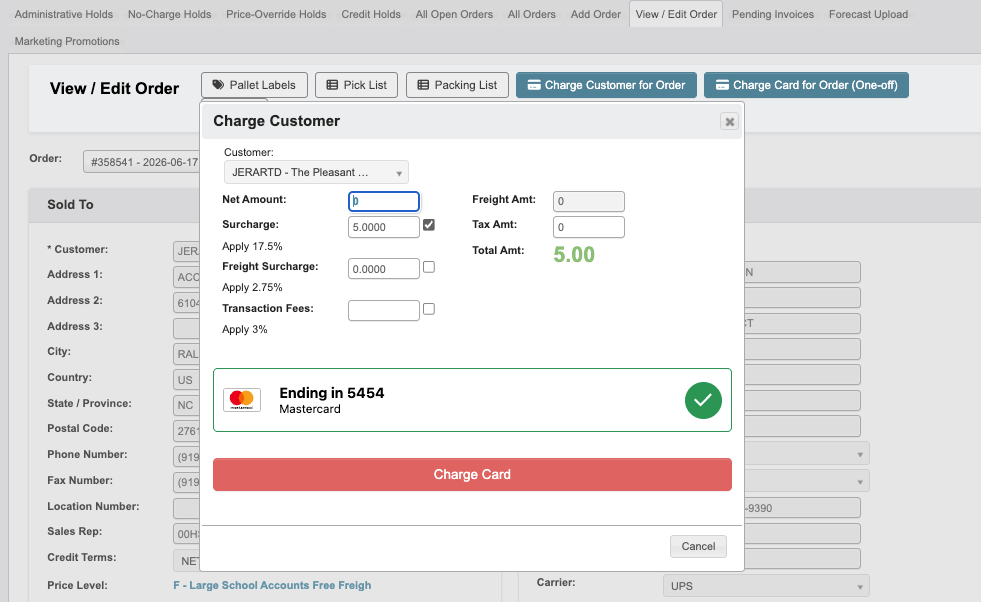
2. Select either 'Charge Customer for Order' or 'Charge Card for Order (One-off)' at the top of the page. Use 'Charge Customer for Order' when a card is already on file. If no card is on file, use 'Charge Card for Order (One-off)' and enter the card information.
## Charging a Customer Card
### From an Order
1. Navigate to Order Processing → Manage Orders → View / Edit Order and search for the order you want to charge.
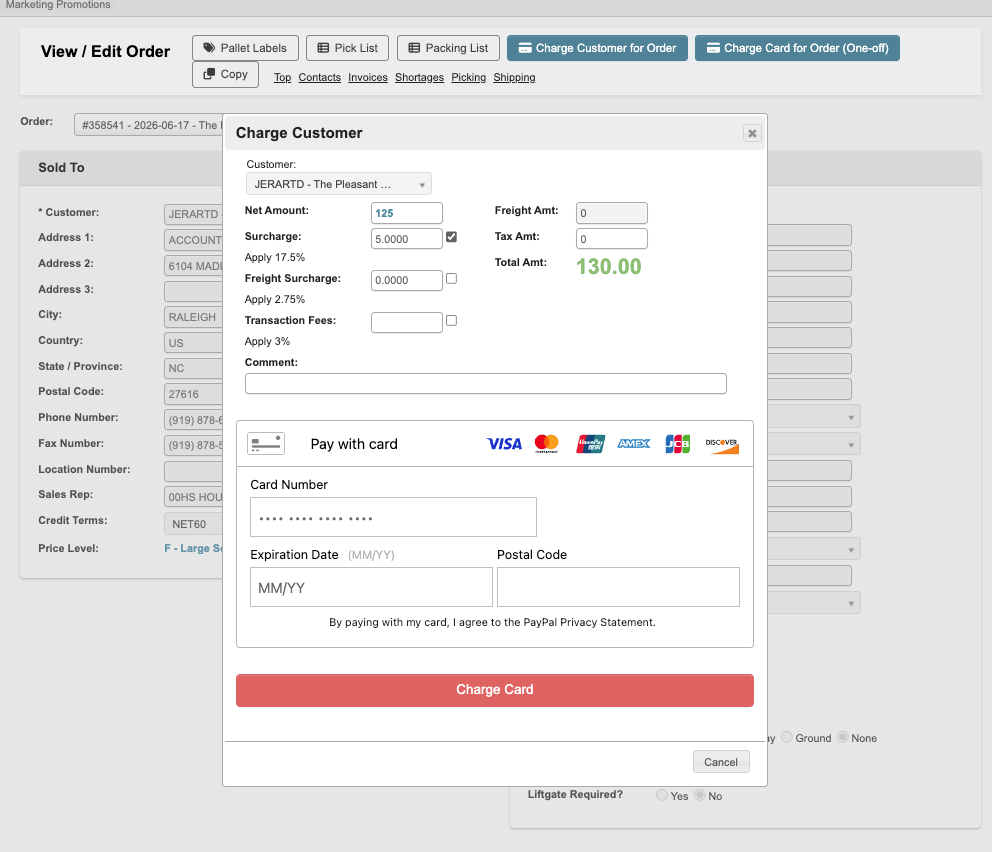
2. Select either 'Charge Customer for Order' or 'Charge Card for Order (One-off)' at the top of the page. Use 'Charge Customer for Order' when a card is already on file. If no card is on file, use 'Charge Card for Order (One-off)' and enter the card information.
 3. Enter the net amount and tax amount, toggle any surcharge, freight surcharge, or transaction fee via its checkbox, add an optional comment, then click 'Charge Card'.
 4. For a one-off charge, you'll be prompted to enter the card information after filling in the payment details.
 Once a charge is submitted, DASH sends the transaction to Braintree for settlement. Settlement can take a few days, and DASH checks for settled transactions on a regular (hourly) schedule. Once the transaction settles, DASH automatically creates an AR payment for the order.
### From an Invoice
Charging a card from an invoice works much like charging from an order, with two differences: the payment details pull from the invoice rather than the order, and the transaction is submitted for settlement automatically once the invoice is past a Pending status (Posted or Finalized).
## Credit Card Report
The credit card report lets you view past and current credit card transactions and issue refunds. To access it, navigate to Accounting → Accounts Receivable → CC Report.
1. Set the filters, such as 'Invoice Date', 'Transaction Date', 'Status', and 'Include Failed'.
Once a charge is submitted, DASH sends the transaction to Braintree for settlement. Settlement can take a few days, and DASH checks for settled transactions on a regular (hourly) schedule. Once the transaction settles, DASH automatically creates an AR payment for the order.
### From an Invoice
Charging a card from an invoice works much like charging from an order, with two differences: the payment details pull from the invoice rather than the order, and the transaction is submitted for settlement automatically once the invoice is past a Pending status (Posted or Finalized).
## Credit Card Report
The credit card report lets you view past and current credit card transactions and issue refunds. To access it, navigate to Accounting → Accounts Receivable → CC Report.
1. Set the filters, such as 'Invoice Date', 'Transaction Date', 'Status', and 'Include Failed'.
 2. Click 'Run Report'. The table populates with the order number, customer information, and transaction status and details.
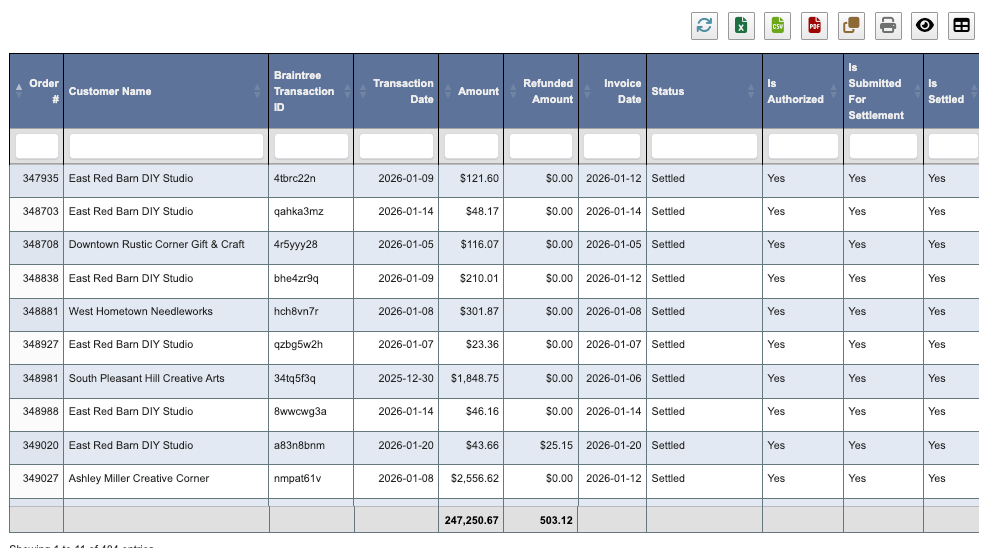 3. From this report, you can view the underlying AR invoice and payment batch, and issue a refund.
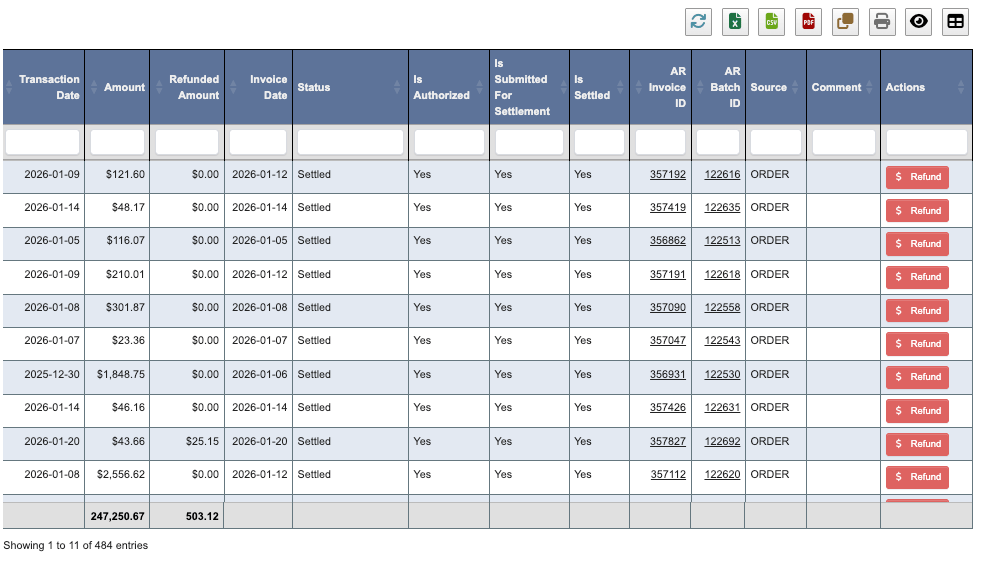 4. To issue a refund, click the 'Refund' button in the Actions column. A modal appears where you can enter the refund amount. Once the amount is entered and validated, click 'Refund'.
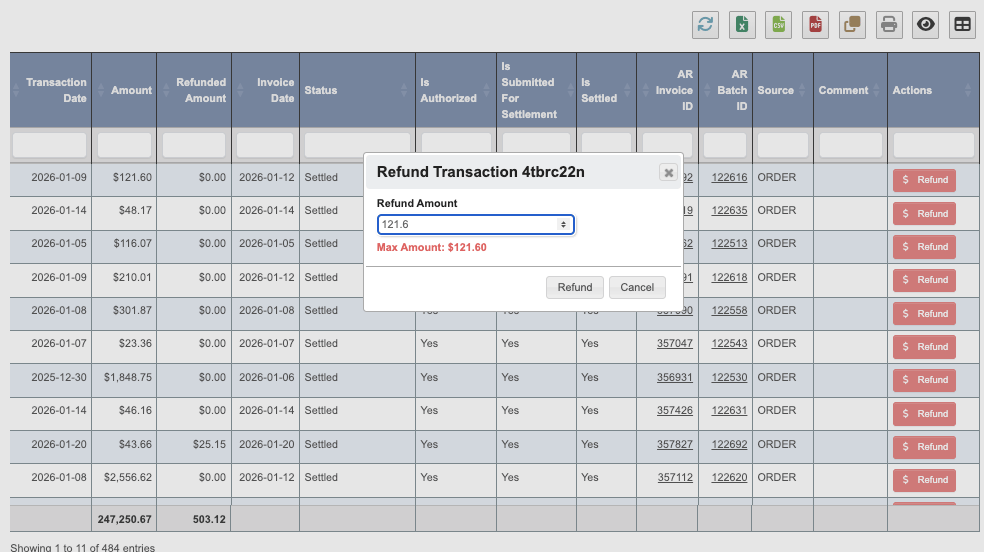 After a refund is issued, DASH automatically creates a debit memo for the refunded amount under the customer's account.
## Good to Know
* Braintree also offers its own UI for viewing and managing customer cards, transactions, and refunds — log in at the Braintree website with your credentials. If a card transaction fails, you can view detailed information about the failure there.
* DASH automatically creates AR payments for settled charges and debit memos for refunds.
* Each transaction has a maximum chargeable amount based on the order/invoice details. This reduces erroneous transactions and helps ensure the correct amount is charged.
* Partial payments are allowed only for customers who receive a single invoice per order (that is, customers not set up for multiple invoices per order).
After a refund is issued, DASH automatically creates a debit memo for the refunded amount under the customer's account.
## Good to Know
* Braintree also offers its own UI for viewing and managing customer cards, transactions, and refunds — log in at the Braintree website with your credentials. If a card transaction fails, you can view detailed information about the failure there.
* DASH automatically creates AR payments for settled charges and debit memos for refunds.
* Each transaction has a maximum chargeable amount based on the order/invoice details. This reduces erroneous transactions and helps ensure the correct amount is charged.
* Partial payments are allowed only for customers who receive a single invoice per order (that is, customers not set up for multiple invoices per order).