> ## Documentation Index
> Fetch the complete documentation index at: https://docs.decoart.com/llms.txt
> Use this file to discover all available pages before exploring further.
# Manage Customers Submodule
## Overview
The **Customer Information** → **Manage Customers** submodule lets you view and manage customer records used across the DASH system for orders, pricing, and shipping.
The submodule contains the following tabs:
* **View / Edit Customer**: Manage your existing customer information.
* **Add Customer**: Create a new customer record and save it in the database for use across DASH.
* **Active Customers**: View customers that you are currently doing ongoing business with, or mark active customers as inactive.
* **Inactive Customers**: View customer records that are no longer in use but preserved for later reference, or mark inactive customers as active.
## View / Edit Customer
From within the View / Edit Customer tab, you can explore and manage existing customer information.
### Step 1: Pull up a customer’s records
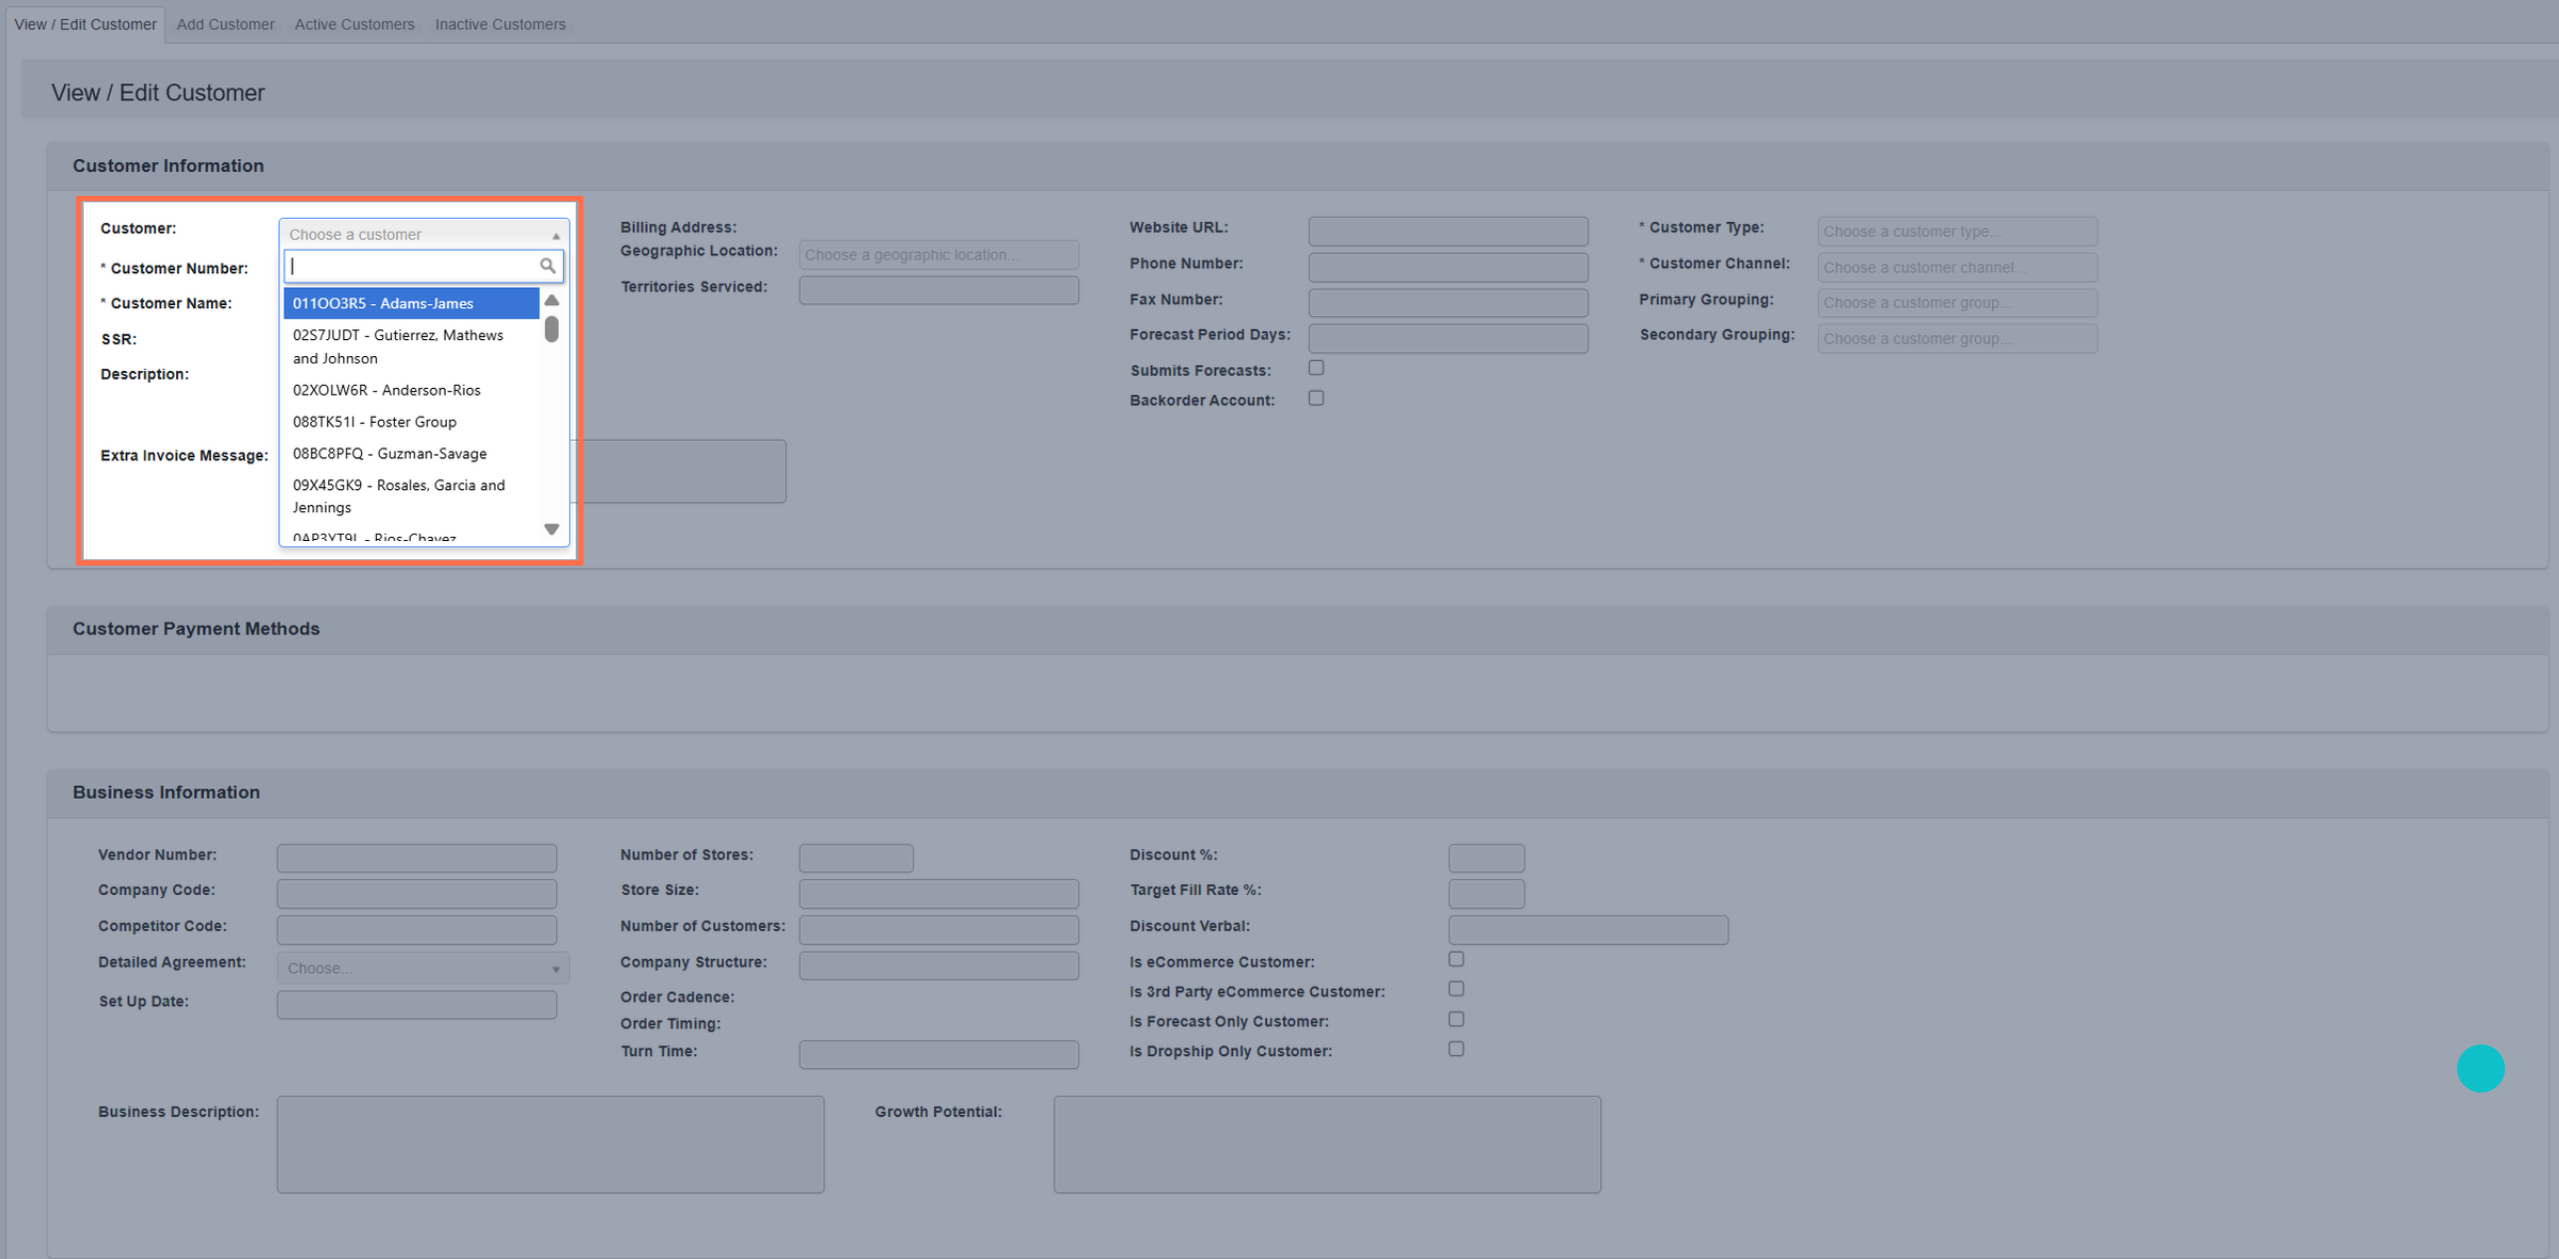
1. From the Customer Information → Manage Customers submodule, click on the `View / Edit Customer` tab.
2. Click the dropdown menu next to the Customer field.
3. Enter the customer number or name you’re looking for, then click to select it.
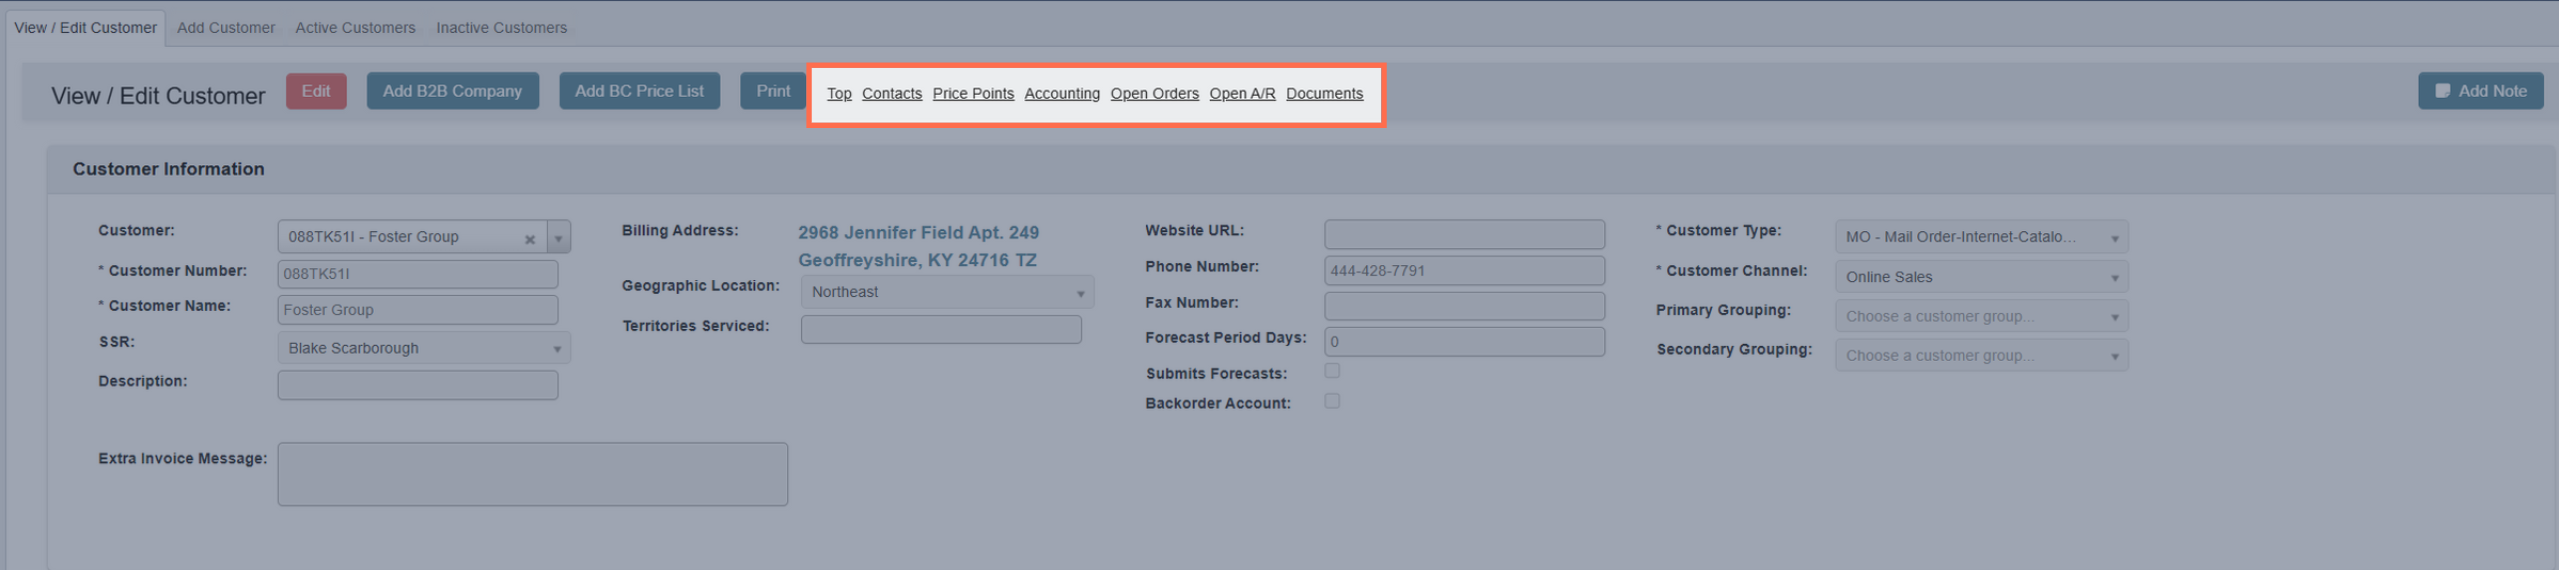
 4. You can now view that customer’s existing personal, payment, business, and shipping information.
TIP: In the toolbar, click on an underlined word/phrase to quickly navigate to its respective section within the page.
For example, clicking on `Open A/R` would take you to the Open Accounts Receivable section.
4. You can now view that customer’s existing personal, payment, business, and shipping information.
TIP: In the toolbar, click on an underlined word/phrase to quickly navigate to its respective section within the page.
For example, clicking on `Open A/R` would take you to the Open Accounts Receivable section.
 ### Step 2: Use the toolbar to manage a customer’s records
Once you’ve pulled up a customer’s records, you can manage their information with the following features located in the toolbar:
* `Edit`: Edit customer information. Once in the edit view:
### Step 2: Use the toolbar to manage a customer’s records
Once you’ve pulled up a customer’s records, you can manage their information with the following features located in the toolbar:
* `Edit`: Edit customer information. Once in the edit view:
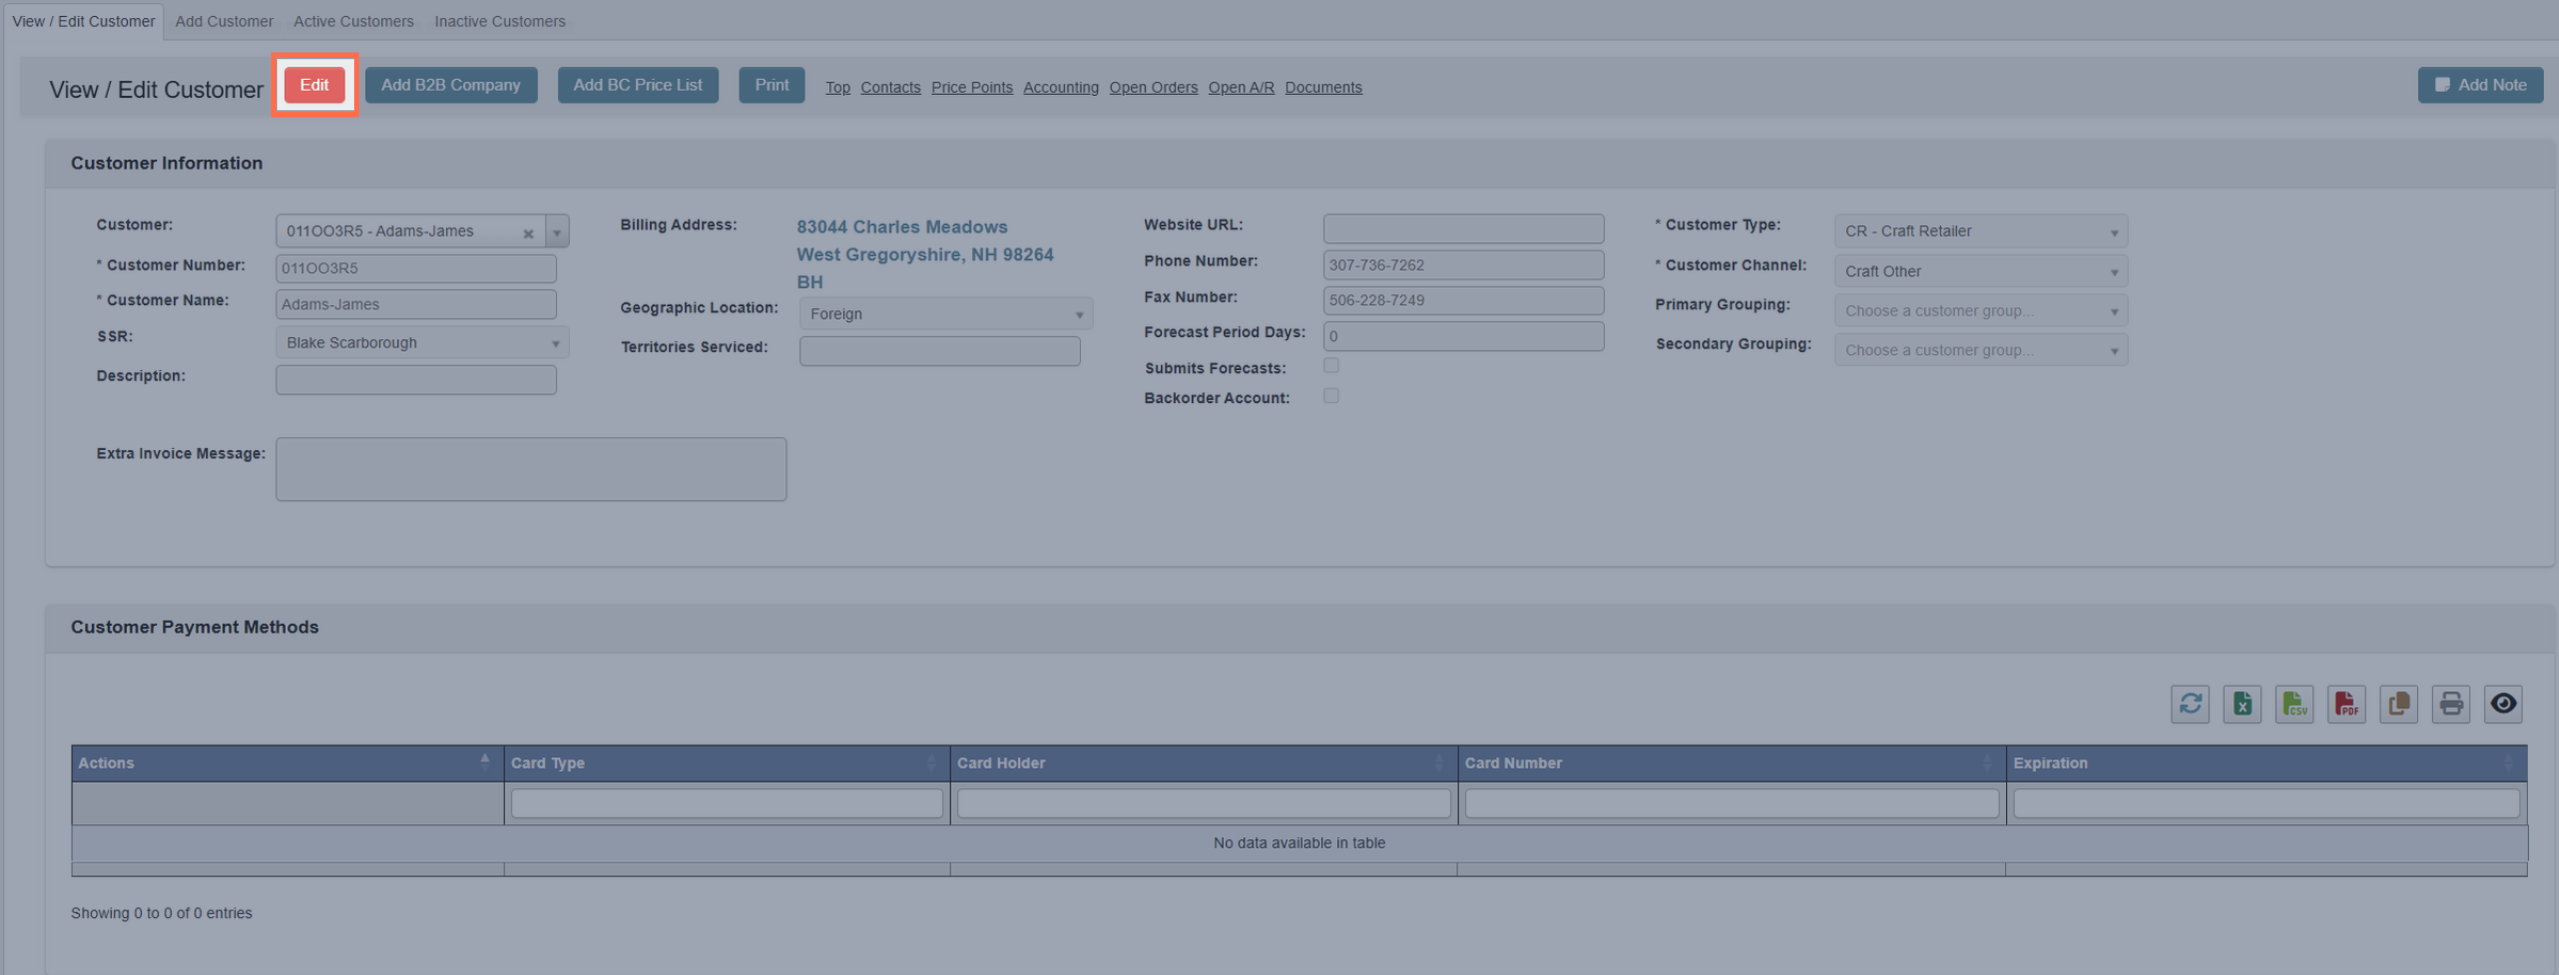 * Click `Cancel Editing` to cancel editing.
 * Click `Save` to save your changes.
* Click `Clear` to wipe all information from the customer’s records and begin from scratch.
## Add Customer
1. From the Customer Information → Manage Customers submodule, click on the `Add Customer` tab.
2. Fill in `Customer Number` with a unique alphanumeric code to identify this customer with.
3. Fill in `Customer Name` with the customer’s name.
4. Choose a `Customer Type` and `Customer Channel`. You can manage or create new Customer Types and Channels in the Customer Information → Maintenance submodule.
5. Fill in any other information you have for the customer. You can always go back and add new information later.
6. `Save` the new customer profile. If you change your mind, you can exit the tab or click `Clear` to delete your entries.
## Understand Special Inputs
Each customer record is broken into cards that group related information. Below is a guide to each card and some of the fields within it that have special behaviors or system-wide effects.
### Customer Information
This card contains basic identity and classification fields for the customer.
* Click `Save` to save your changes.
* Click `Clear` to wipe all information from the customer’s records and begin from scratch.
## Add Customer
1. From the Customer Information → Manage Customers submodule, click on the `Add Customer` tab.
2. Fill in `Customer Number` with a unique alphanumeric code to identify this customer with.
3. Fill in `Customer Name` with the customer’s name.
4. Choose a `Customer Type` and `Customer Channel`. You can manage or create new Customer Types and Channels in the Customer Information → Maintenance submodule.
5. Fill in any other information you have for the customer. You can always go back and add new information later.
6. `Save` the new customer profile. If you change your mind, you can exit the tab or click `Clear` to delete your entries.
## Understand Special Inputs
Each customer record is broken into cards that group related information. Below is a guide to each card and some of the fields within it that have special behaviors or system-wide effects.
### Customer Information
This card contains basic identity and classification fields for the customer.
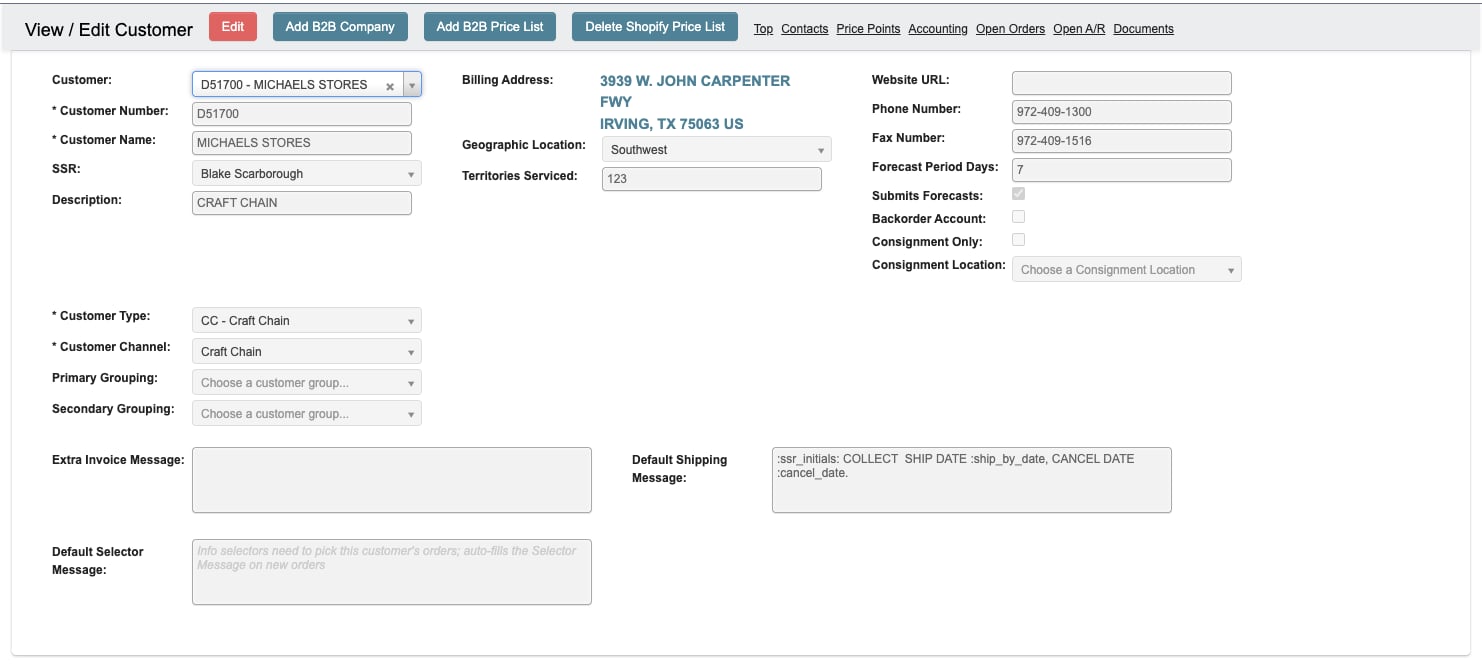 * `Customer Number / Name`: Required identifiers for all customers.
* `Customer Type / Channel`: Determines classification; managed in the Maintenance submodule.
* `SSR`: Sales Service Representative - the point of contact that handles questions and order issues for the customer.
* `Extra Invoice Message`: When creating an invoice for a customer, this message gets auto populated inside the message field of the invoice. See [Accounts Receivable](/accounting/accounts-receivable) for more.
* `Default Shipping Message`: Auto-fills the Shipping Message on every new order for this customer. Use it for standing shipping details and instructions (routing requirements, international documentation notes, etc.); it is shown to shipping and office staff but not to selectors. See [Manage Orders](/order-processing/manage-orders) for more.
* `Default Selector Message`: Auto-fills the Selector Message on every new order for this customer. Use it for the information selectors need while picking, such as heat treated pallet requirements, whether labels are required, and label size. See [Order Picking](/order-processing/order-picking) for more.
* `Backorder Account`: Customer with this checked have backorders automatically created for any items that are shorted on their shipments. See [Manage Orders](/order-processing/manage-orders) for more.
### Business Information
This card captures operational behavior and structural designations.
* `Customer Number / Name`: Required identifiers for all customers.
* `Customer Type / Channel`: Determines classification; managed in the Maintenance submodule.
* `SSR`: Sales Service Representative - the point of contact that handles questions and order issues for the customer.
* `Extra Invoice Message`: When creating an invoice for a customer, this message gets auto populated inside the message field of the invoice. See [Accounts Receivable](/accounting/accounts-receivable) for more.
* `Default Shipping Message`: Auto-fills the Shipping Message on every new order for this customer. Use it for standing shipping details and instructions (routing requirements, international documentation notes, etc.); it is shown to shipping and office staff but not to selectors. See [Manage Orders](/order-processing/manage-orders) for more.
* `Default Selector Message`: Auto-fills the Selector Message on every new order for this customer. Use it for the information selectors need while picking, such as heat treated pallet requirements, whether labels are required, and label size. See [Order Picking](/order-processing/order-picking) for more.
* `Backorder Account`: Customer with this checked have backorders automatically created for any items that are shorted on their shipments. See [Manage Orders](/order-processing/manage-orders) for more.
### Business Information
This card captures operational behavior and structural designations.
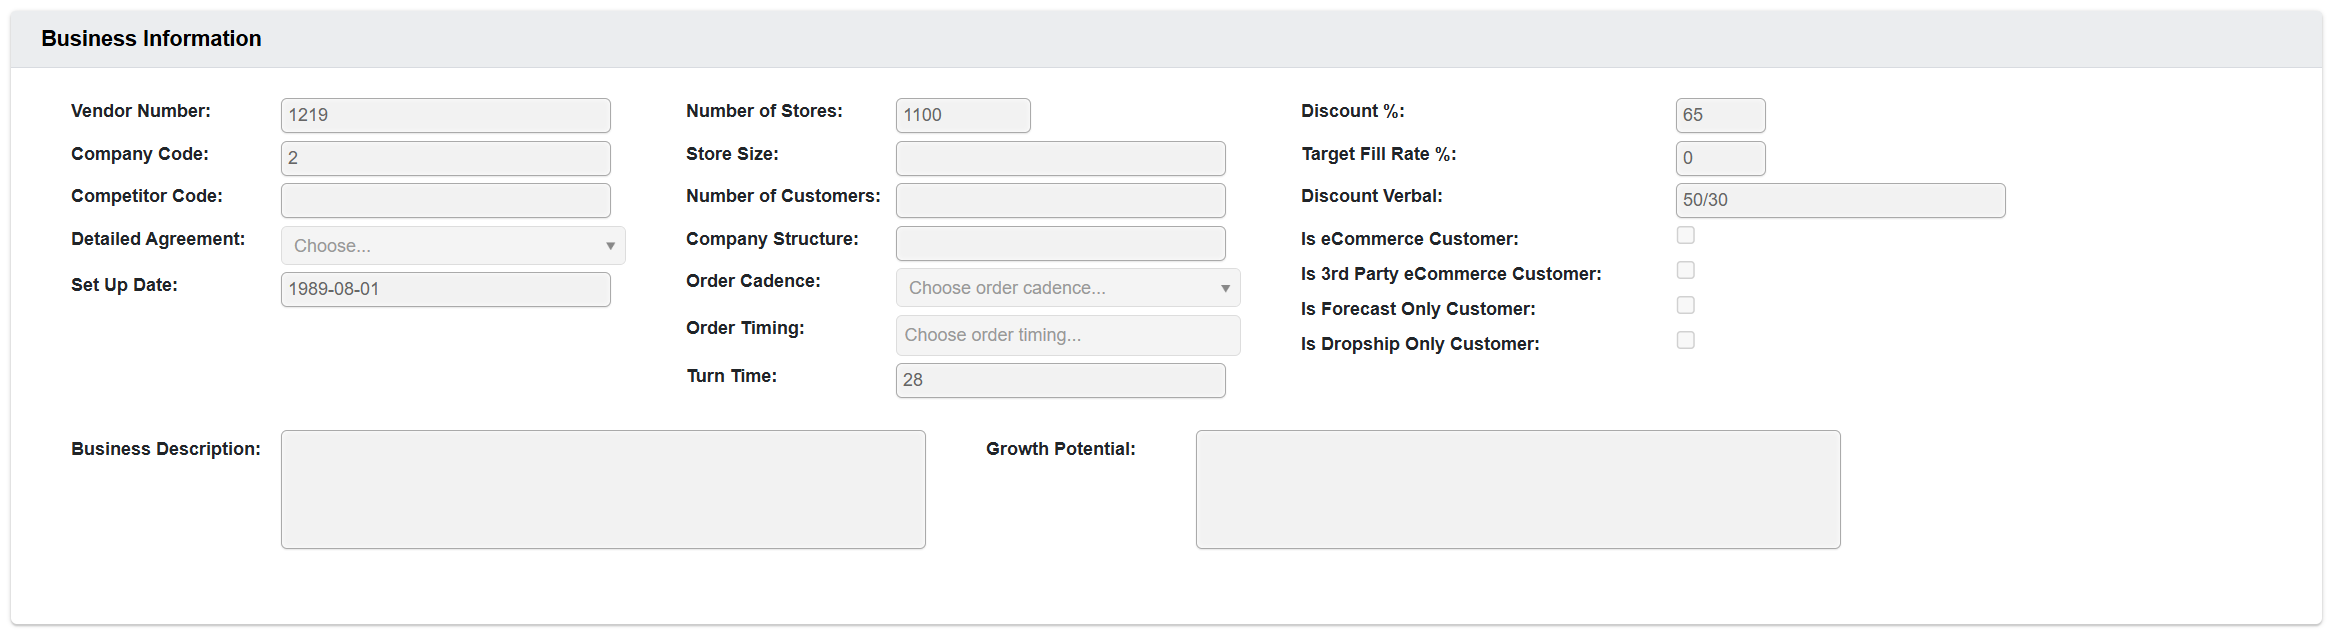 * `Order Cadence`: How often the customer submits orders.
* `Order Timing`: The days that the customer typically submits an order (i.e. every Wednesday).
* `Turn Time`: The time from order submission to shipment.
* `Is Dropship Only Customer`: This customer only submits dropship orders. After selecting this customer when creating an order the Dropship Order checkbox will automatically be checked. See [Manage Orders](/order-processing/manage-orders) for more.
* `Target Fill Rate %`: The goal percentage of shipped order line items.
### Shipping Info
This card defines fulfillment preferences, routing conditions, and special shipping behaviors.
* `Order Cadence`: How often the customer submits orders.
* `Order Timing`: The days that the customer typically submits an order (i.e. every Wednesday).
* `Turn Time`: The time from order submission to shipment.
* `Is Dropship Only Customer`: This customer only submits dropship orders. After selecting this customer when creating an order the Dropship Order checkbox will automatically be checked. See [Manage Orders](/order-processing/manage-orders) for more.
* `Target Fill Rate %`: The goal percentage of shipped order line items.
### Shipping Info
This card defines fulfillment preferences, routing conditions, and special shipping behaviors.
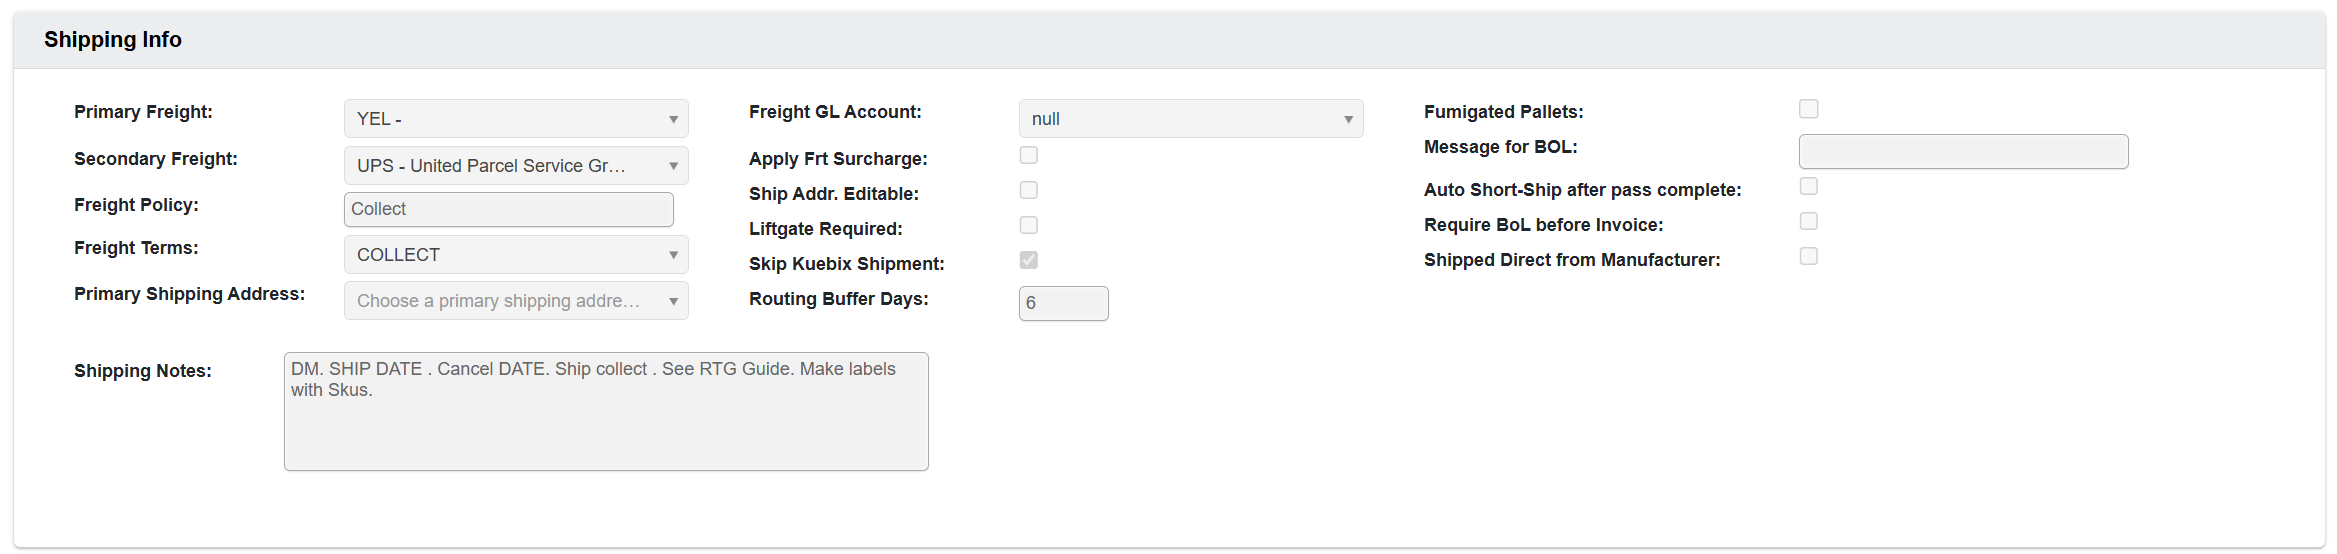 * `Primary Freight`, `Freight Policy`, `Freight Terms`, and `Shipping Notes`: Will populate when entering an order. See [Manage Orders](/order-processing/manage-orders) for more.
* `Liftgate Required`: Customers with this checked require a liftgate for delivery. This will be noted on the bill of lading. See [Bill of Lading](/shipping/bill-of-lading) for more.
* `Skip Kuebix Shipment`: When saving a Bill of Lading a Kuebix shipment is created. Customer with this checked don't have a Kuebix shipment created. See [Bill of Lading](/shipping/bill-of-lading) for more.
* `Routing Buffer Days`: This field is used for calculating the required routing date for an order. Customers that have this field populated are required to have their orders routed the number of buffer days prior to the required ship date. See [Bill of Lading](/shipping/bill-of-lading) for more.
* `Fumigated Pallets`: Customers with this checked require their orders to be stacked on fumigated pallets. When a selector starts picking an order they are notified in an order information screen that fumigated pallets are required and they have to acknowledge the info prior to starting selecting. See [Order Picking](/order-processing/order-picking) for more.
* `Message for BOL`: The message contained in this field is auto populated onto a section of the Bill of Lading. See [Bill of Lading](/shipping/bill-of-lading) for more.
* `Auto Short-Ship after pass complete`: Once a selector finishes their first pass attempting to pick all line items on an order (all lines either picked or shorted), the system will automatically create a short-ship authorization notifying the shipping department to process and ship the order without it being complete. See [Manage Orders](/order-processing/manage-orders) for more.
* `Require BOL before Invoice`: Customers with this check require that a bill of lading is generated before an invoice can be generated. See [Manage Orders](/order-processing/manage-orders) for more.
### Electronic Delivery Contacts
This card controls where automated emails are sent during billing and shipping.
* `Primary Freight`, `Freight Policy`, `Freight Terms`, and `Shipping Notes`: Will populate when entering an order. See [Manage Orders](/order-processing/manage-orders) for more.
* `Liftgate Required`: Customers with this checked require a liftgate for delivery. This will be noted on the bill of lading. See [Bill of Lading](/shipping/bill-of-lading) for more.
* `Skip Kuebix Shipment`: When saving a Bill of Lading a Kuebix shipment is created. Customer with this checked don't have a Kuebix shipment created. See [Bill of Lading](/shipping/bill-of-lading) for more.
* `Routing Buffer Days`: This field is used for calculating the required routing date for an order. Customers that have this field populated are required to have their orders routed the number of buffer days prior to the required ship date. See [Bill of Lading](/shipping/bill-of-lading) for more.
* `Fumigated Pallets`: Customers with this checked require their orders to be stacked on fumigated pallets. When a selector starts picking an order they are notified in an order information screen that fumigated pallets are required and they have to acknowledge the info prior to starting selecting. See [Order Picking](/order-processing/order-picking) for more.
* `Message for BOL`: The message contained in this field is auto populated onto a section of the Bill of Lading. See [Bill of Lading](/shipping/bill-of-lading) for more.
* `Auto Short-Ship after pass complete`: Once a selector finishes their first pass attempting to pick all line items on an order (all lines either picked or shorted), the system will automatically create a short-ship authorization notifying the shipping department to process and ship the order without it being complete. See [Manage Orders](/order-processing/manage-orders) for more.
* `Require BOL before Invoice`: Customers with this check require that a bill of lading is generated before an invoice can be generated. See [Manage Orders](/order-processing/manage-orders) for more.
### Electronic Delivery Contacts
This card controls where automated emails are sent during billing and shipping.
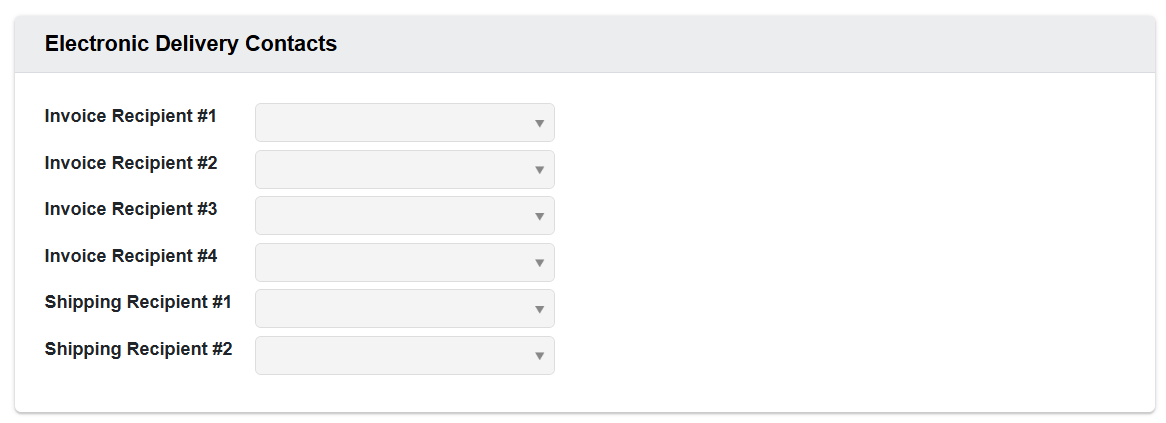 * `Invoice Recipients`: The contacts listed in these boxes will receive an emailed copy of the invoice. See [Accounts Receivable](/accounting/accounts-receivable) for more.
* `Shipping Recipients`: The contacts listed in these boxes will receive an email notification of tracking number for parcel shipments and bill of lading / packing lists for LTL or FTL shipments. See [Bill of Lading](/shipping/bill-of-lading) for more.
### Contacts
This card allows you to view and manage individual contacts associated with the customer.
* `Invoice Recipients`: The contacts listed in these boxes will receive an emailed copy of the invoice. See [Accounts Receivable](/accounting/accounts-receivable) for more.
* `Shipping Recipients`: The contacts listed in these boxes will receive an email notification of tracking number for parcel shipments and bill of lading / packing lists for LTL or FTL shipments. See [Bill of Lading](/shipping/bill-of-lading) for more.
### Contacts
This card allows you to view and manage individual contacts associated with the customer.
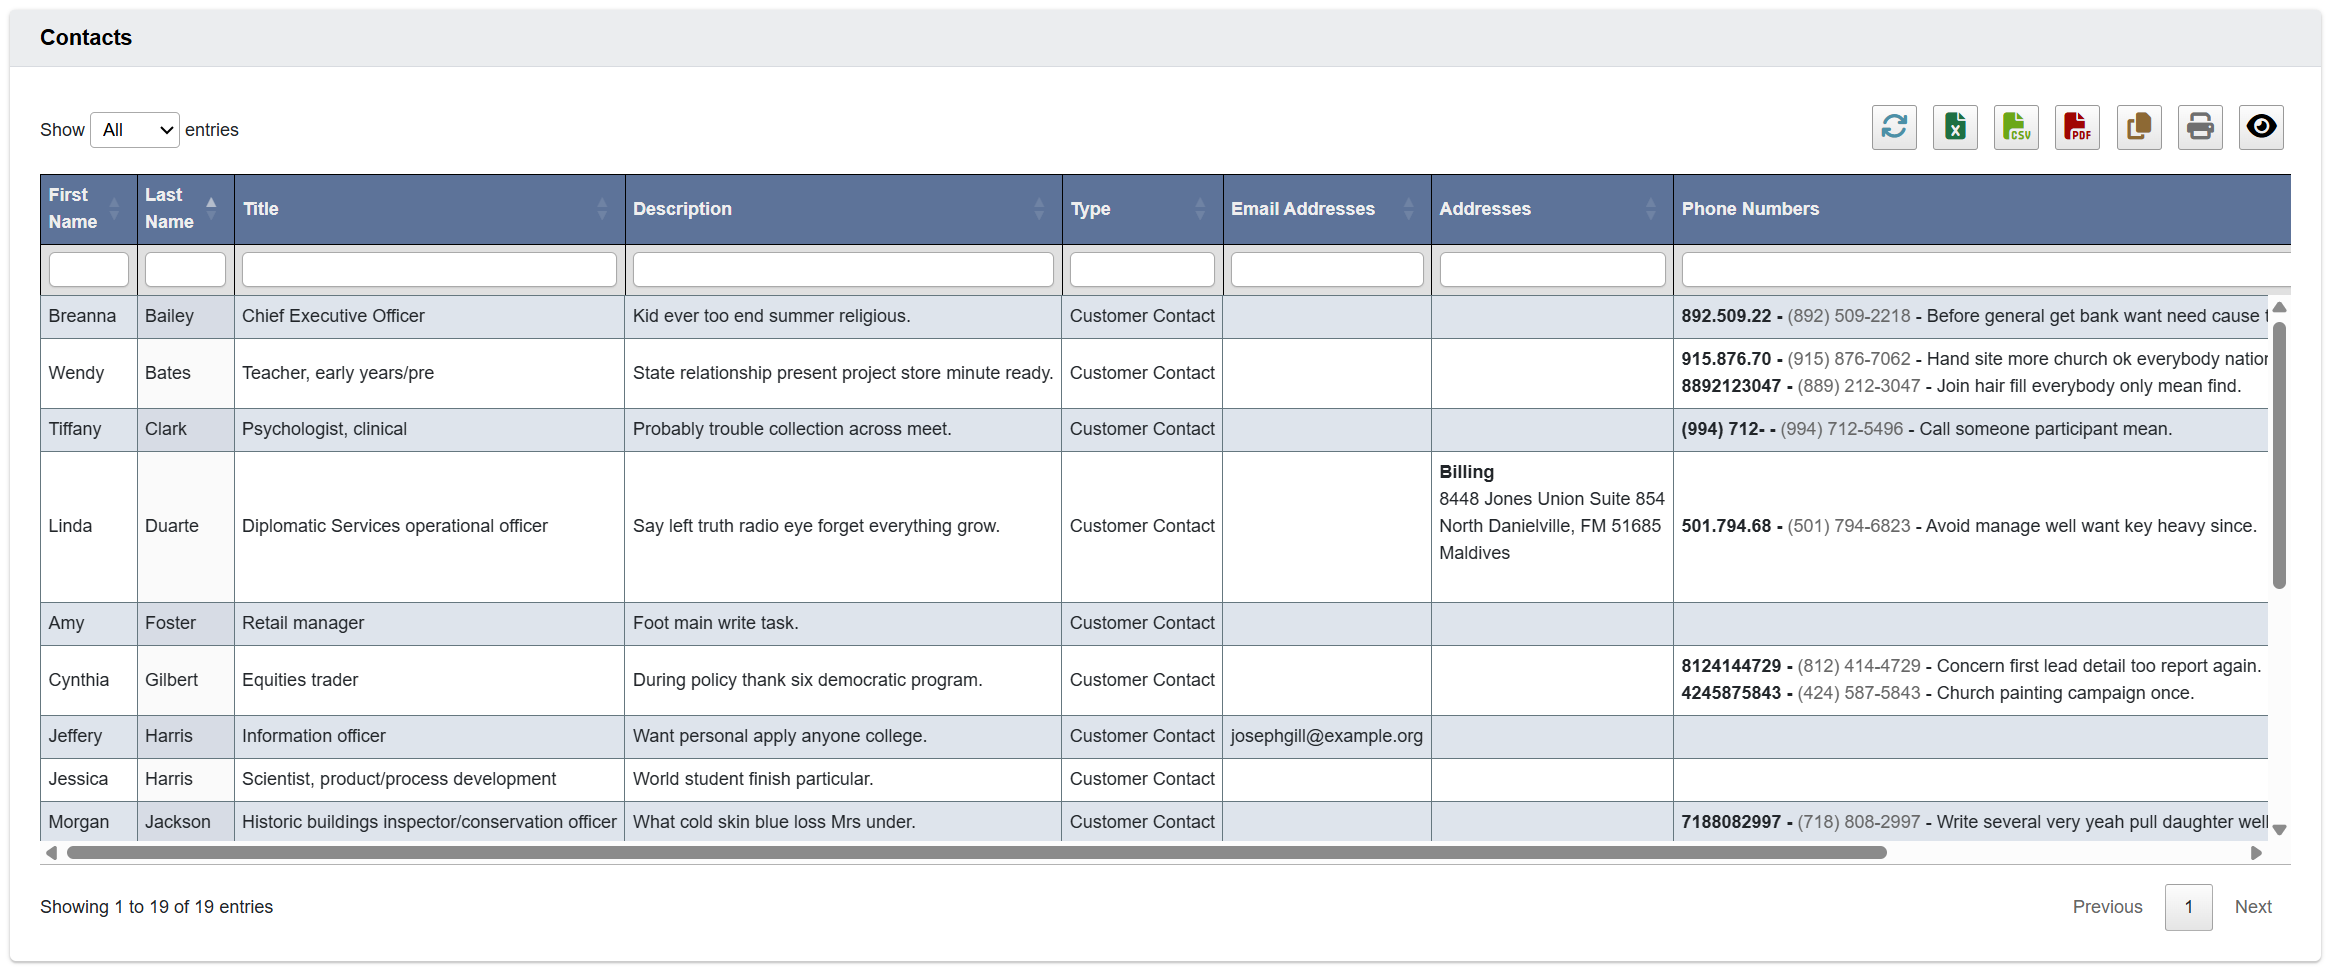 The information here is used in Electronic Delivery Contacts to specify who should receive emailed invoices and shipping documents (such as the bill of lading, tracking number, and packing list).
### Addresses
This card stores physical addresses associated with the customer.
The information here is used in Electronic Delivery Contacts to specify who should receive emailed invoices and shipping documents (such as the bill of lading, tracking number, and packing list).
### Addresses
This card stores physical addresses associated with the customer.
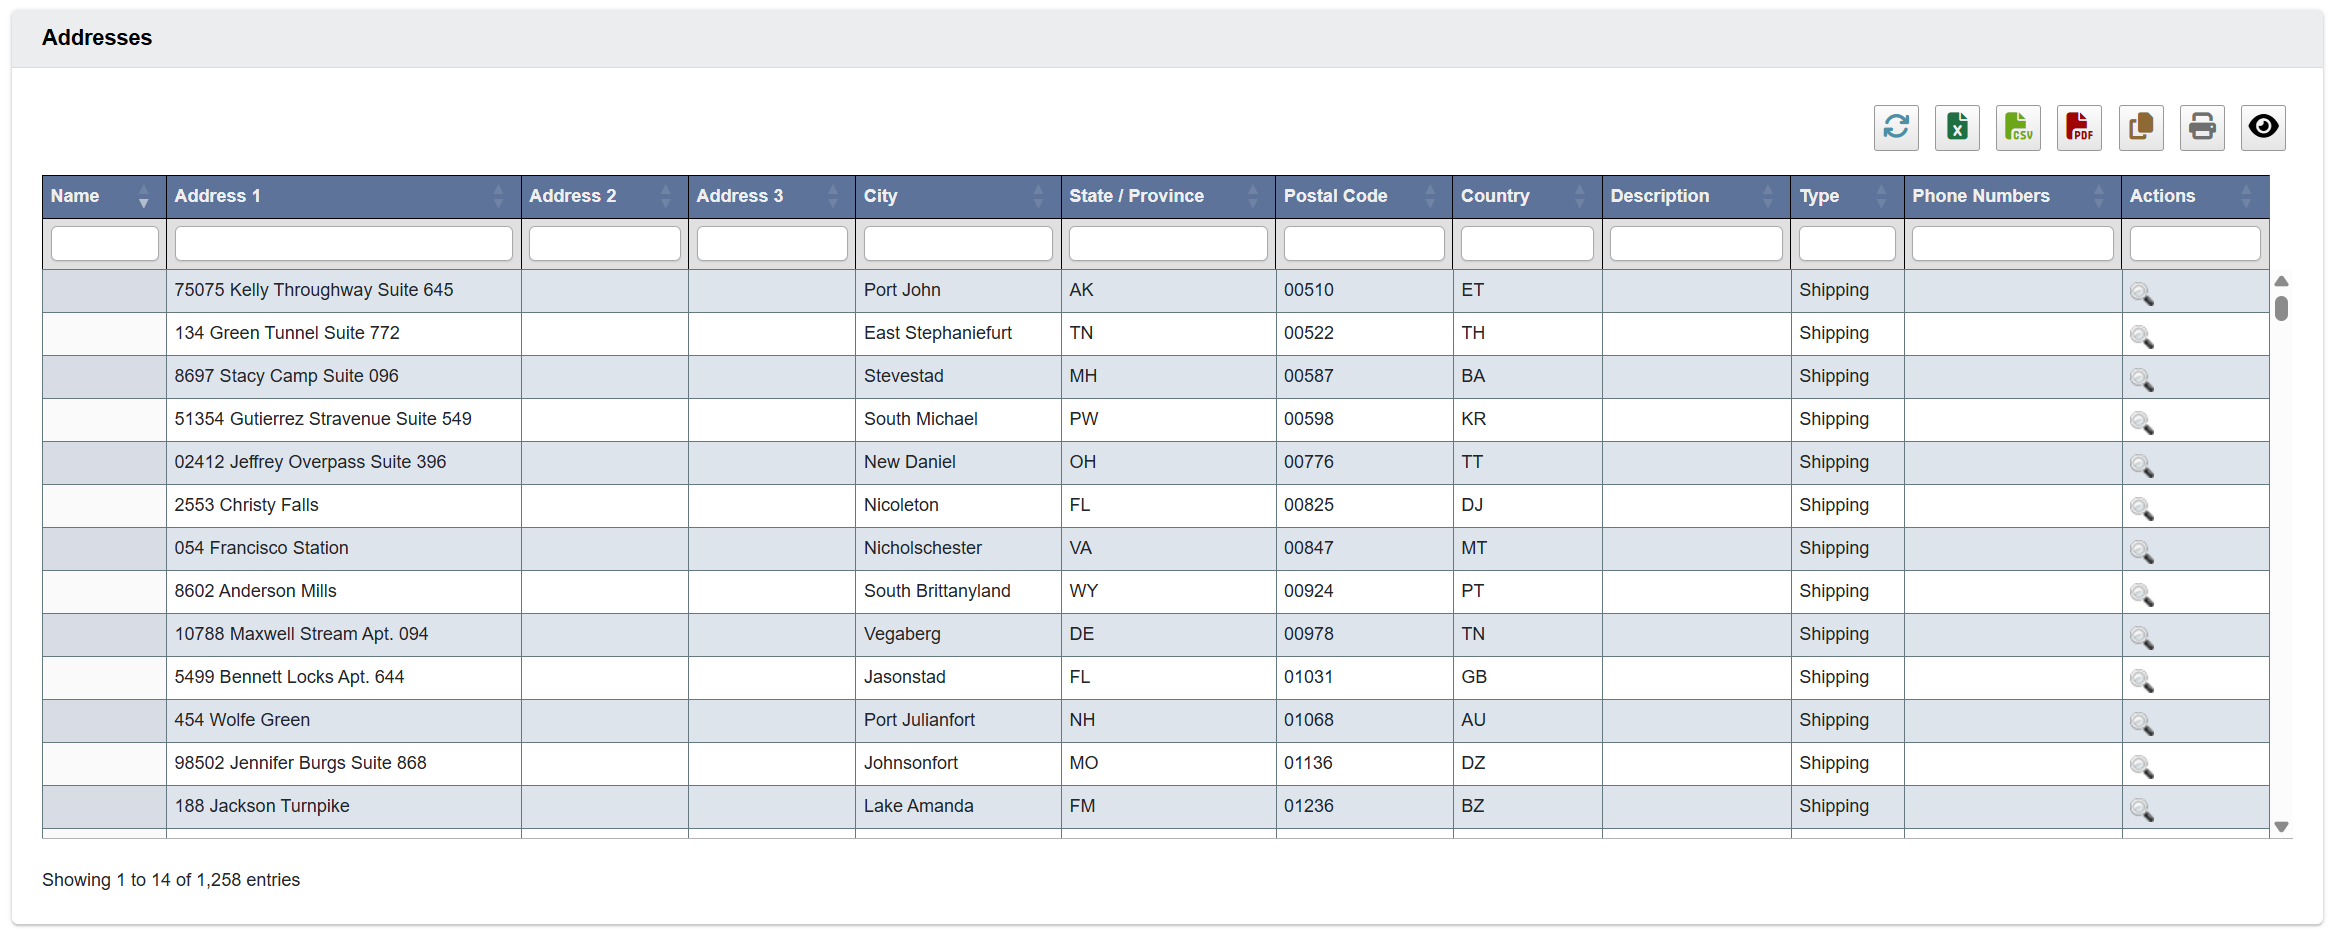 This information will auto populate when you put in an order ([Order Processing → Manage Orders](/order-processing/manage-orders)).
When adding or editing an address, `Address 1`, `Postal Code`, `City`, `Country`, and `Address Type` are required, plus `State` for US addresses. If any required field is missing when you click `Save`, DASH highlights the missing fields in red and does not save the address.
When you add a new customer address and set the `Address Type` to `Billing` or `Shipping`, the checkbox label changes to `Also create a Shipping address with the same details` or `Also create a Billing address with the same details` so you can create the matching address from the same entry instead of entering it twice.
### Accounting Info
This card manages credit behavior and order-level financial overrides.
This information will auto populate when you put in an order ([Order Processing → Manage Orders](/order-processing/manage-orders)).
When adding or editing an address, `Address 1`, `Postal Code`, `City`, `Country`, and `Address Type` are required, plus `State` for US addresses. If any required field is missing when you click `Save`, DASH highlights the missing fields in red and does not save the address.
When you add a new customer address and set the `Address Type` to `Billing` or `Shipping`, the checkbox label changes to `Also create a Shipping address with the same details` or `Also create a Billing address with the same details` so you can create the matching address from the same entry instead of entering it twice.
### Accounting Info
This card manages credit behavior and order-level financial overrides.
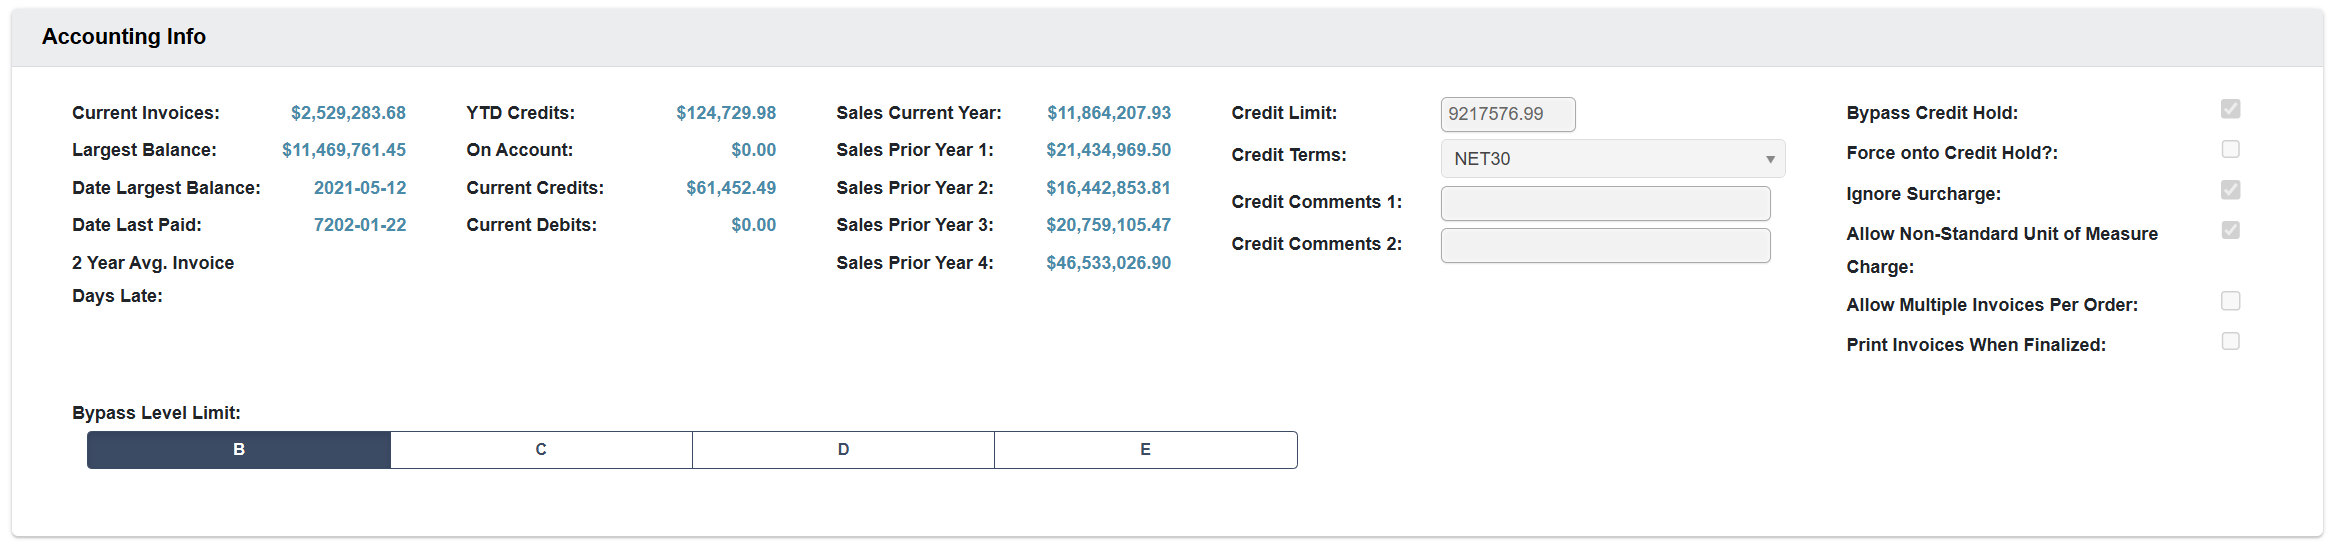 * `Bypass Credit Hold`: Customers with this checked will automatically bypass credit holds, even if they are over their credit limit. See [Manage Orders](/order-processing/manage-orders) for more.
* `Force Onto Credit Hold`: Customers with this checked will have their orders placed on credit hold after submission. See [Manage Orders](/order-processing/manage-orders) for more.
* `Allows Non-Standard UoM Charge`: When placing an order, customers with this checked can order items in a unit of measure different from the standard (for example, they can order an each when the standard UOM is a case). See [Manage Orders](/order-processing/manage-orders) for more.
* `Ignore Surcharge`: Customers with this checked will not have a freight surcharge added to their order total. See [Manage Orders](/order-processing/manage-orders) for more.
Depending on your assigned permissions, the following enhanced actions are available across the Manage Customers submodule:
* **Edit Customer Credit**: Modify Accounting Info for any customer directly from their record.
* **Braintree Integration**:
* Access and manage saved customer payment methods.
* Charge customer accounts directly from an order or invoice screen.
* Use "Charge Card for Order (One Off)" for ad hoc transactions.
### EDI Info
This card configures electronic document exchange (EDI) with the customer's trading-partner systems.
* `Bypass Credit Hold`: Customers with this checked will automatically bypass credit holds, even if they are over their credit limit. See [Manage Orders](/order-processing/manage-orders) for more.
* `Force Onto Credit Hold`: Customers with this checked will have their orders placed on credit hold after submission. See [Manage Orders](/order-processing/manage-orders) for more.
* `Allows Non-Standard UoM Charge`: When placing an order, customers with this checked can order items in a unit of measure different from the standard (for example, they can order an each when the standard UOM is a case). See [Manage Orders](/order-processing/manage-orders) for more.
* `Ignore Surcharge`: Customers with this checked will not have a freight surcharge added to their order total. See [Manage Orders](/order-processing/manage-orders) for more.
Depending on your assigned permissions, the following enhanced actions are available across the Manage Customers submodule:
* **Edit Customer Credit**: Modify Accounting Info for any customer directly from their record.
* **Braintree Integration**:
* Access and manage saved customer payment methods.
* Charge customer accounts directly from an order or invoice screen.
* Use "Charge Card for Order (One Off)" for ad hoc transactions.
### EDI Info
This card configures electronic document exchange (EDI) with the customer's trading-partner systems.
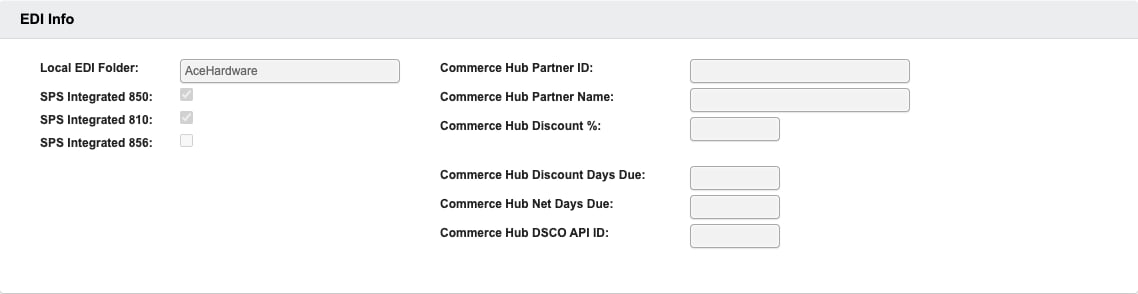 * `Local EDI Folder`: The folder name DASH uses to organize this trading partner's EDI documents on the server.
* `SPS Integrated 850`: Inbound purchase orders (EDI 850) received from SPS Commerce are automatically converted into DASH orders.
* `SPS Integrated 810`: Finalized invoices are transmitted to SPS Commerce as EDI 810 documents. This applies to every finalized invoice for the customer — including orders entered manually, not just orders received as EDI 850s — and replaces the emailed PDF invoice. See [Accounts Receivable](/accounting/accounts-receivable#edi-invoices-810) for more.
* `SPS Integrated 856`: Advance Ship Notices (EDI 856) are sent for the customer's shipments. See [Advanced Shipping Notices](/shipping/advanced-shipping-notices) for more.
* The `Commerce Hub` fields configure the CommerceHub dropship integration used by eCommerce partners.
## Active Customers
From the Customer Information → Manage Customers submodule, click on the `Active Customers` tab. This contains a table of summarized customer records for every “active” customer.
Within this tab, you can:
* Click on an attribute heading (such as Customer Name) to sort in ascending order. Click again to sort in descending order.
* Click on a Customer ID or Customer Number to view or manage the associated customer records in the `View / Edit Customer` tab.
* You can also edit their records by scrolling to the far right of the table, and clicking the View (”magnify”) or Edit (’pencil”) buttons.
* Refresh, export, print, or filter data with the toolbar.
### How to mark a customer as inactive
1. Scroll to the far right of the table and find the `Actions` column.
2. Click the `Deactivate Customer` (red ”no”) button.
3. Click “YES, deactivate” when prompted.
## Inactive Customers
From the Customer Information → Manage Customers submodule, click on the `Inactive Customers` tab. This contains a table of summarized customer records for every “inactive” customer.
Just like the `Active Customers` tab, you can:
* Click on an attribute heading (such as Customer Name) to sort in ascending order. Click again to sort in descending order.
* Click on a Customer ID or Customer Number to view or manage the associated customer records in the `View / Edit Customer` tab.
* Refresh, export, print, or filter data with the toolbar.
### How to mark a customer as active
1. Scroll to the far right of the table and find the `Actions` column.
2. Click the `Activate Customer` (green “checkmark”) button.
3. Click “YES, activate” when prompted.
* `Local EDI Folder`: The folder name DASH uses to organize this trading partner's EDI documents on the server.
* `SPS Integrated 850`: Inbound purchase orders (EDI 850) received from SPS Commerce are automatically converted into DASH orders.
* `SPS Integrated 810`: Finalized invoices are transmitted to SPS Commerce as EDI 810 documents. This applies to every finalized invoice for the customer — including orders entered manually, not just orders received as EDI 850s — and replaces the emailed PDF invoice. See [Accounts Receivable](/accounting/accounts-receivable#edi-invoices-810) for more.
* `SPS Integrated 856`: Advance Ship Notices (EDI 856) are sent for the customer's shipments. See [Advanced Shipping Notices](/shipping/advanced-shipping-notices) for more.
* The `Commerce Hub` fields configure the CommerceHub dropship integration used by eCommerce partners.
## Active Customers
From the Customer Information → Manage Customers submodule, click on the `Active Customers` tab. This contains a table of summarized customer records for every “active” customer.
Within this tab, you can:
* Click on an attribute heading (such as Customer Name) to sort in ascending order. Click again to sort in descending order.
* Click on a Customer ID or Customer Number to view or manage the associated customer records in the `View / Edit Customer` tab.
* You can also edit their records by scrolling to the far right of the table, and clicking the View (”magnify”) or Edit (’pencil”) buttons.
* Refresh, export, print, or filter data with the toolbar.
### How to mark a customer as inactive
1. Scroll to the far right of the table and find the `Actions` column.
2. Click the `Deactivate Customer` (red ”no”) button.
3. Click “YES, deactivate” when prompted.
## Inactive Customers
From the Customer Information → Manage Customers submodule, click on the `Inactive Customers` tab. This contains a table of summarized customer records for every “inactive” customer.
Just like the `Active Customers` tab, you can:
* Click on an attribute heading (such as Customer Name) to sort in ascending order. Click again to sort in descending order.
* Click on a Customer ID or Customer Number to view or manage the associated customer records in the `View / Edit Customer` tab.
* Refresh, export, print, or filter data with the toolbar.
### How to mark a customer as active
1. Scroll to the far right of the table and find the `Actions` column.
2. Click the `Activate Customer` (green “checkmark”) button.
3. Click “YES, activate” when prompted.