> ## Documentation Index
> Fetch the complete documentation index at: https://docs.decoart.com/llms.txt
> Use this file to discover all available pages before exploring further.
# Material Handler - Tutorial: Manage a License Plate
## Overview
This tutorial helps you manage inventory tied to a specific license plate using the DASH **Inventory → Material Handler** submodule.
Once you’ve entered or scanned a plate number or location code, you can move a license plate to a new location, adjust its quantity, remove it from inventory, or merge it with another plate. Each action is logged in the system and tied to a specific reason code to support traceability, audits, and reporting.
Use this page when handling inventory moves, resolving quantity discrepancies, scrapping damaged goods, or consolidating pallets. Each action below includes a guided workflow.
## Special Conditions that Disable Actions
Before you proceed, be aware that some license plates or locations may **prevent actions** like moving, updating, removing, or merging due to:
1. **License Plate Hold:**
1. If a license plate is on **HOLD** (e.g., pending QA review), you may see a message such as: “This license plate is on HOLD. Reason: Pending Review”
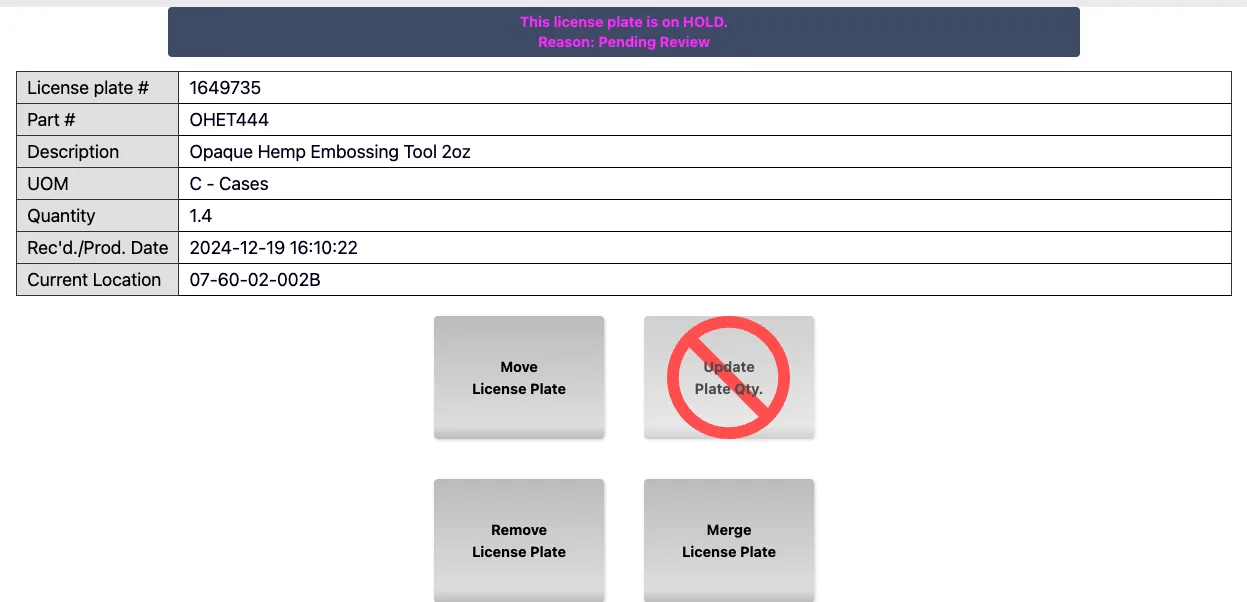
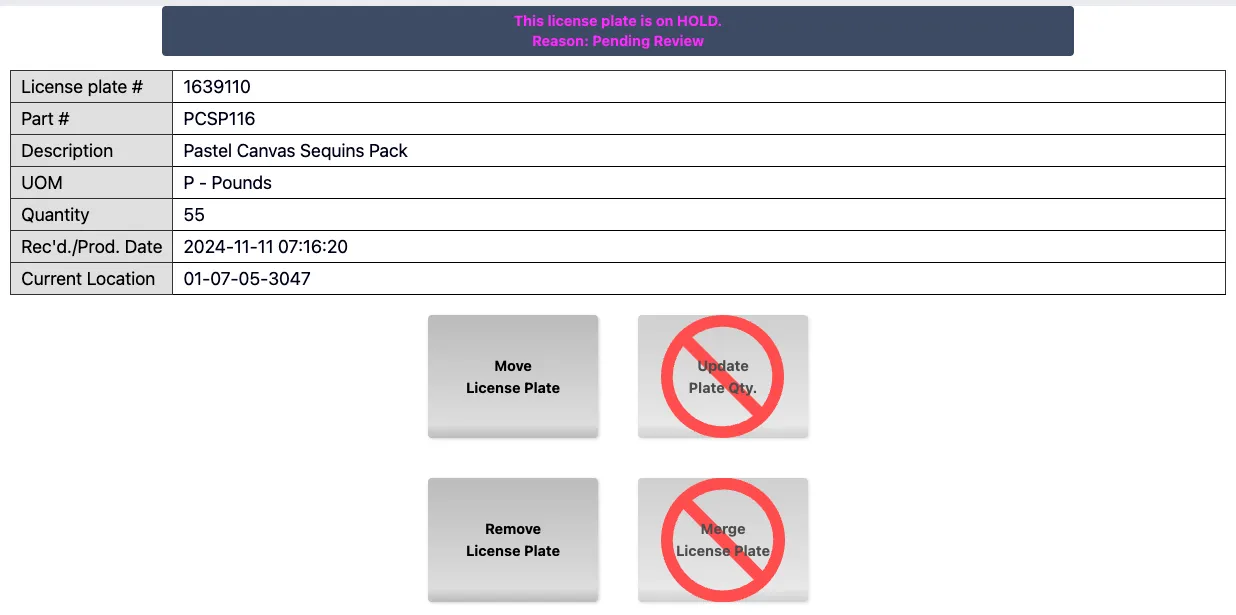 2. When a plate is on HOLD:
* Some or all Material Handler actions are disabled.
* The hold must be resolved before proceeding.
2. **Restricted Locations**
1. Each warehouse location is structured hierarchically and can individually restrict actions. The structure is:
\[Location Code] - \[Area Code] - \[Aisle] - \[Bin ID]
(e.g. 07-40-05-036B)
2. **Permission Override Logic:**
* Permissions are defined at **each level**: location, area, aisle, and bin.
* **The most specific level (bin)** takes precedence over broader levels.
* For example, if a bin does **not allow "Move Out"**, that restriction applies even if the aisle or area allows it.
2. When a plate is on HOLD:
* Some or all Material Handler actions are disabled.
* The hold must be resolved before proceeding.
2. **Restricted Locations**
1. Each warehouse location is structured hierarchically and can individually restrict actions. The structure is:
\[Location Code] - \[Area Code] - \[Aisle] - \[Bin ID]
(e.g. 07-40-05-036B)
2. **Permission Override Logic:**
* Permissions are defined at **each level**: location, area, aisle, and bin.
* **The most specific level (bin)** takes precedence over broader levels.
* For example, if a bin does **not allow "Move Out"**, that restriction applies even if the aisle or area allows it.
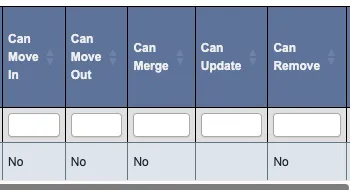 3. You may encounter disabled buttons for plates stored in restricted bins. For example:
* A bin may block **merging**, **removal**, or **move-out** operations.
* This setup supports process control (e.g., staging or QA zones).
## Prerequisite: Pull up a license plate’s information
1. From the **Inventory** → **Material Handler** submodule, click on the `Material Handling` button.
2. Scan or enter the license plate number (`Plate #`) or associated location code (`Location`), then hit enter.
3. You may encounter disabled buttons for plates stored in restricted bins. For example:
* A bin may block **merging**, **removal**, or **move-out** operations.
* This setup supports process control (e.g., staging or QA zones).
## Prerequisite: Pull up a license plate’s information
1. From the **Inventory** → **Material Handler** submodule, click on the `Material Handling` button.
2. Scan or enter the license plate number (`Plate #`) or associated location code (`Location`), then hit enter.
 3. The associated license plate’s information will appear on the screen. From here, you can follow the below tutorials to:
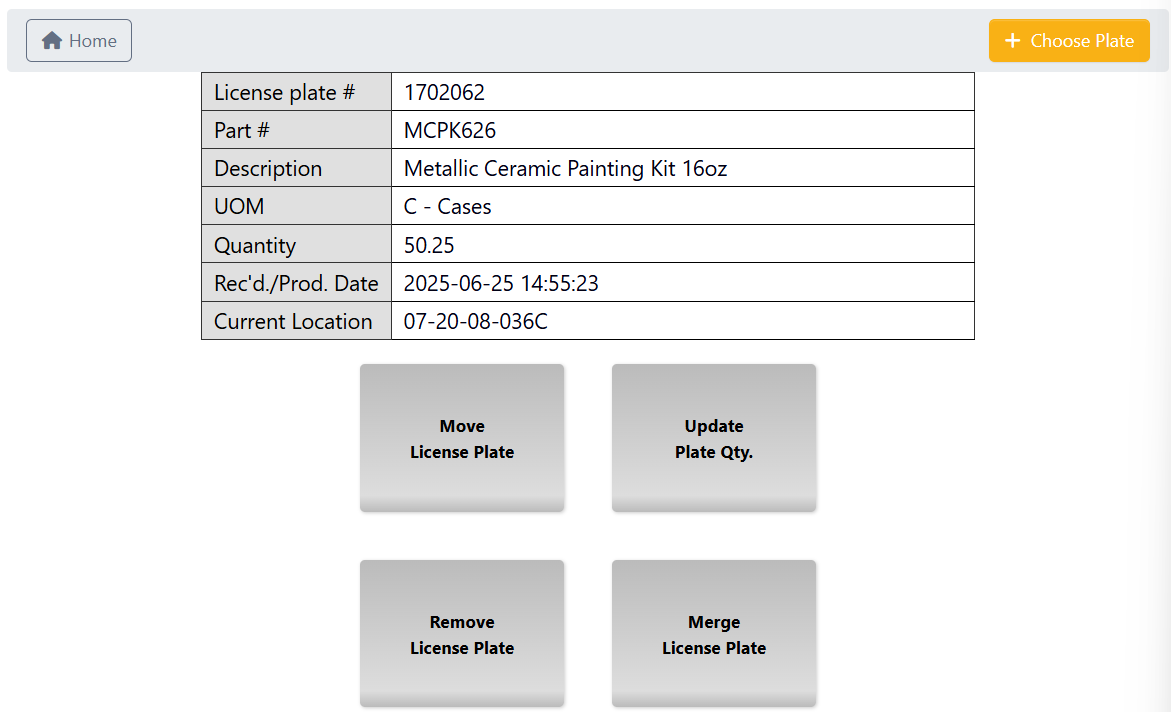 1. `Move License Plate` to another location.
2. `Update Plate Qty` to reflect inventory changes.
3. `Remove License Plate` to remove it from your inventory.
4. `Merge License Plate` information with another license plate.
5. Click `Choose Plate` to go back and select a different license plate or location code.
## Move a license plate
After you’ve pulled up a license plate’s information, follow these steps to move it to another location:
1. From the License Info page, click `Move License Plate`.
1. `Move License Plate` to another location.
2. `Update Plate Qty` to reflect inventory changes.
3. `Remove License Plate` to remove it from your inventory.
4. `Merge License Plate` information with another license plate.
5. Click `Choose Plate` to go back and select a different license plate or location code.
## Move a license plate
After you’ve pulled up a license plate’s information, follow these steps to move it to another location:
1. From the License Info page, click `Move License Plate`.
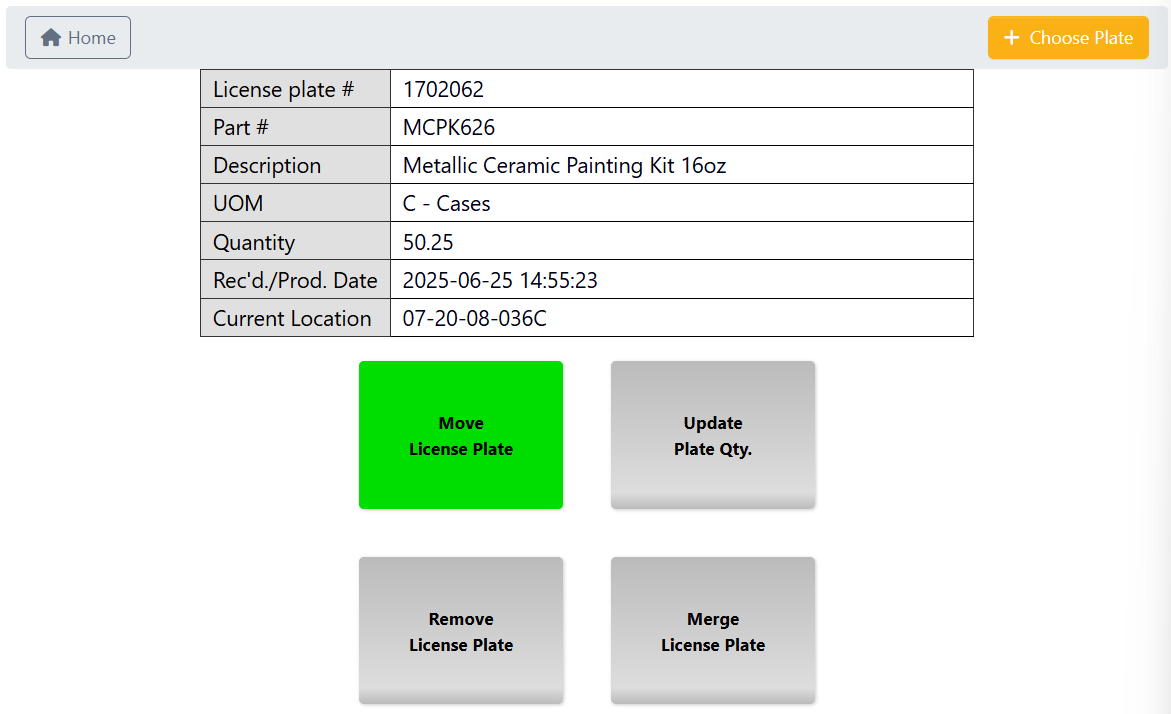 2. Click `Checkout` to confirm that this is the license plate you want to move. Note that clicking checkout does **not** automatically select the Suggested Location (Sugg. Loc.), that is the next step.
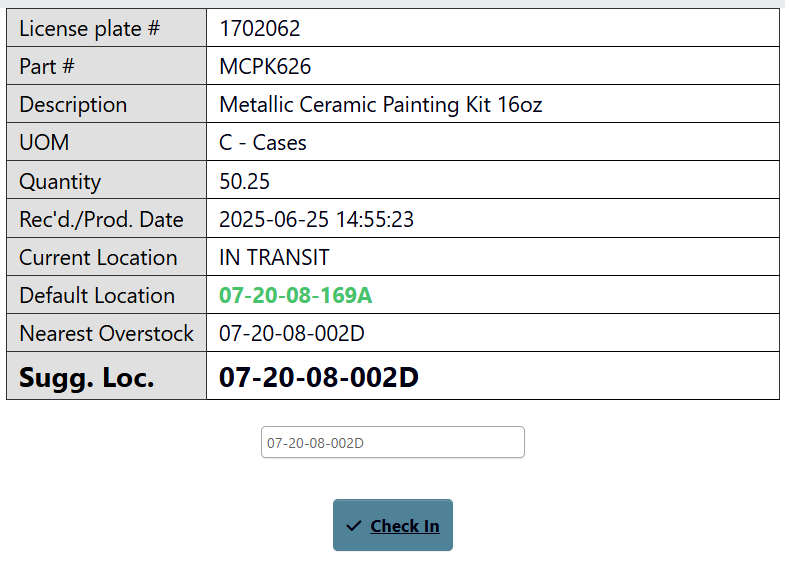
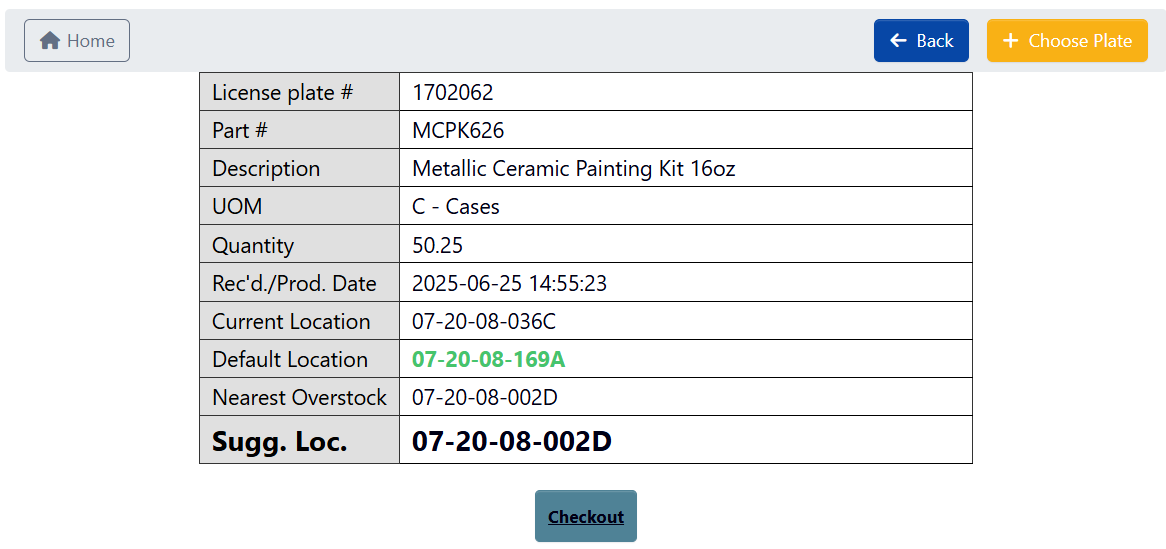 3. In `Scan New Location Tag`, scan the location code you want to move the license plate to. This can be the Suggested Location (Sugg. Loc.) or a different one of your choosing.
4. Hit enter to check whether that location is available (only if not using a scan gun - scan guns automatically Enter).
1. If it is available, click `Check In` to confirm your selection.
3. In `Scan New Location Tag`, scan the location code you want to move the license plate to. This can be the Suggested Location (Sugg. Loc.) or a different one of your choosing.
4. Hit enter to check whether that location is available (only if not using a scan gun - scan guns automatically Enter).
1. If it is available, click `Check In` to confirm your selection.
 2. If it is not available, try entering a different location tag.
5. Once the Move has been Checked In, you’ll be taken back to the License Info page, and can see the new location code updated there.
## Update a license plate’s quantity
After you’ve pulled up a license plate’s information, follow these steps to update its quantity:
1. From the License Info page, click `Update Plate Qty`.
2. If it is not available, try entering a different location tag.
5. Once the Move has been Checked In, you’ll be taken back to the License Info page, and can see the new location code updated there.
## Update a license plate’s quantity
After you’ve pulled up a license plate’s information, follow these steps to update its quantity:
1. From the License Info page, click `Update Plate Qty`.
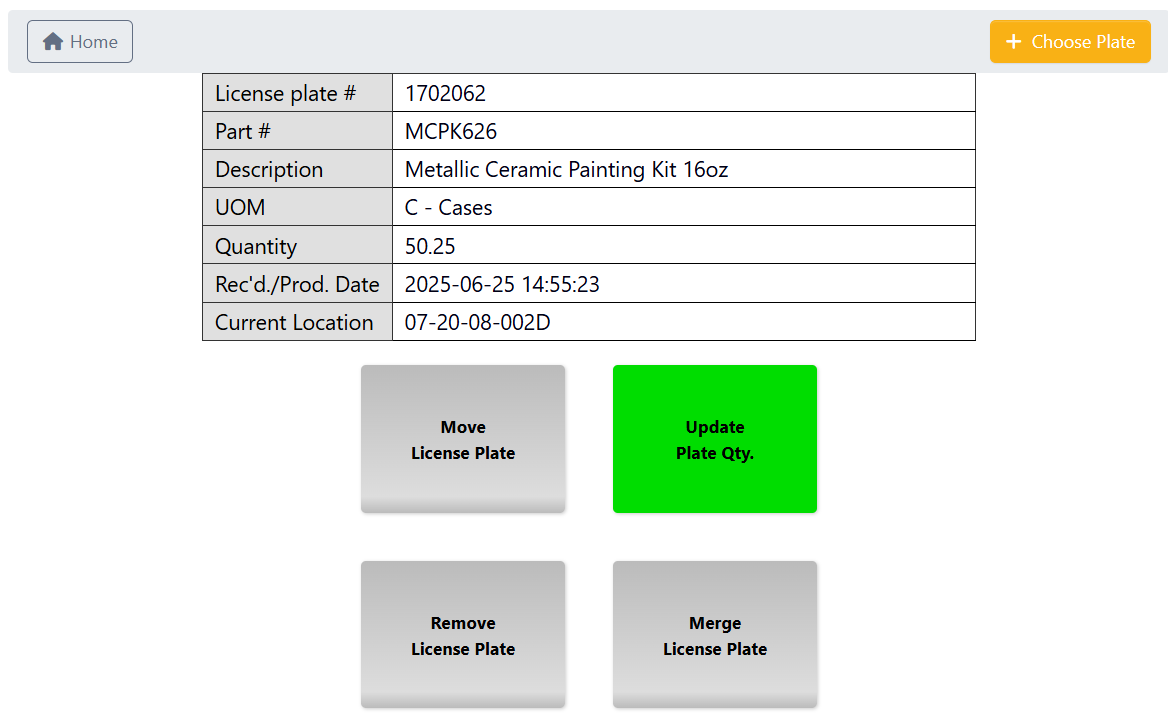 2. Select either:
1. `Set Total`, and enter the total inventory item quantity you want represented by this license plate.
2. Select either:
1. `Set Total`, and enter the total inventory item quantity you want represented by this license plate.
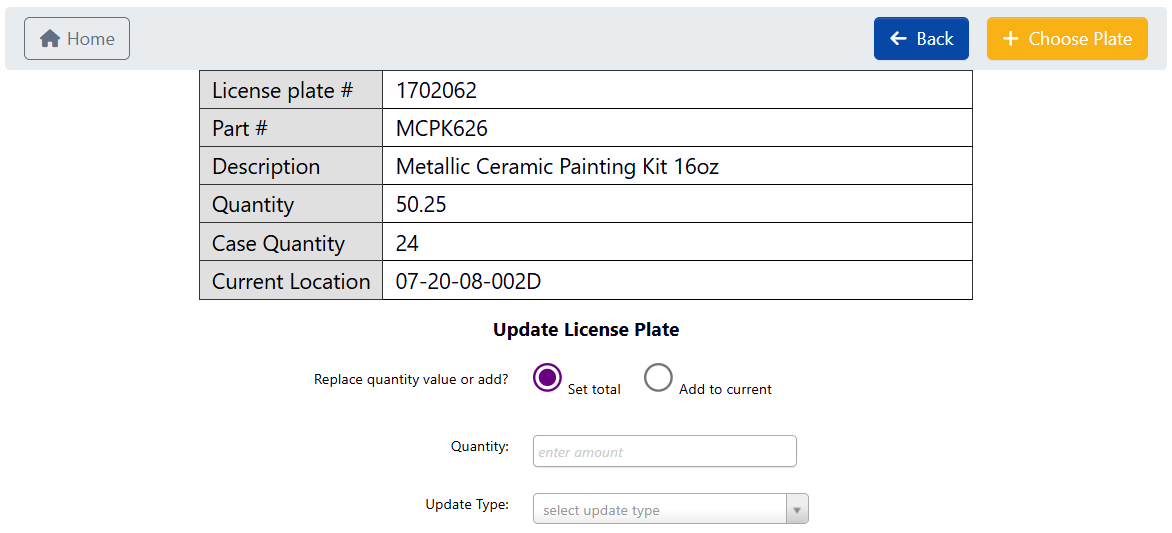 2. `Add to Current`, and enter the new inventory item quantity you want added to the pre-existing quantity represented by this license plate.
You can also enter a negative number here to remove that specific quantity.
2. `Add to Current`, and enter the new inventory item quantity you want added to the pre-existing quantity represented by this license plate.
You can also enter a negative number here to remove that specific quantity.
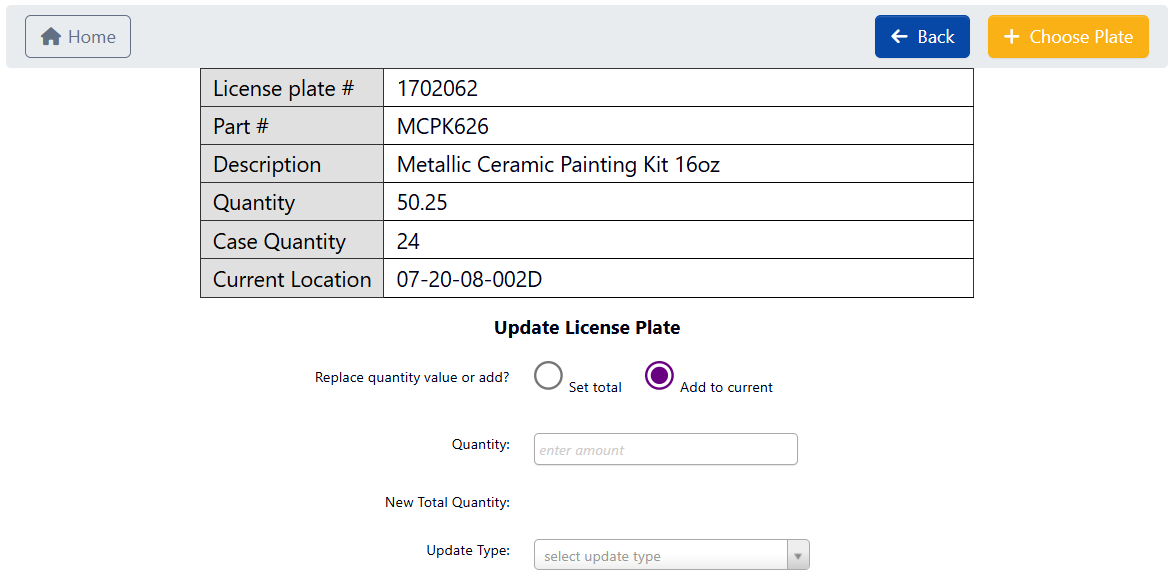 3. Choose an `Update Type`. This specifies the *reason* or *context* for the quantity change. Each option feeds into the transaction log for audit and reporting purposes. For example:
1. **Quantity Adj - Generic**: A manual, general-purpose quantity adjustment. Use this if the reason doesn’t fit a more specific category.
2. **Quantity Adj - Recount**: Used after recounting a license plate during a cycle count or audit. Helps separate counting errors from other adjustments.
3. **Scrap Ticket**: Logs a reduction in inventory due to damage, contamination, or expiration. Typically used during QA or production review.
4. Click `Submit` to confirm your selection.
5. Once the quantity has been updated, you’ll be taken back to the License Info page, and can see the new quantity updated there.
## Remove a license plate
After you’ve pulled up a license plate’s information, follow these steps to remove it from inventory:
1. From the License Info page, click `Remove License Plate`.
3. Choose an `Update Type`. This specifies the *reason* or *context* for the quantity change. Each option feeds into the transaction log for audit and reporting purposes. For example:
1. **Quantity Adj - Generic**: A manual, general-purpose quantity adjustment. Use this if the reason doesn’t fit a more specific category.
2. **Quantity Adj - Recount**: Used after recounting a license plate during a cycle count or audit. Helps separate counting errors from other adjustments.
3. **Scrap Ticket**: Logs a reduction in inventory due to damage, contamination, or expiration. Typically used during QA or production review.
4. Click `Submit` to confirm your selection.
5. Once the quantity has been updated, you’ll be taken back to the License Info page, and can see the new quantity updated there.
## Remove a license plate
After you’ve pulled up a license plate’s information, follow these steps to remove it from inventory:
1. From the License Info page, click `Remove License Plate`.
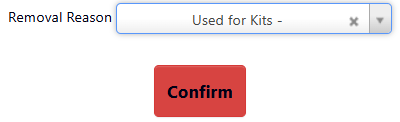
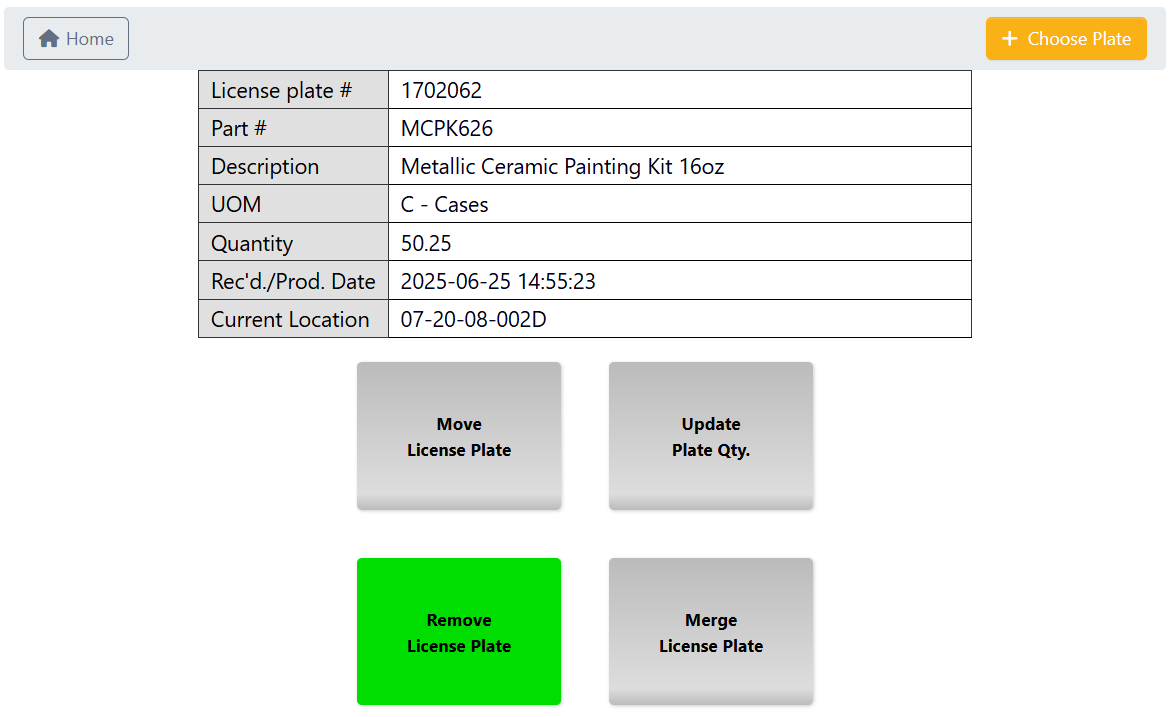 2. Choose a `Removal Reason` to be logged with the removal.
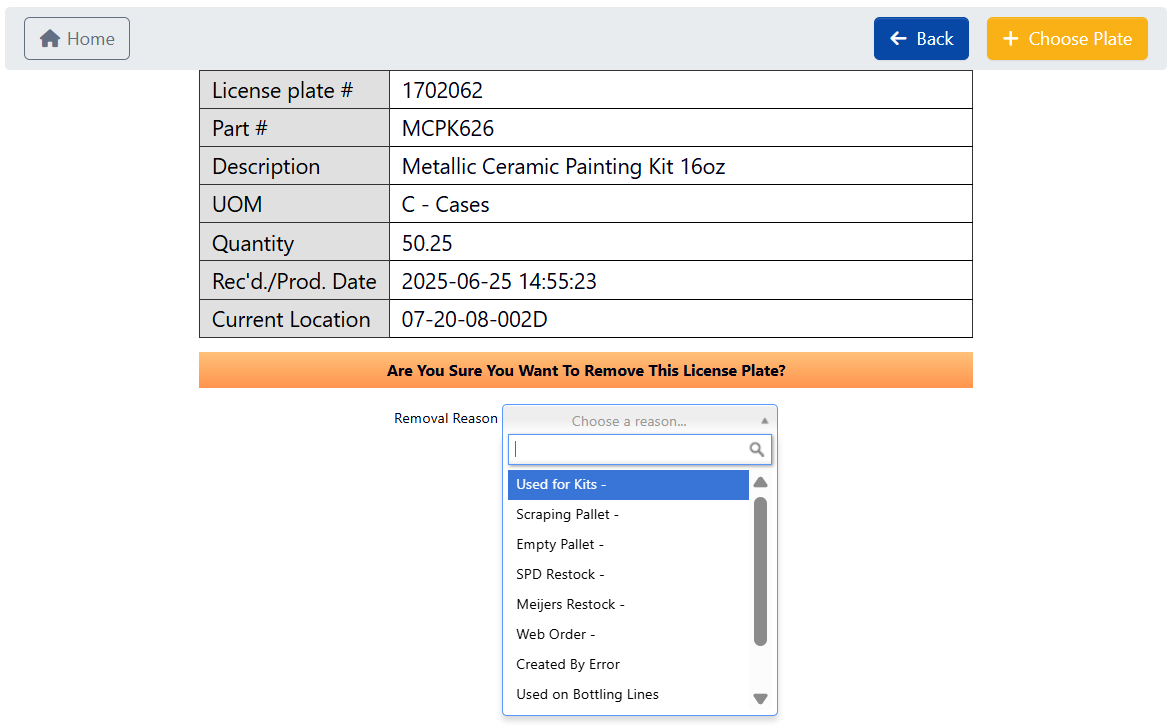 3. Click `Confirm` to confirm the removal.
 ## Merge a license plate
After you’ve pulled up a license plate’s information, follow these steps to transfer partial or full inventory from this license plate to another one.
1. From the License Info page, click `Merge License Plate`.
## Merge a license plate
After you’ve pulled up a license plate’s information, follow these steps to transfer partial or full inventory from this license plate to another one.
1. From the License Info page, click `Merge License Plate`.
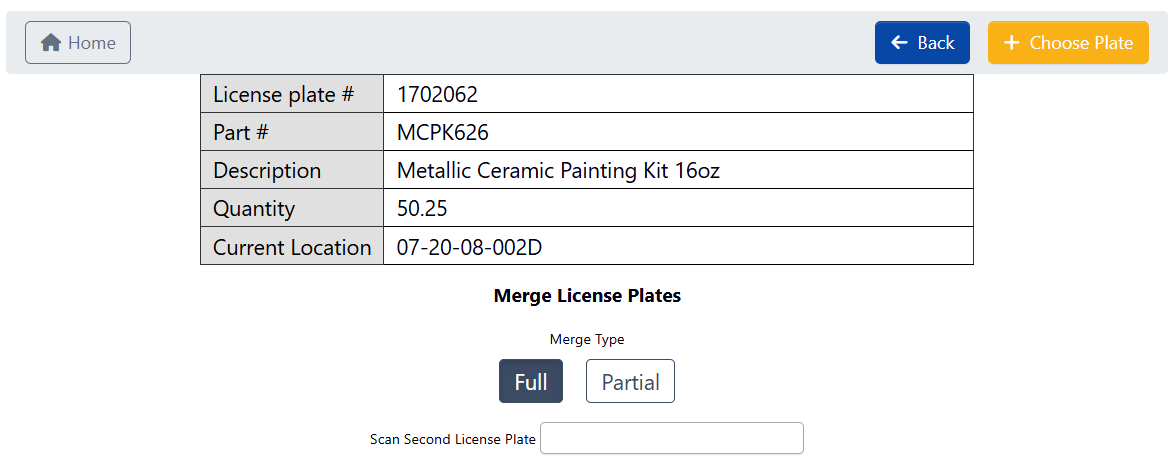
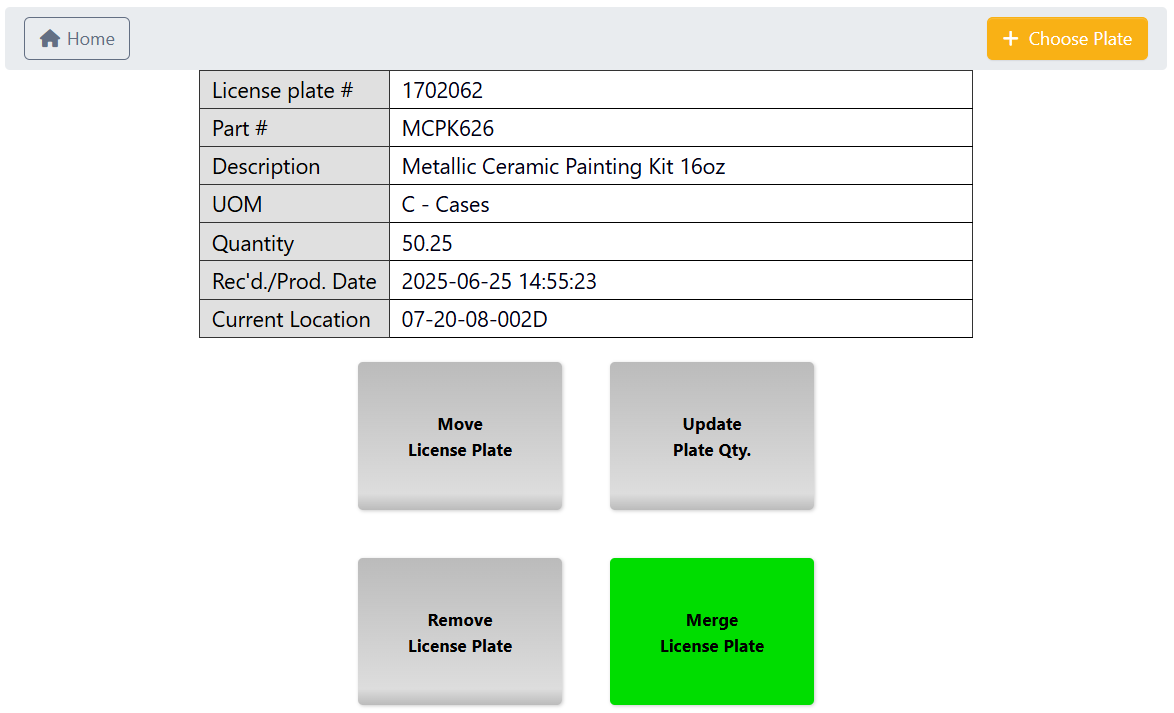 2. Choose the `Merge Type`:
1. `Full`: This transfers all inventory from the prior selected license plate to another license plate, and deletes the prior license plate from your inventory.
2. Choose the `Merge Type`:
1. `Full`: This transfers all inventory from the prior selected license plate to another license plate, and deletes the prior license plate from your inventory.
 2. `Partial`: This transfers only a specific quantity of inventory from one license plate to another, and retains both license plates in your inventory.
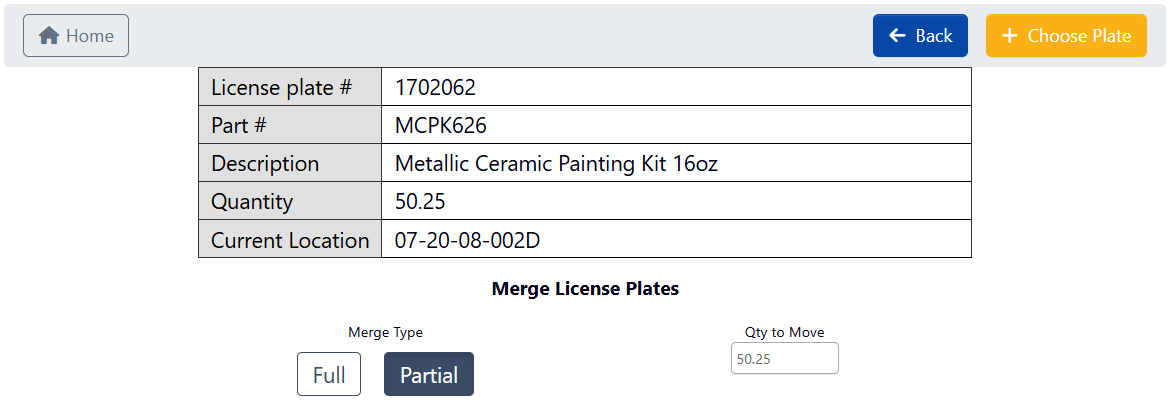 If you choose a Partial merge, you will have to fill in the `Qty to Move`, and hit enter to continue.
3. In `Scan Second License Plate`, enter the destination license plate number for the inventory merge, and hit enter to continue. Both license plates must have the same Part number to be successfully merged.
4. Check that the second license plate (underneath the green ‘plus’) matches your expectations.
1. If it matches, click `Continue`.
2. Otherwise, click `Reset` to try entering a different second license plate number.
5. Check that the resulting merged license plate (underneath the green ‘arrow’) matches your expectations, then click `Submit`.
6. Once the merge is complete, you’ll be taken back to the License Info page with a notification confirming the merge.
If you choose a Partial merge, you will have to fill in the `Qty to Move`, and hit enter to continue.
3. In `Scan Second License Plate`, enter the destination license plate number for the inventory merge, and hit enter to continue. Both license plates must have the same Part number to be successfully merged.
4. Check that the second license plate (underneath the green ‘plus’) matches your expectations.
1. If it matches, click `Continue`.
2. Otherwise, click `Reset` to try entering a different second license plate number.
5. Check that the resulting merged license plate (underneath the green ‘arrow’) matches your expectations, then click `Submit`.
6. Once the merge is complete, you’ll be taken back to the License Info page with a notification confirming the merge.