> ## Documentation Index
> Fetch the complete documentation index at: https://docs.decoart.com/llms.txt
> Use this file to discover all available pages before exploring further.
# Material Handler - Tutorial: Replenish Inventory
## Overview
This tutorial helps you replenish inventory using the DASH **Inventory → Material Handler** submodule.
## For Standard Location-Based Replenishment:
### Step 1: Pull up all inventory at a specific location
1. From the **Inventory** → **Material Handler** submodule, click on the `Replenishment` button.
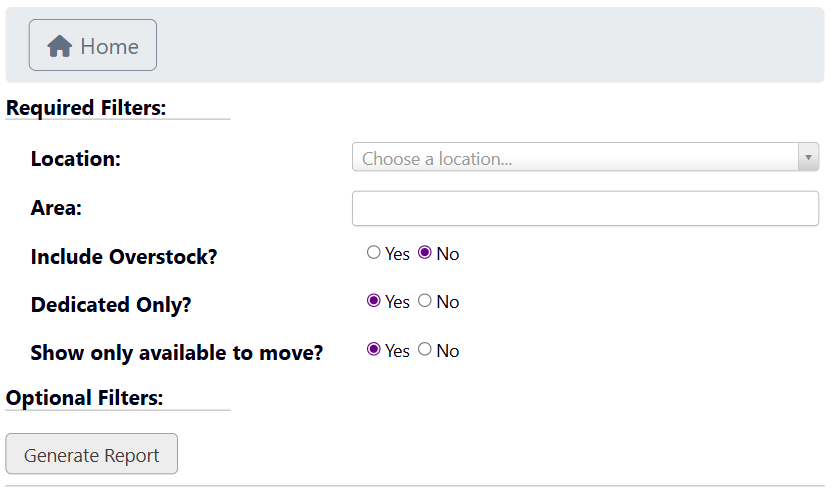 2. Select the `Location` and `Area` you want to replenish from the dropdown menus.
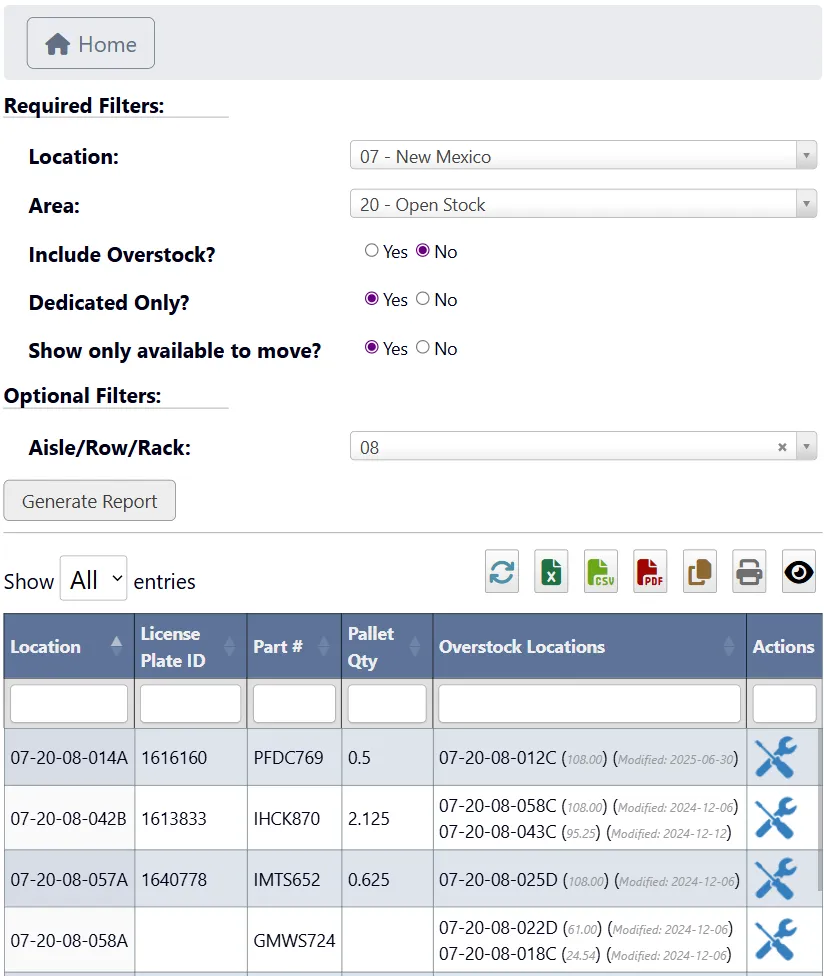 3. Toggle the following options:
1. `Include Overstock?` : Shows backstocked inventory along with primary inventory.
2. `Dedicated Only?` : Only shows items in fixed/dedicated bins.
3. `Show only available to move?` : Only shows items that can be picked/relocated immediately.
4. Optionally, select an `Aisle/Row/Rack` to filter by.
5. Click `Generate Report` to view a table of all inventory at that location, including pallet quantity and overstock history.
6. From this table, you have the following features:
1. Use the toolbar to refresh, export, print, or filter the table data.
2. Click on a table heading to sort by that attribute.
3. Use the search bars below each attribute heading to search by that attribute.
### Step 2: Replenish inventory for a license plate
1. Click the `Crossed Tools` icon for a specific license plate to go to the License Info page and modify its inventory quantity.
3. Toggle the following options:
1. `Include Overstock?` : Shows backstocked inventory along with primary inventory.
2. `Dedicated Only?` : Only shows items in fixed/dedicated bins.
3. `Show only available to move?` : Only shows items that can be picked/relocated immediately.
4. Optionally, select an `Aisle/Row/Rack` to filter by.
5. Click `Generate Report` to view a table of all inventory at that location, including pallet quantity and overstock history.
6. From this table, you have the following features:
1. Use the toolbar to refresh, export, print, or filter the table data.
2. Click on a table heading to sort by that attribute.
3. Use the search bars below each attribute heading to search by that attribute.
### Step 2: Replenish inventory for a license plate
1. Click the `Crossed Tools` icon for a specific license plate to go to the License Info page and modify its inventory quantity.
 2. Follow this tutorial (skipping the prerequisite step) to learn how to manage specific license plates from the License Info page: [Tutorial: Manage a License Plate](/inventory/material-handler-tutorial-manage-a-license-plate)
Some inventory moves or updates may be restricted based on part status (e.g., on hold) or location rules. If a move isn’t allowed, DASH will prevent the action.
## For eCommerce Picking Area Replenishment (SPD):
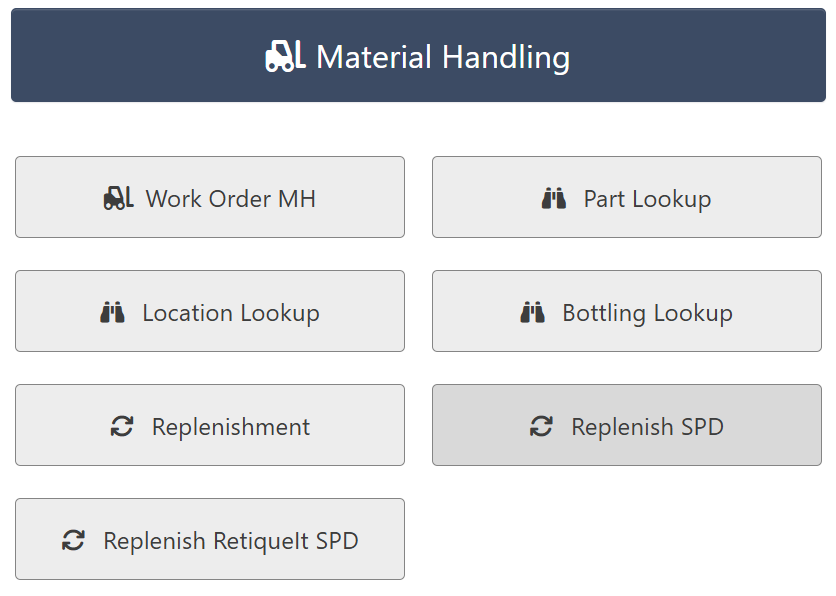
In addition to standard replenishment, DASH also supports the **replenishment of eCommerce picking areas**, such as Small Package Delivery (SPD) zones. These areas have dedicated replenishment buttons within the **Inventory → Material Handler** submodule, like `Replenish SPD` or `Replenish RetiqueIt SPD`.
These are controlled at the **eCommerce channel level**, and in theory, there could be more, depending on how many eCommerce areas are set up in the system.
These replenishment pages work a bit differently:
* **SPD = Small Package Delivery.**
* They are based on a **min/max/restock level system** and will **suggest replenishment quantities** based on that logic.
* Once you choose a license plate and a location in the warehouse to replenish from, **the system automatically executes the update process**.
This approach is designed to streamline restocking of high-volume pick areas with minimal manual intervention.
The exact names of these buttons may vary depending on how your organization has named the eCommerce areas in DASH.
### Step 1: Go to the eCommerce picking area replenishment screen
1. From the **Inventory** → **Material Handler** submodule, click on a replenishment button for an eCommerce picking area (these buttons may look something like `Replenish SPD`).
2. Follow this tutorial (skipping the prerequisite step) to learn how to manage specific license plates from the License Info page: [Tutorial: Manage a License Plate](/inventory/material-handler-tutorial-manage-a-license-plate)
Some inventory moves or updates may be restricted based on part status (e.g., on hold) or location rules. If a move isn’t allowed, DASH will prevent the action.
## For eCommerce Picking Area Replenishment (SPD):
In addition to standard replenishment, DASH also supports the **replenishment of eCommerce picking areas**, such as Small Package Delivery (SPD) zones. These areas have dedicated replenishment buttons within the **Inventory → Material Handler** submodule, like `Replenish SPD` or `Replenish RetiqueIt SPD`.
These are controlled at the **eCommerce channel level**, and in theory, there could be more, depending on how many eCommerce areas are set up in the system.
These replenishment pages work a bit differently:
* **SPD = Small Package Delivery.**
* They are based on a **min/max/restock level system** and will **suggest replenishment quantities** based on that logic.
* Once you choose a license plate and a location in the warehouse to replenish from, **the system automatically executes the update process**.
This approach is designed to streamline restocking of high-volume pick areas with minimal manual intervention.
The exact names of these buttons may vary depending on how your organization has named the eCommerce areas in DASH.
### Step 1: Go to the eCommerce picking area replenishment screen
1. From the **Inventory** → **Material Handler** submodule, click on a replenishment button for an eCommerce picking area (these buttons may look something like `Replenish SPD`).
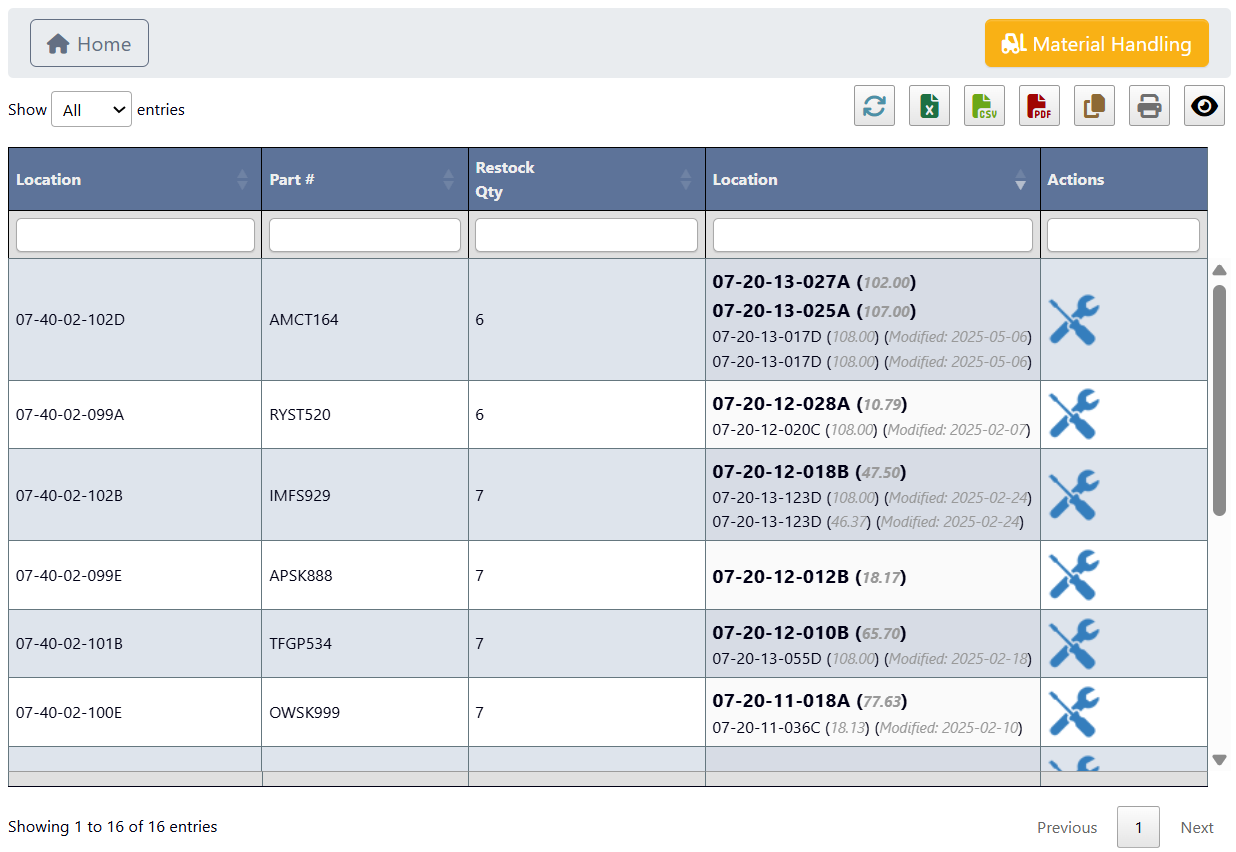
 2. You’ll see a table that shows all recommended restocks for the selected eCommerce picking area.
Each row includes:
* The **current location** of the inventory
* The **part number**
* The **suggested restock quantity**
* One or more **locations** where the part is currently available and can be picked from
* An **Actions** column with a `Crossed Tools` icon to complete the replenishment
The number in parentheses next to each location shows the **current quantity on the license plate** at that location.
2. You’ll see a table that shows all recommended restocks for the selected eCommerce picking area.
Each row includes:
* The **current location** of the inventory
* The **part number**
* The **suggested restock quantity**
* One or more **locations** where the part is currently available and can be picked from
* An **Actions** column with a `Crossed Tools` icon to complete the replenishment
The number in parentheses next to each location shows the **current quantity on the license plate** at that location.
 ### Step 2: Replenish inventory
1. In the suggested replenishment list, click the `Crossed Tools` icon next to an item to open the **Restock SPD** window.
2. From here, scan the **Plate #** using a scan gun (recommended), or manually enter the ID if needed.
### Step 2: Replenish inventory
1. In the suggested replenishment list, click the `Crossed Tools` icon next to an item to open the **Restock SPD** window.
2. From here, scan the **Plate #** using a scan gun (recommended), or manually enter the ID if needed.
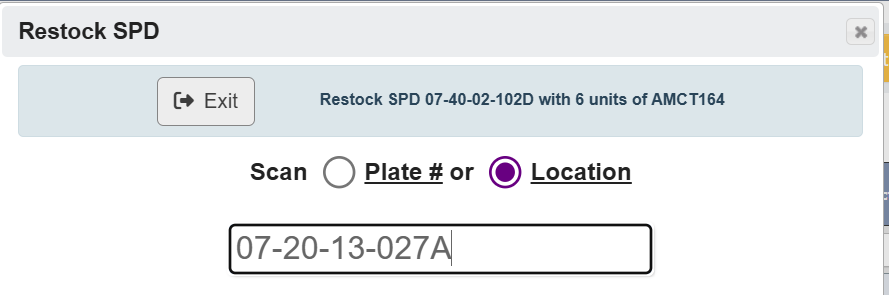 3. The **Restock SPD** window will now show additional information:
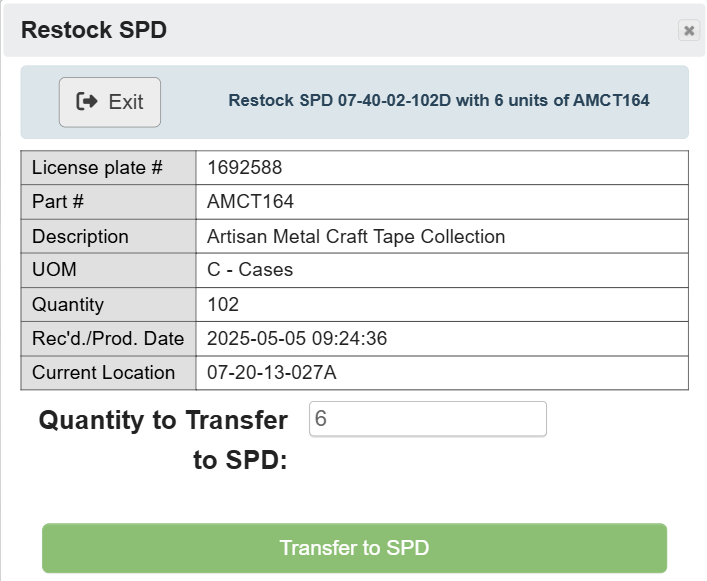 * License plate number
* Part number and description
* UOM (unit of measure)
* Total quantity associated with that license plate
* Received/production date
* Current location
* Suggested restock quantity
4. Confirm or edit the **Quantity to Transfer to SPD**, then click `Transfer to SPD` to complete the transaction.
* License plate number
* Part number and description
* UOM (unit of measure)
* Total quantity associated with that license plate
* Received/production date
* Current location
* Suggested restock quantity
4. Confirm or edit the **Quantity to Transfer to SPD**, then click `Transfer to SPD` to complete the transaction.
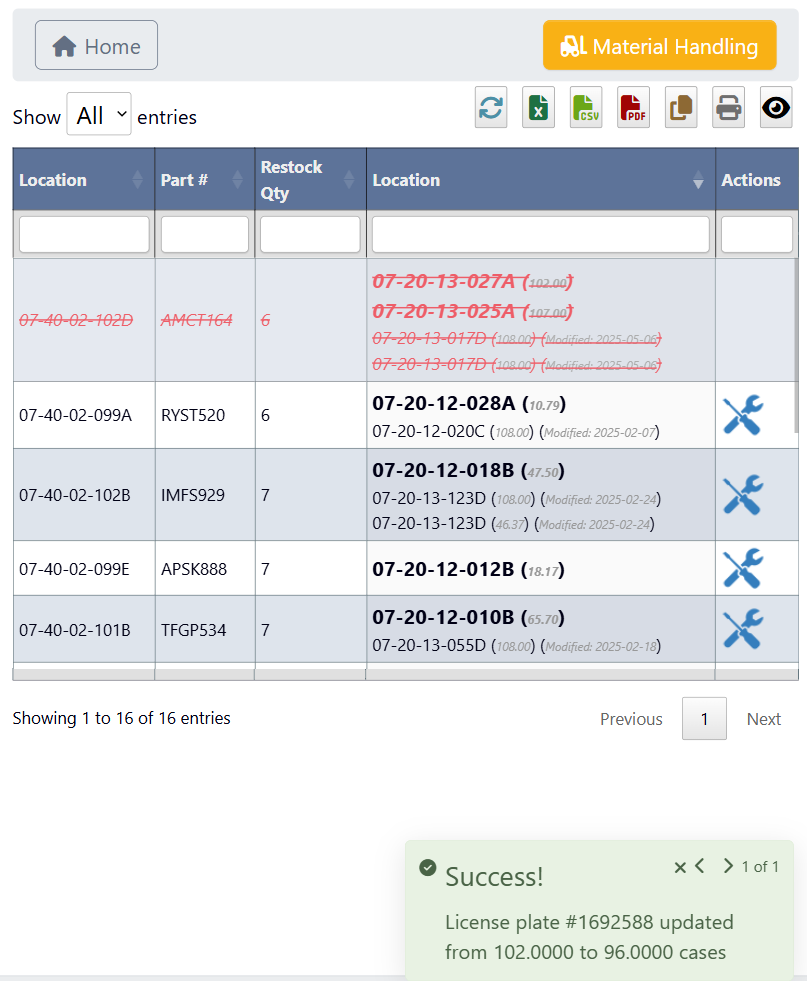 1. After submitting, the row for that item will appear **crossed out**, indicating the replenishment has been processed.
2. A **success notification** will confirm the update. For example: “Success! License plate #1692588 updated from 102.0000 to 96.0000 cases.”
3. The **first number** reflects the original quantity on the license plate, and the **second number** reflects the remaining quantity after the transfer. In this example, 6 cases were transferred to SPD: `102.00 - 6 = 96.00`.
1. After submitting, the row for that item will appear **crossed out**, indicating the replenishment has been processed.
2. A **success notification** will confirm the update. For example: “Success! License plate #1692588 updated from 102.0000 to 96.0000 cases.”
3. The **first number** reflects the original quantity on the license plate, and the **second number** reflects the remaining quantity after the transfer. In this example, 6 cases were transferred to SPD: `102.00 - 6 = 96.00`.