> ## Documentation Index
> Fetch the complete documentation index at: https://docs.decoart.com/llms.txt
> Use this file to discover all available pages before exploring further.
# IT Functions Submodule
## Overview
The **Miscellaneous → IT Functions** submodule provides system administrators and IT staff with tools for testing and managing various hardware components, monitoring system replication, executing administrative scripts, and performing recurring maintenance tasks within the DASH environment.
## Test Printers
The Test Printers tab allows IT staff to test and configure different types of printers used throughout the facility.
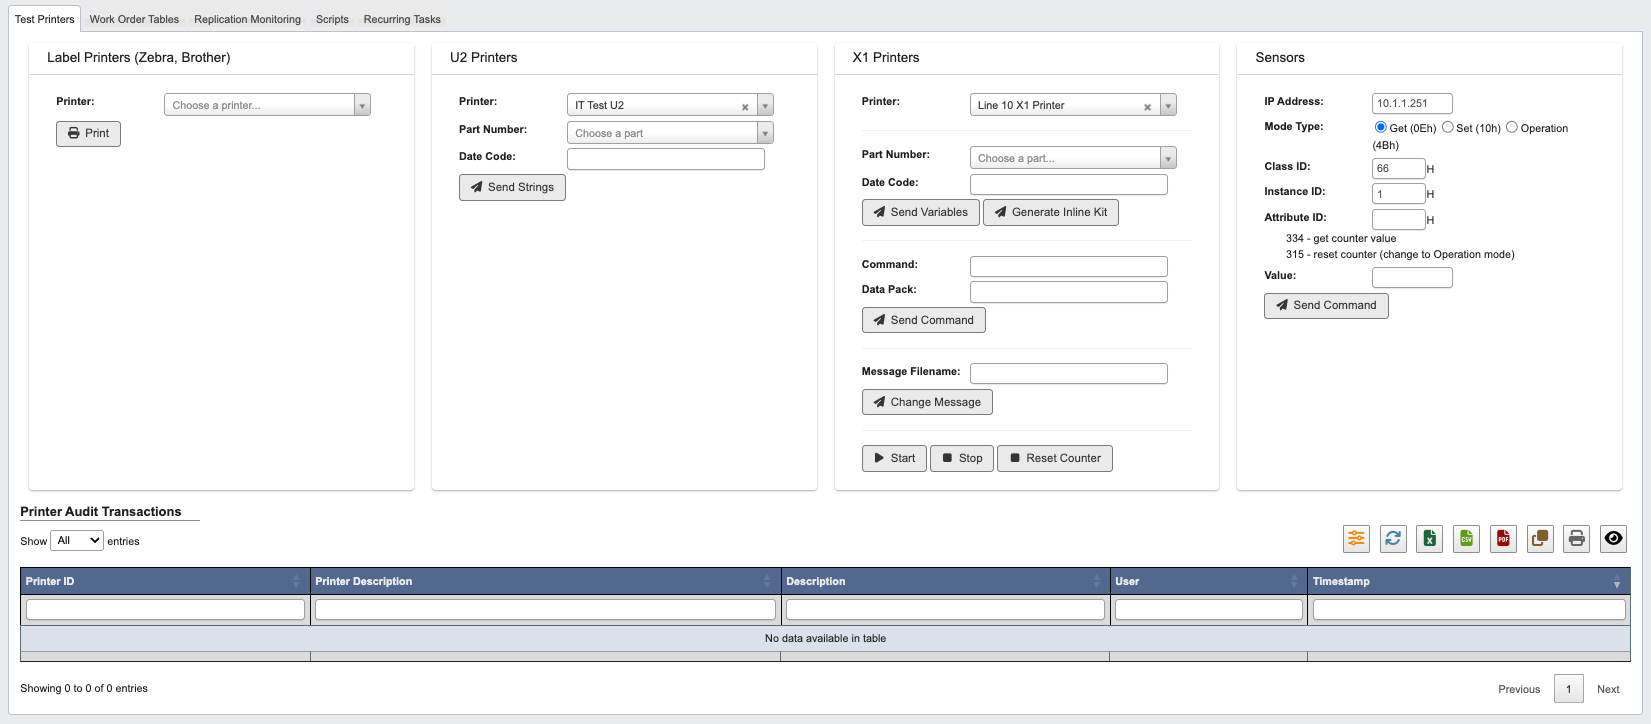 ### Label Printers (Zebra, Brother)
Test basic label printer functionality:
1. Choose the target `Printer` from the dropdown menu.
2. Click the `Print` button to send a test print job.
### U2 Printers
Test U2 printer functionality with part-specific data:
1. Choose the target `Printer` from the dropdown menu.
2. Choose a `Part Number` from the dropdown (must enter at least 2 characters to search).
3. Enter the `Data Code` for the test.
4. Click `Send Strings` to transmit the test data to the printer.
### X1 Printers
Test X1 printer functionality with advanced controls:
1. Choose the target `Printer` from the dropdown.
2. Choose a `Part Number` from the dropdown.
3. Enter the `Data Code` for the test.
4. Click `Send Variables` to send variable data or `Generate Inline Kit` for kit generation.
5. For command testing:
* Enter the `Command` to execute.
* Enter the `Data Pack` information.
* Click `Send Command` to execute.
6. For message management:
* Enter the `Message Filename`.
* Click `Change Message` to update the message file.
7. Use control buttons:
* `Start`: Begin printer operations.
* `Stop`: Halt printer operations.
* `Reset Counter`: Reset the printer's internal counter.
### Sensors
Test and configure sensor communications:
1. Enter the sensor's `IP Address`.
2. Select the `Mode Type`:
* `Get (0Eh)`: Retrieve sensor data.
* `Set (10h)`: Configure sensor settings.
* `Operation (4Bh)`: Execute sensor operations.
3. Configure sensor parameters:
* `Class ID`: Enter the class identifier (hexadecimal).
* `Instance ID`: Enter the instance identifier (hexadecimal).
* `Attribute ID`: Enter the attribute identifier (hexadecimal).
4. Enter the `Value` if setting parameters.
5. Click `Send Command` to execute the sensor command.
### Printer Audit Transactions
View a table of printer audit transactions that tracks all printer-related activities and communications for troubleshooting and monitoring purposes.
## Work Order Tables
### Label Printers (Zebra, Brother)
Test basic label printer functionality:
1. Choose the target `Printer` from the dropdown menu.
2. Click the `Print` button to send a test print job.
### U2 Printers
Test U2 printer functionality with part-specific data:
1. Choose the target `Printer` from the dropdown menu.
2. Choose a `Part Number` from the dropdown (must enter at least 2 characters to search).
3. Enter the `Data Code` for the test.
4. Click `Send Strings` to transmit the test data to the printer.
### X1 Printers
Test X1 printer functionality with advanced controls:
1. Choose the target `Printer` from the dropdown.
2. Choose a `Part Number` from the dropdown.
3. Enter the `Data Code` for the test.
4. Click `Send Variables` to send variable data or `Generate Inline Kit` for kit generation.
5. For command testing:
* Enter the `Command` to execute.
* Enter the `Data Pack` information.
* Click `Send Command` to execute.
6. For message management:
* Enter the `Message Filename`.
* Click `Change Message` to update the message file.
7. Use control buttons:
* `Start`: Begin printer operations.
* `Stop`: Halt printer operations.
* `Reset Counter`: Reset the printer's internal counter.
### Sensors
Test and configure sensor communications:
1. Enter the sensor's `IP Address`.
2. Select the `Mode Type`:
* `Get (0Eh)`: Retrieve sensor data.
* `Set (10h)`: Configure sensor settings.
* `Operation (4Bh)`: Execute sensor operations.
3. Configure sensor parameters:
* `Class ID`: Enter the class identifier (hexadecimal).
* `Instance ID`: Enter the instance identifier (hexadecimal).
* `Attribute ID`: Enter the attribute identifier (hexadecimal).
4. Enter the `Value` if setting parameters.
5. Click `Send Command` to execute the sensor command.
### Printer Audit Transactions
View a table of printer audit transactions that tracks all printer-related activities and communications for troubleshooting and monitoring purposes.
## Work Order Tables
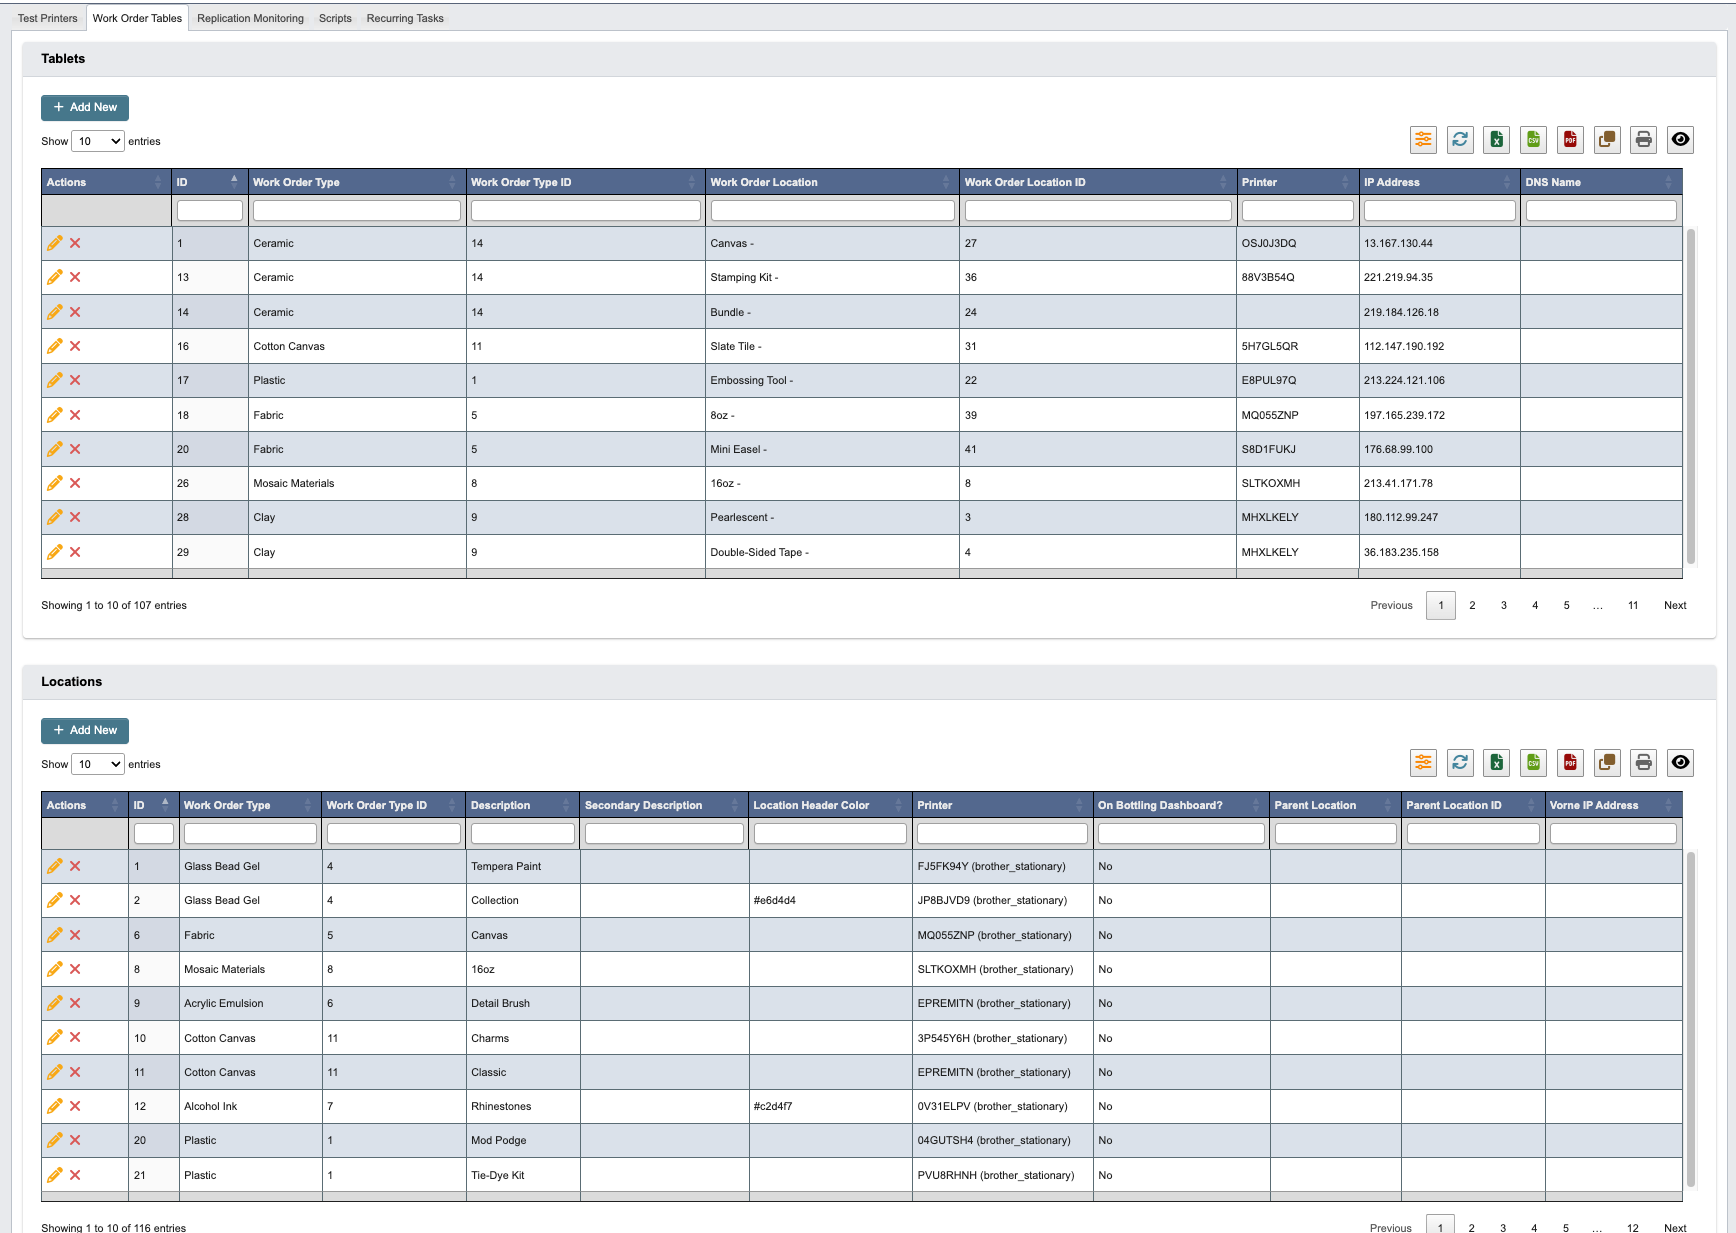 The Work Order Tables tab manages tablet devices and work order locations used throughout production areas. This section displays tables showing configured tablets and locations, with options to add new entries.
### Add Tablet
To add a new tablet device to the system:
1. Click `+ Add New` to create a new tablet entry
The Work Order Tables tab manages tablet devices and work order locations used throughout production areas. This section displays tables showing configured tablets and locations, with options to add new entries.
### Add Tablet
To add a new tablet device to the system:
1. Click `+ Add New` to create a new tablet entry
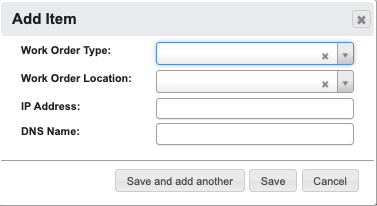 2. Fill in the tablet configuration details:
* `Work Order Type`: Select the type of work orders this tablet will handle.
* `Work Order Location`: Assign the physical location where this tablet is installed.
* `IP Address`: Enter the tablet's network IP address.
* `DNS Name`: Enter the tablet's DNS hostname.
3. When you have filled in the details, click:
* `Save and add another` to add another tablet.
* `Save` to save the details and return to the table.
* `Cancel` to close the window and return to the table.
### Add Location
To add a new work order location to the system:
1. Click `+ Add New` to create a new location entry
2. Fill in the tablet configuration details:
* `Work Order Type`: Select the type of work orders this tablet will handle.
* `Work Order Location`: Assign the physical location where this tablet is installed.
* `IP Address`: Enter the tablet's network IP address.
* `DNS Name`: Enter the tablet's DNS hostname.
3. When you have filled in the details, click:
* `Save and add another` to add another tablet.
* `Save` to save the details and return to the table.
* `Cancel` to close the window and return to the table.
### Add Location
To add a new work order location to the system:
1. Click `+ Add New` to create a new location entry
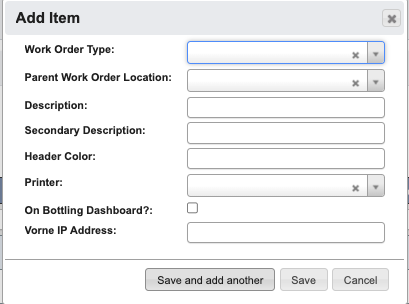 2. Fill in the location configuration details:
* `Work Order Type`: Select the type of work orders for this location.
* `Parent Work Order Location`: Select the parent location if this is a sub-location.
* `Description`: Enter the primary description of the location.
* `Secondary Description`: Enter additional location details.
* `Header Color`: Choose the color scheme for this location's interface.
* `Printer`: Assign the default printer for this location.
* `On Bottling Dashboard?`: Check if this location should appear on the bottling dashboard.
* `Vorne IP Address`: Enter the IP address for Vorne system integration.
3. When you have filled in the details, click:
* `Save and add another` to add another location.
* `Save` to save the details and return to the table.
* `Cancel` to close the window and return to the table.
## Replication Monitoring
2. Fill in the location configuration details:
* `Work Order Type`: Select the type of work orders for this location.
* `Parent Work Order Location`: Select the parent location if this is a sub-location.
* `Description`: Enter the primary description of the location.
* `Secondary Description`: Enter additional location details.
* `Header Color`: Choose the color scheme for this location's interface.
* `Printer`: Assign the default printer for this location.
* `On Bottling Dashboard?`: Check if this location should appear on the bottling dashboard.
* `Vorne IP Address`: Enter the IP address for Vorne system integration.
3. When you have filled in the details, click:
* `Save and add another` to add another location.
* `Save` to save the details and return to the table.
* `Cancel` to close the window and return to the table.
## Replication Monitoring
 The Replication Monitoring tab helps IT staff verify database synchronization across multiple MySQL servers to ensure data consistency.
Click `Generate Reports` to create a database replication status report.
The generated report includes the following columns:
* `Table`: Database table name being monitored
* `MySQL1 Checksum`: Checksum value from the first MySQL server
* `MySQL2 Checksum`: Checksum value from the second MySQL server
* `MySQL3 Checksum`: Checksum value from the third MySQL server
* `Match 1 to 2?`: Indicates whether MySQL1 and MySQL2 checksums match
* `Match 2 to 3?`: Indicates whether MySQL2 and MySQL3 checksums match
This report helps identify any synchronization issues between database servers that may require attention.
## Scripts
The Replication Monitoring tab helps IT staff verify database synchronization across multiple MySQL servers to ensure data consistency.
Click `Generate Reports` to create a database replication status report.
The generated report includes the following columns:
* `Table`: Database table name being monitored
* `MySQL1 Checksum`: Checksum value from the first MySQL server
* `MySQL2 Checksum`: Checksum value from the second MySQL server
* `MySQL3 Checksum`: Checksum value from the third MySQL server
* `Match 1 to 2?`: Indicates whether MySQL1 and MySQL2 checksums match
* `Match 2 to 3?`: Indicates whether MySQL2 and MySQL3 checksums match
This report helps identify any synchronization issues between database servers that may require attention.
## Scripts
 The Scripts tab provides IT administrators with automated tools for common system administration tasks.
### Resume ZD420 Print Jobs
Resume paused print jobs on ZD420 printers:
1. Click `Add Argument` to specify printer parameters:
* `Prefix`: Enter the argument prefix.
* `Argument`: Enter the specific argument value.
2. Click the printer icon `Resume` to resume print jobs.
### Torque Reading
Retrieve torque readings from specified computers:
1. Configure the argument:
* `Prefix`: Computer (Prefilled).
* `Argument`: Enter the target computer name.
2. Click `Add Argument` to add another parameter.
3. Click `Execute` to run the torque reading script.
### WSUS Single Computer
Execute Windows Server Update Services operations on a single computer:
1. Configure the argument:
* `Prefix`: Computer (Prefilled).
* `Argument`: Enter the target computer name.
2. Click `Add Argument` to add another parameter.
3. Click `Execute` to run the WSUS script.
### Check Users Password Change Date
Check when a user's password was last changed:
1. Configure the argument:
* `Prefix`: User (Prefilled).
* `Argument`: Enter the username to check.
2. Click `Add Argument` to add another parameter.
3. Click `Execute` to run the password check script.
### Sync AD to Azure
Synchronize Active Directory with Azure Active Directory:
1. Click `Execute` to run the AD to Azure synchronization script.
### Add Users to Local Admin Group on Computer
Add users to the local administrator group on specified computers:
1. The following arguments are prefilled:
* `Computer`: Target computer name.
* `User`: Target username to add to the admin group.
2. Click `Add Argument` to add another parameter.
3. Click `Execute` to run the user administration script.
## Recurring Tasks
The Scripts tab provides IT administrators with automated tools for common system administration tasks.
### Resume ZD420 Print Jobs
Resume paused print jobs on ZD420 printers:
1. Click `Add Argument` to specify printer parameters:
* `Prefix`: Enter the argument prefix.
* `Argument`: Enter the specific argument value.
2. Click the printer icon `Resume` to resume print jobs.
### Torque Reading
Retrieve torque readings from specified computers:
1. Configure the argument:
* `Prefix`: Computer (Prefilled).
* `Argument`: Enter the target computer name.
2. Click `Add Argument` to add another parameter.
3. Click `Execute` to run the torque reading script.
### WSUS Single Computer
Execute Windows Server Update Services operations on a single computer:
1. Configure the argument:
* `Prefix`: Computer (Prefilled).
* `Argument`: Enter the target computer name.
2. Click `Add Argument` to add another parameter.
3. Click `Execute` to run the WSUS script.
### Check Users Password Change Date
Check when a user's password was last changed:
1. Configure the argument:
* `Prefix`: User (Prefilled).
* `Argument`: Enter the username to check.
2. Click `Add Argument` to add another parameter.
3. Click `Execute` to run the password check script.
### Sync AD to Azure
Synchronize Active Directory with Azure Active Directory:
1. Click `Execute` to run the AD to Azure synchronization script.
### Add Users to Local Admin Group on Computer
Add users to the local administrator group on specified computers:
1. The following arguments are prefilled:
* `Computer`: Target computer name.
* `User`: Target username to add to the admin group.
2. Click `Add Argument` to add another parameter.
3. Click `Execute` to run the user administration script.
## Recurring Tasks
 The Recurring Tasks tab provides tools for performing scheduled maintenance and bulk operations on system data.
### Discontinue SKUs for Customer
1. Fill in the recurring tasks details:
* `Skip Rows`: Specify how many header rows to skip in the uploaded file.
* `Part # Column (zero-based)`: Enter the column number containing part numbers (starting from 0).
* `Customer`: Select the customer for whom SKUs will be discontinued.
* Click the `Discontinue SKUs for customer` button to upload the discontinuation file.
The Recurring Tasks tab provides tools for performing scheduled maintenance and bulk operations on system data.
### Discontinue SKUs for Customer
1. Fill in the recurring tasks details:
* `Skip Rows`: Specify how many header rows to skip in the uploaded file.
* `Part # Column (zero-based)`: Enter the column number containing part numbers (starting from 0).
* `Customer`: Select the customer for whom SKUs will be discontinued.
* Click the `Discontinue SKUs for customer` button to upload the discontinuation file.
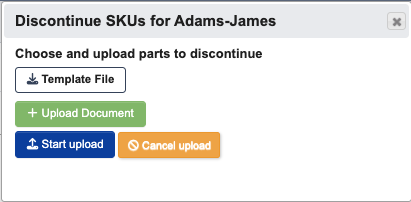 * Click `Template File` to download the proper file format.
* Click `+ Upload Document` to select your prepared file.
* Click `Start upload` to begin processing the discontinuation.
* Click `Cancel upload` to cancel the upload process.
* Click `Template File` to download the proper file format.
* Click `+ Upload Document` to select your prepared file.
* Click `Start upload` to begin processing the discontinuation.
* Click `Cancel upload` to cancel the upload process.