> ## Documentation Index
> Fetch the complete documentation index at: https://docs.decoart.com/llms.txt
> Use this file to discover all available pages before exploring further.
# Manage Parts Reference
## Production Type
### Purchased Parts
* Items bought from external vendors.
* Include raw materials, packaging components, and finished goods from suppliers.
* Feature Purchasing Information section with vendor details, lead times, and pricing.
### Manufactured Parts
* Items produced in-house.
* Include finished goods and work-in-process items.
* Includes labor hours
## Inventory Type
### Raw Materials
* Chemical components, pigments, resins used in paint formulation.
* Packaging materials like bottles, lids, labels, cartons.
* Can be purchased parts with vendor information.
### Finished Goods
* Completed products ready for sale.
* Can be manufactured (produced in-house) or purchased (from external suppliers).
* Include UPC codes, product classes, and pricing information.
* Feature customer pricing options and packaging details.
### Work-in-Process (WIP)
* Intermediate products used in manufacturing steps.
* Paint batches from dispersion before bottling.
* Base materials that get further processed.
* Won’t have package information since the product is still being made
### Packaging/Kits
* Assortments combining multiple finished goods.
* Special packaging configurations.
* Multi-item bundles for retail or promotional purposes.
## All FG Parts Miscellaneous Section
 All FG Parts Miscellaneous section provides several filtering and display options to customize your view:
* **Hide Obsolete Parts**: By default, the table hides obsolete parts. Uncheck this box to include obsolete parts in the view.
* **Show only parts with required amount**: Displays only parts that have a required quantity set.
* **Show only parts with Perp QOH or Tracking QOH**: Limits the view to parts that have perpetual or tracking quantities on hand.
* **Show Perp QOH / Tracking QOH variance**: Adds a variance column to compare perpetual and tracking quantities for inventory accuracy.
* **Show master cases only**: Filters results to display master case-level parts only.
* **Show manufactured only**: Displays only manufactured parts.
## Available Action Buttons
* `Rebuild Required`: Refreshes required part quantities based on current production schedules and order data.
* `Close Month`: Finalizes part data for the selected month to prevent further changes and lock inventory values.
* `Rebuild YTD Sales`: Recalculates year-to-date sales totals for accurate reporting.
* `Rebuild YTD Ordered`: Recalculates year-to-date ordered quantities for demand planning.
* `Perform Bulk Status Change`: Allows batch updates to part statuses across multiple items simultaneously.
## Add Inventory Adjustment
All FG Parts Miscellaneous section provides several filtering and display options to customize your view:
* **Hide Obsolete Parts**: By default, the table hides obsolete parts. Uncheck this box to include obsolete parts in the view.
* **Show only parts with required amount**: Displays only parts that have a required quantity set.
* **Show only parts with Perp QOH or Tracking QOH**: Limits the view to parts that have perpetual or tracking quantities on hand.
* **Show Perp QOH / Tracking QOH variance**: Adds a variance column to compare perpetual and tracking quantities for inventory accuracy.
* **Show master cases only**: Filters results to display master case-level parts only.
* **Show manufactured only**: Displays only manufactured parts.
## Available Action Buttons
* `Rebuild Required`: Refreshes required part quantities based on current production schedules and order data.
* `Close Month`: Finalizes part data for the selected month to prevent further changes and lock inventory values.
* `Rebuild YTD Sales`: Recalculates year-to-date sales totals for accurate reporting.
* `Rebuild YTD Ordered`: Recalculates year-to-date ordered quantities for demand planning.
* `Perform Bulk Status Change`: Allows batch updates to part statuses across multiple items simultaneously.
## Add Inventory Adjustment
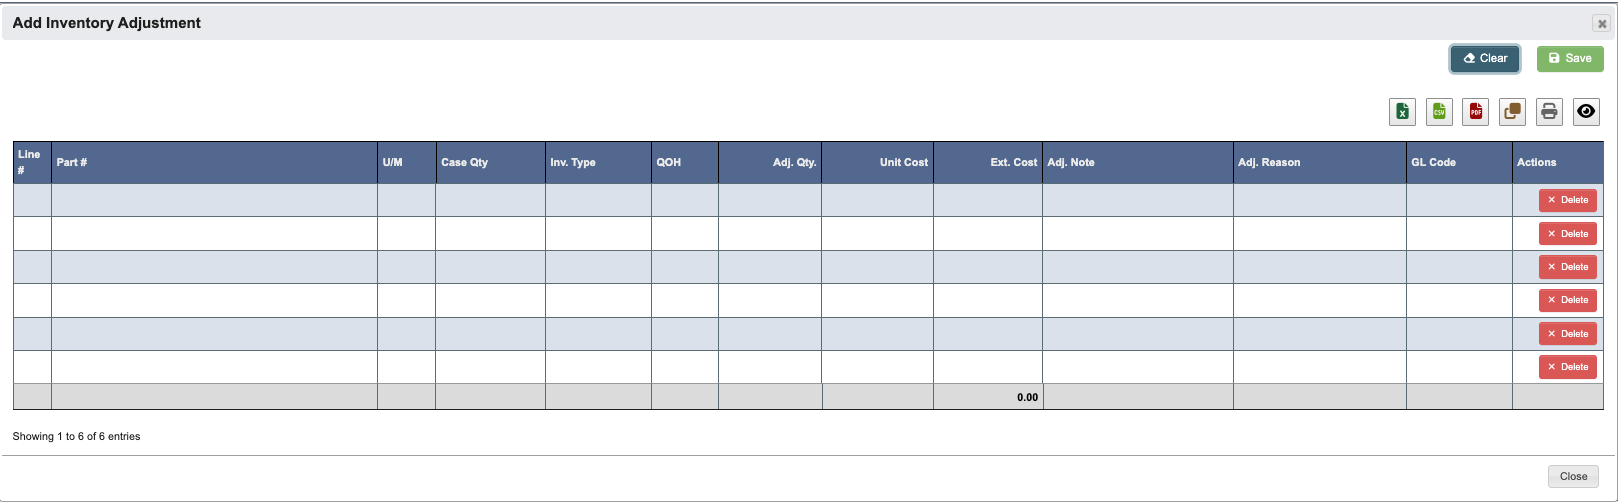 When creating a new inventory adjustment, the following fields are required:
* `Part #` (Required): Use dropdown to select the part number requiring adjustment.
* `Adj. Qty.` (Required): Enter the adjustment quantity (positive for increases, negative for decreases).
* `Adj. Note` (Required): Provide detailed notes explaining the reason for the adjustment.
* `Adj. Reason` (Required): Select from predefined adjustment reasons tracking and reporting.
### Create a new inventory adjustment
1. Click `+ Add Inventory Adjustment`.
2. In the pop-up window, fill in the required fields as defined above.
3. Click `Save` in the top right corner to save.
4. Click `Cancel` in the bottom right corner to discard changes.
### Upload inventory adjustments in bulk
1. Click `+ Upload` to upload multiple adjustments at once.
2. Click `Download Template` to get the Excel template format with proper column headers.
3. Fill in the template with adjustment data following the field requirements above.
4. Upload the completed file and review before saving.
## Add Scrap
When creating a new inventory adjustment, the following fields are required:
* `Part #` (Required): Use dropdown to select the part number requiring adjustment.
* `Adj. Qty.` (Required): Enter the adjustment quantity (positive for increases, negative for decreases).
* `Adj. Note` (Required): Provide detailed notes explaining the reason for the adjustment.
* `Adj. Reason` (Required): Select from predefined adjustment reasons tracking and reporting.
### Create a new inventory adjustment
1. Click `+ Add Inventory Adjustment`.
2. In the pop-up window, fill in the required fields as defined above.
3. Click `Save` in the top right corner to save.
4. Click `Cancel` in the bottom right corner to discard changes.
### Upload inventory adjustments in bulk
1. Click `+ Upload` to upload multiple adjustments at once.
2. Click `Download Template` to get the Excel template format with proper column headers.
3. Fill in the template with adjustment data following the field requirements above.
4. Upload the completed file and review before saving.
## Add Scrap
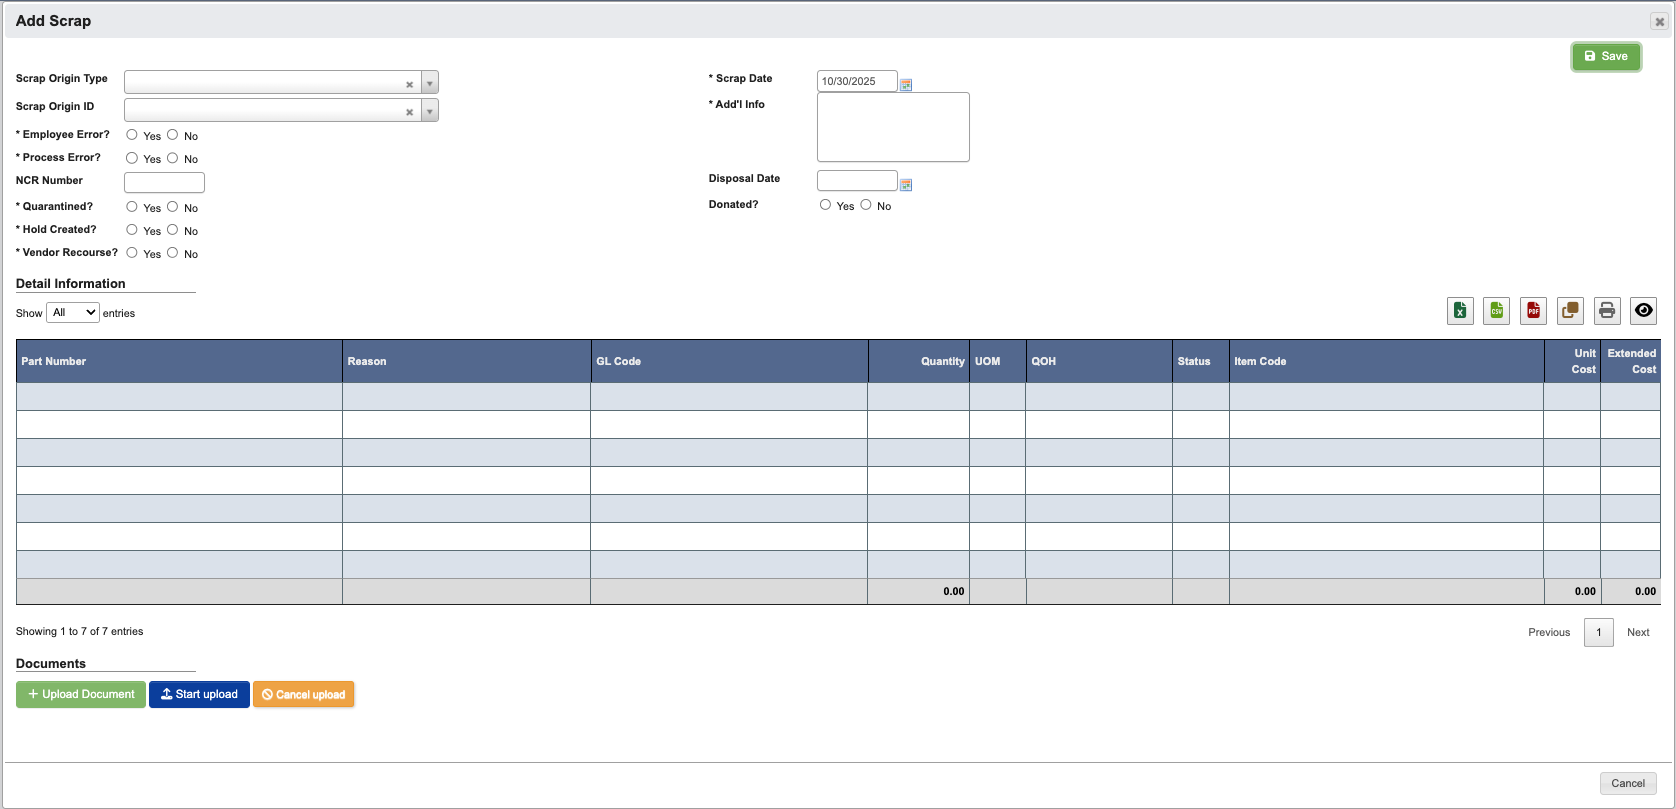 When creating a scrap ticket, the following fields are required:
* `Scrap Origin Type` (Required): Select from dropdown options:
* Dispersion, Bottling, Shrink Wrap, Label Press, Kit, Purchasing, Blister, Rework, Inventory Conversion, Paint Pots, Half Gallon
* `Scrap Origin ID` (Required): Select the specific work order, batch, or process identifier where the scrap originated.
* `Employee Error?` (Required): Indicates if the scrap was caused by employee error.
* `Process Error?` (Required): Indicates if the scrap was caused by a process or system failure.
* `NCR Number`: Non-Conformance Report number if applicable for quality tracking.
* `Quarantined?` (Required): Indicates if the material has been quarantined pending investigation.
* `Hold Created?` (Required): Indicates if a quality hold has been placed on related materials.
* `Vendor Recourse?` (Required): Indicates if the vendor may be responsible for reimbursement.
* `Scrap Date` (Required): Date when the scrap occurred (defaults to creation date).
* `Add'l Info` (Required): Detailed description of the scrap incident, root cause, and any corrective actions taken.
* `Disposal Date`: Date when the scrapped material was physically disposed of.
* `Donated?`: Indicates if the scrapped material was donated rather than disposed of.
### Create a new scrap ticket
1. Click `+ Add Scrap`.
2. Fill in the required fields as defined above.
3. Under `Documents`, upload any related documents such as photos, NCR reports, or investigation findings.
1. Click `Upload Document` to select a file.
2. Click `Start upload` to attach the document.
3. Click `Cancel upload` to stop the upload process.
4. Click `Save` in the top right corner to save the scrap ticket.
5. Click `Cancel` in the bottom right corner to discard the scrap ticket and return to the table.
### Approve a scrap ticket
1. Locate the ticket on the table.
2. Click the `Batch ID` or `Week Begin Date` to open a pop-up window with the Scrap Details.
3. Click `Approve` in the top right corner to approve the scrap ticket.
4. Click `YES, appprove` to finalize the approval, or click `Cancel` to return to the previous page.
## Add Tariff Code
When creating a scrap ticket, the following fields are required:
* `Scrap Origin Type` (Required): Select from dropdown options:
* Dispersion, Bottling, Shrink Wrap, Label Press, Kit, Purchasing, Blister, Rework, Inventory Conversion, Paint Pots, Half Gallon
* `Scrap Origin ID` (Required): Select the specific work order, batch, or process identifier where the scrap originated.
* `Employee Error?` (Required): Indicates if the scrap was caused by employee error.
* `Process Error?` (Required): Indicates if the scrap was caused by a process or system failure.
* `NCR Number`: Non-Conformance Report number if applicable for quality tracking.
* `Quarantined?` (Required): Indicates if the material has been quarantined pending investigation.
* `Hold Created?` (Required): Indicates if a quality hold has been placed on related materials.
* `Vendor Recourse?` (Required): Indicates if the vendor may be responsible for reimbursement.
* `Scrap Date` (Required): Date when the scrap occurred (defaults to creation date).
* `Add'l Info` (Required): Detailed description of the scrap incident, root cause, and any corrective actions taken.
* `Disposal Date`: Date when the scrapped material was physically disposed of.
* `Donated?`: Indicates if the scrapped material was donated rather than disposed of.
### Create a new scrap ticket
1. Click `+ Add Scrap`.
2. Fill in the required fields as defined above.
3. Under `Documents`, upload any related documents such as photos, NCR reports, or investigation findings.
1. Click `Upload Document` to select a file.
2. Click `Start upload` to attach the document.
3. Click `Cancel upload` to stop the upload process.
4. Click `Save` in the top right corner to save the scrap ticket.
5. Click `Cancel` in the bottom right corner to discard the scrap ticket and return to the table.
### Approve a scrap ticket
1. Locate the ticket on the table.
2. Click the `Batch ID` or `Week Begin Date` to open a pop-up window with the Scrap Details.
3. Click `Approve` in the top right corner to approve the scrap ticket.
4. Click `YES, appprove` to finalize the approval, or click `Cancel` to return to the previous page.
## Add Tariff Code
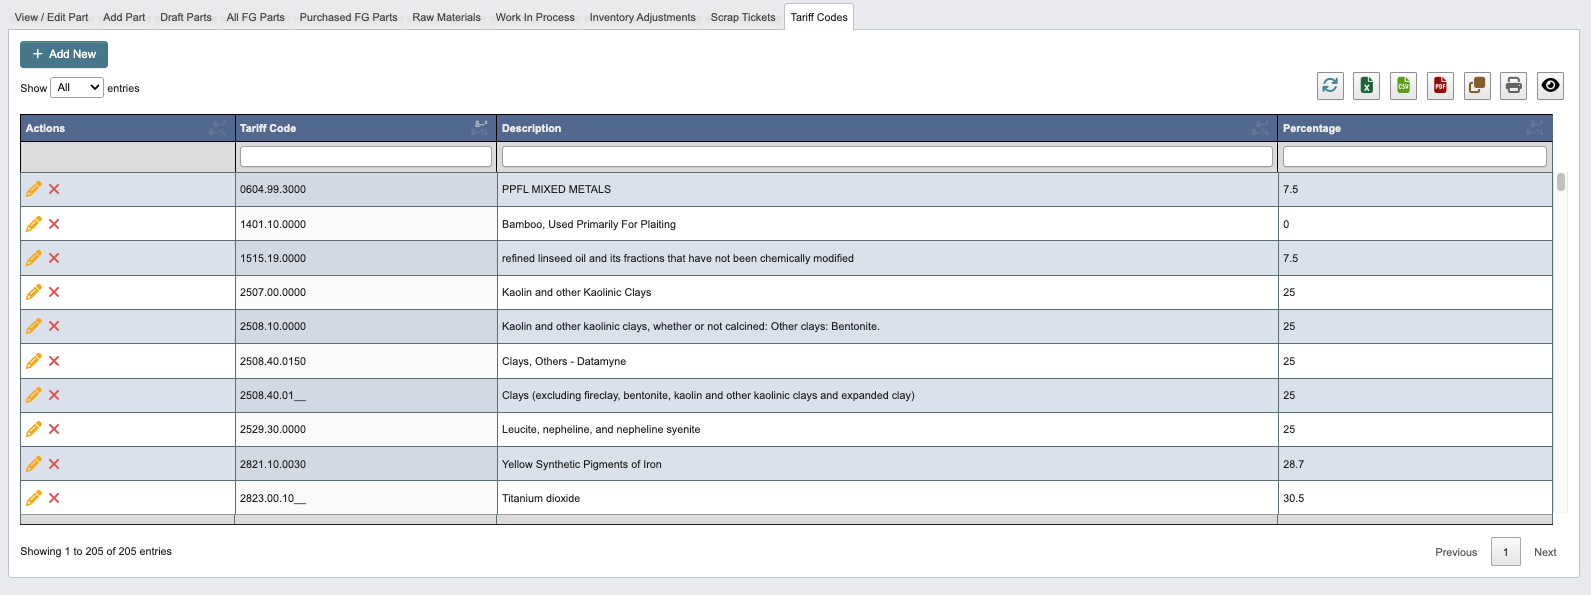 ### How to add a tariff code
1. Click `+ Add New`.
2. In the pop-up window, enter the following:
### How to add a tariff code
1. Click `+ Add New`.
2. In the pop-up window, enter the following:
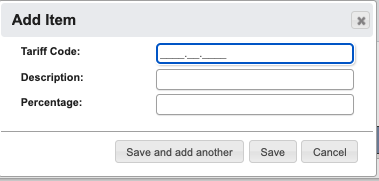 * `Tariff Code` (Required): The official tariff code for the product category.
* `Description` (Required): Description of the products covered by this tariff code.
* `Percentage`: The tariff rate percentage applied to products under this code.
3. When you have filled in the details, click:
1. `Save and add another` to add another tariff code.
2. `Save` to save the details and go back to the table.
3. `Cancel` to close the window and go back to the table.
### How to edit or delete a tariff code
1. Find the the `Actions` column on the left.
2. Click the `Edit` (pencil icon) to make an edit to the tariff code, then click:
1. `Save` to save the changes and go back to the table.
2. `Cancel` to close the window and go back to the table.
3. Click the `Delete` (red “x” icon) to delete the tariff code.
1. `YES, delete` to delete the tariff code.
2. `Cancel` to close the window and go back to the table.
* `Tariff Code` (Required): The official tariff code for the product category.
* `Description` (Required): Description of the products covered by this tariff code.
* `Percentage`: The tariff rate percentage applied to products under this code.
3. When you have filled in the details, click:
1. `Save and add another` to add another tariff code.
2. `Save` to save the details and go back to the table.
3. `Cancel` to close the window and go back to the table.
### How to edit or delete a tariff code
1. Find the the `Actions` column on the left.
2. Click the `Edit` (pencil icon) to make an edit to the tariff code, then click:
1. `Save` to save the changes and go back to the table.
2. `Cancel` to close the window and go back to the table.
3. Click the `Delete` (red “x” icon) to delete the tariff code.
1. `YES, delete` to delete the tariff code.
2. `Cancel` to close the window and go back to the table.