> ## Documentation Index
> Fetch the complete documentation index at: https://docs.decoart.com/llms.txt
> Use this file to discover all available pages before exploring further.
# Manage Parts Submodule
## Overview
The **Part Information → Manage Parts** submodule is the central hub for creating, viewing, and managing all part records in the DASH system. This includes finished goods, raw materials, work-in-process (WIP) items, and purchased components used throughout DecoArt's operations.
The submodule contains the following tabs:
* **View / Edit Part**: Access and modify existing part information, including bill of materials, pricing, and specifications.
* **Add Part**: Create new part records for finished goods, raw materials, or work-in-process items.
* **Draft Parts**: View parts that are in development but not yet active in the system.
* **All FG Parts**: Comprehensive view of all finished goods with inventory and costing data.
* **Purchased FG Parts**: View finished goods that are purchased rather than manufactured.
* **Raw Materials**: Manage raw material parts used in production.
* **Work In Process**: View WIP parts used in manufacturing processes.
* **Inventory Adjustments**: Make corrections to inventory quantities when discrepancies are found.
* **Scrap Tickets**: View scrap tickets for damaged or unusable materials.
* **Tariff Codes**: Maintain tariff classification codes for international shipping.
Depending on your role and permissions, you may not see all of these tabs or have access to all part management functions.
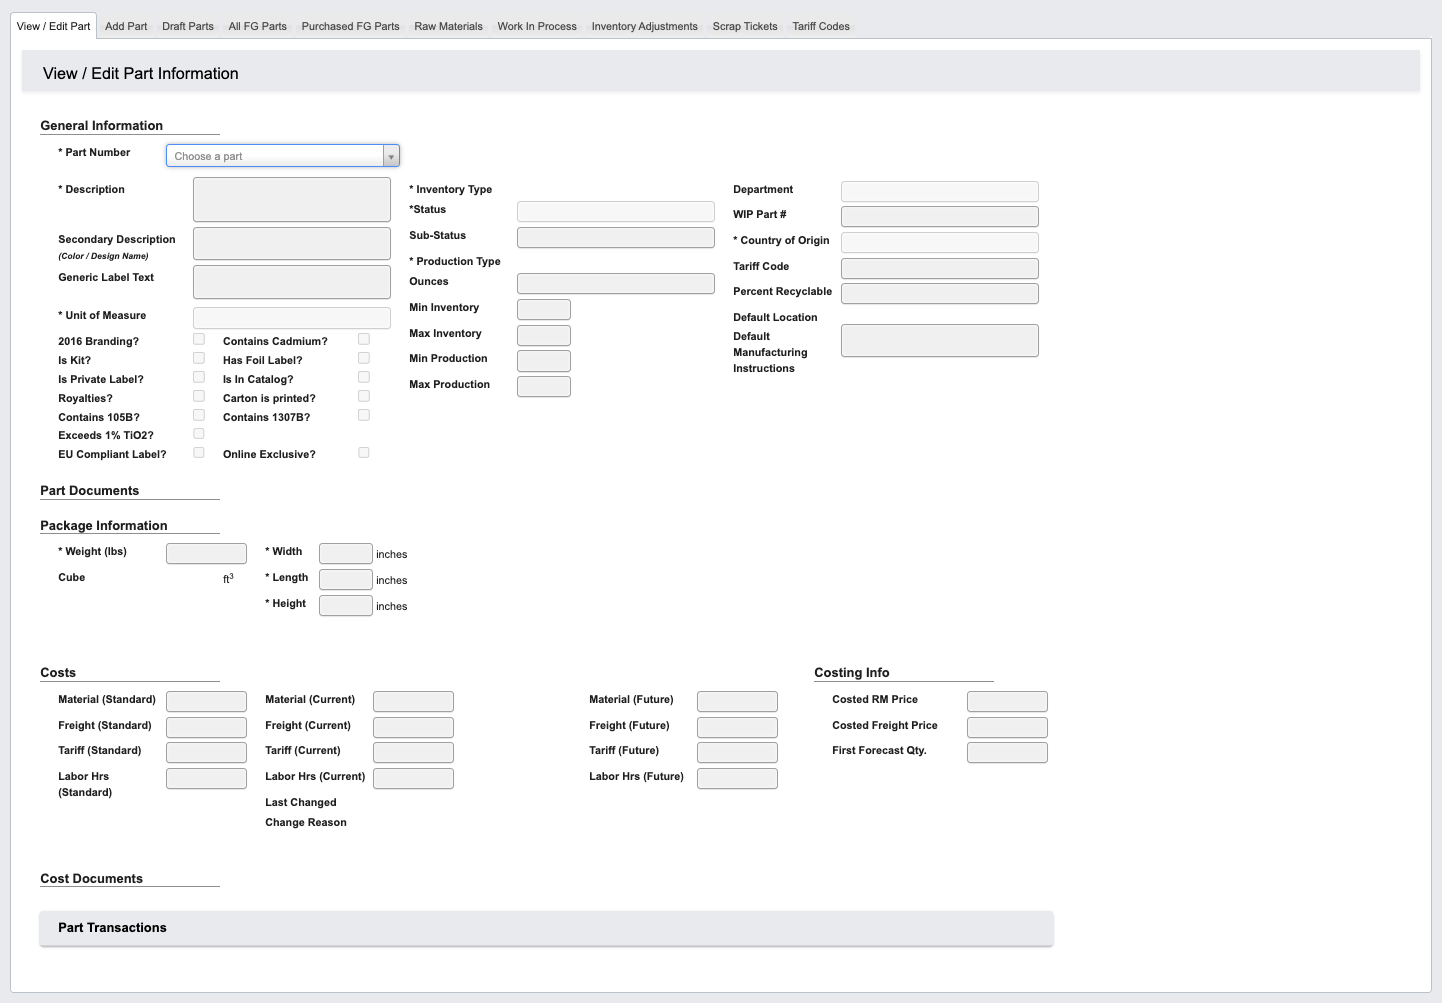
## View / Edit Part
From the Part Information → Manage Parts submodule, click on the `View / Edit Part` tab. This tab allows you to view and edit existing Parts. Follow this tutorial to learn how to add a part [Tutorial View / Edit Part](/part-information/part-information-tutorial-view-edit-part).
 ## Add Part
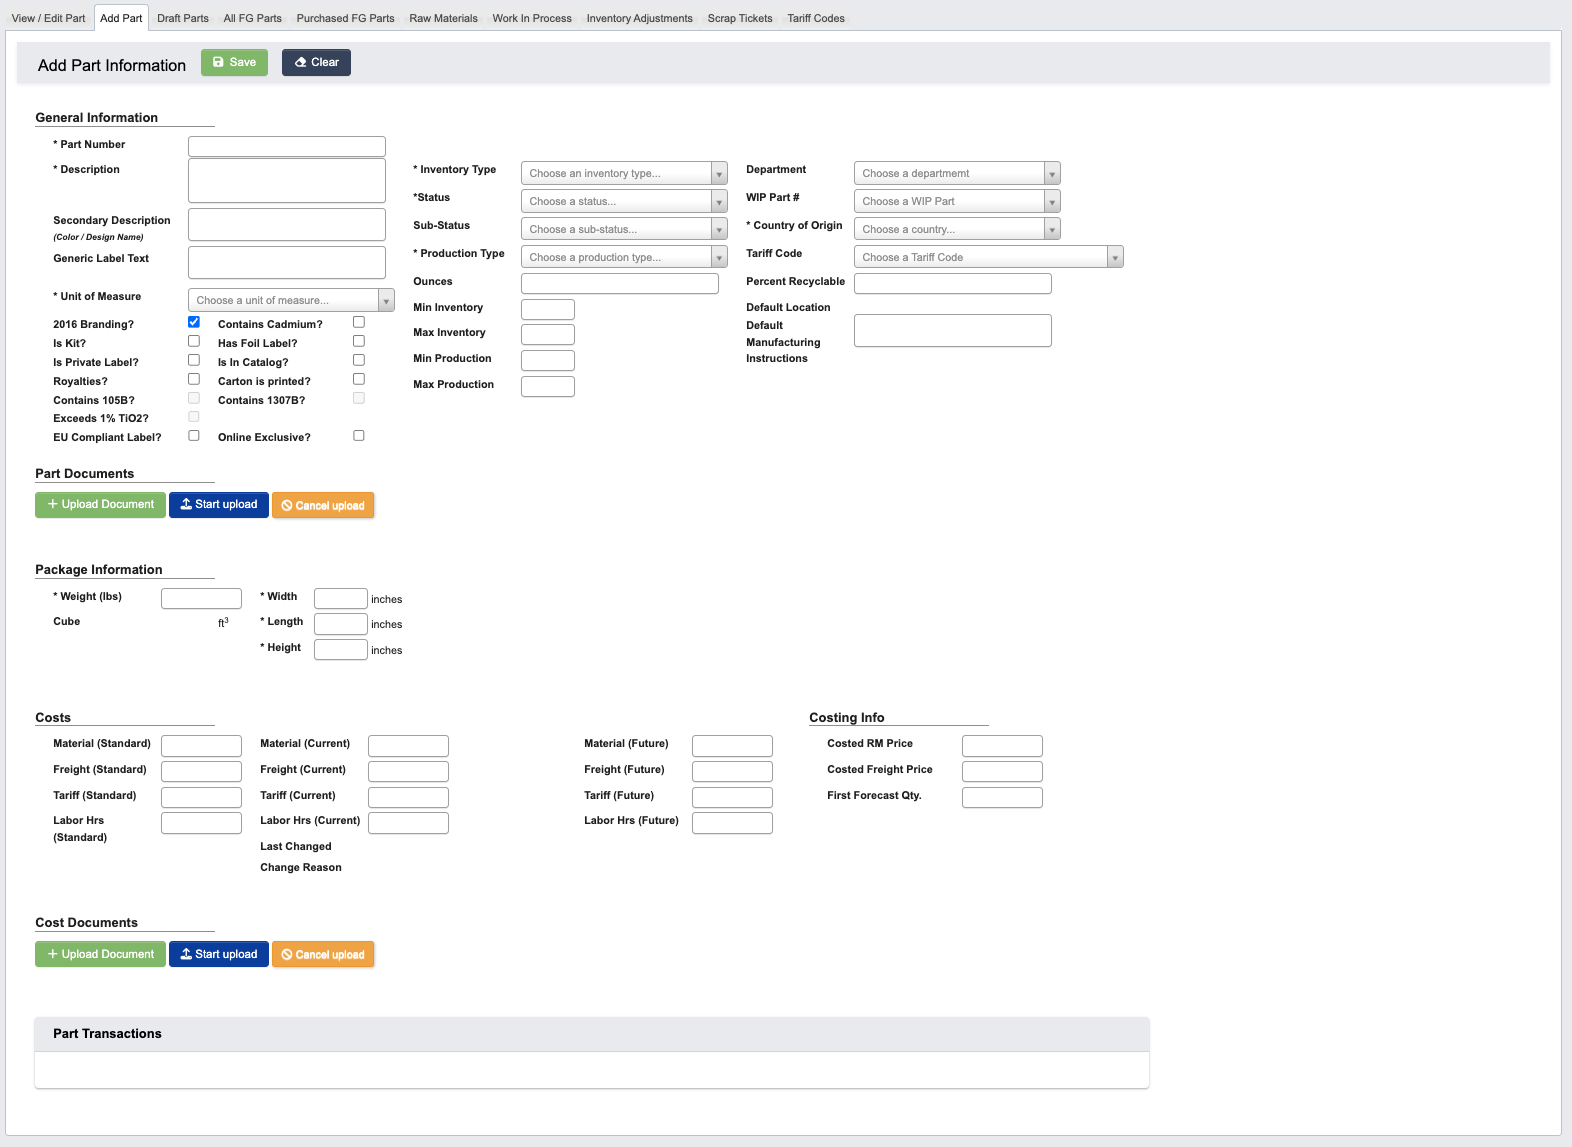
From the Part Information → Manage Parts submodule, click on the `Add Part` tab. This tab is where you add a new part. Follow this tutorial to learn how to add a part [Tutorial: Add a Part](/part-information/part-information-tutorial-add-a-part).
## Add Part
From the Part Information → Manage Parts submodule, click on the `Add Part` tab. This tab is where you add a new part. Follow this tutorial to learn how to add a part [Tutorial: Add a Part](/part-information/part-information-tutorial-add-a-part).
 ## Draft Parts
From the Part Information → Manage Parts submodule, click on the `Draft Parts` tab. This tab shows parts that are in development but not yet active in the system.
## Draft Parts
From the Part Information → Manage Parts submodule, click on the `Draft Parts` tab. This tab shows parts that are in development but not yet active in the system.
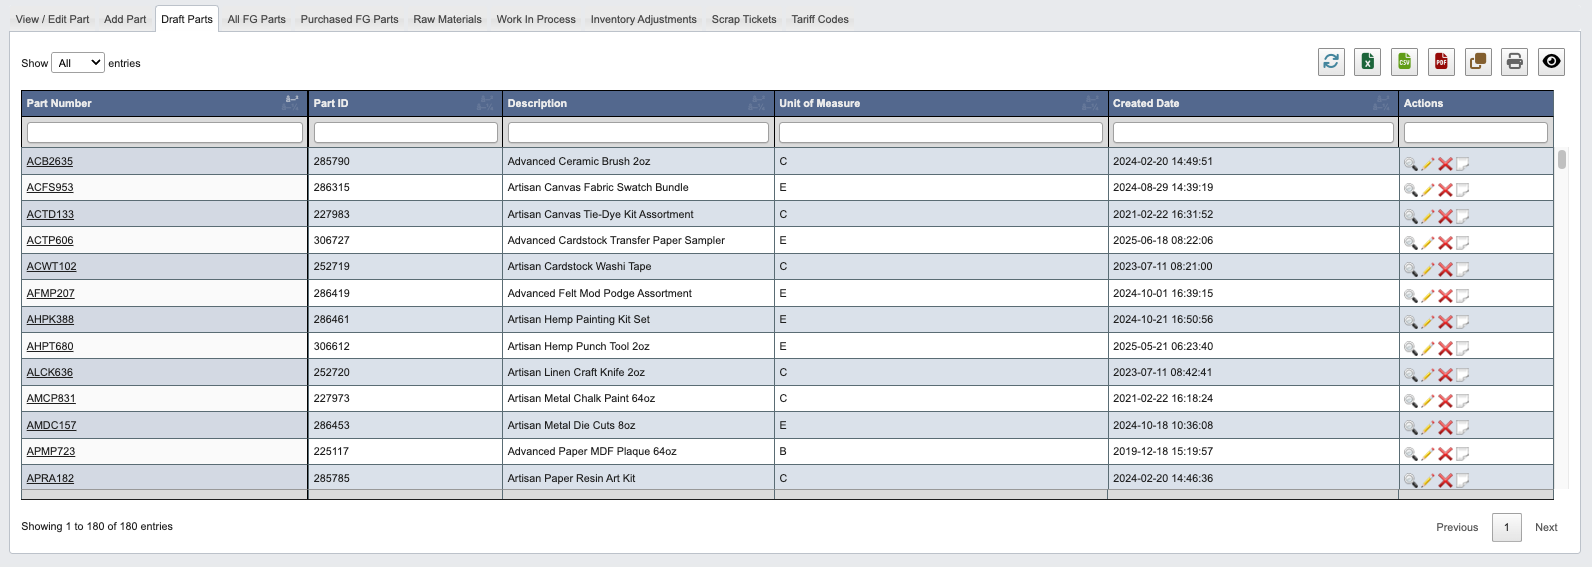 * Click on an attribute heading (such as Part Number) to sort in ascending order. Click again to sort in descending order.
* Click on a Part Number to view or manage the associated part records in the `View / Edit Part` tab.
* Refresh, export, print, or filter data with the toolbar.
### How to edit or delete a draft part
1. Find the the `Actions` column on the left.
2. Click the `View` (magnifying glass icon) to view the draft part in the `View / Edit Part` tab.
3. Click the `Edit` (pencil icon) to make an edit to the draft part in the `View / Edit Part` tab. Learn more about editing a draft part with the [Tutorial View / Edit Part](/part-information/part-information-tutorial-view-edit-part).
4. Click the `Deactivate` (red “x” icon) to deactivate the draft part .
1. `Deactivate Part` to deactivate the draft part.
5. Click the `Note` (paper icon) to add a new to the draft part.
## All FG Parts
From the Part Information → Manage Parts submodule, click on the `All FG Parts` tab. This tab provides a comprehensive view of all finished goods with inventory and costing data.
* Click on an attribute heading (such as Part Number) to sort in ascending order. Click again to sort in descending order.
* Click on a Part Number to view or manage the associated part records in the `View / Edit Part` tab.
* Refresh, export, print, or filter data with the toolbar.
### How to edit or delete a draft part
1. Find the the `Actions` column on the left.
2. Click the `View` (magnifying glass icon) to view the draft part in the `View / Edit Part` tab.
3. Click the `Edit` (pencil icon) to make an edit to the draft part in the `View / Edit Part` tab. Learn more about editing a draft part with the [Tutorial View / Edit Part](/part-information/part-information-tutorial-view-edit-part).
4. Click the `Deactivate` (red “x” icon) to deactivate the draft part .
1. `Deactivate Part` to deactivate the draft part.
5. Click the `Note` (paper icon) to add a new to the draft part.
## All FG Parts
From the Part Information → Manage Parts submodule, click on the `All FG Parts` tab. This tab provides a comprehensive view of all finished goods with inventory and costing data.
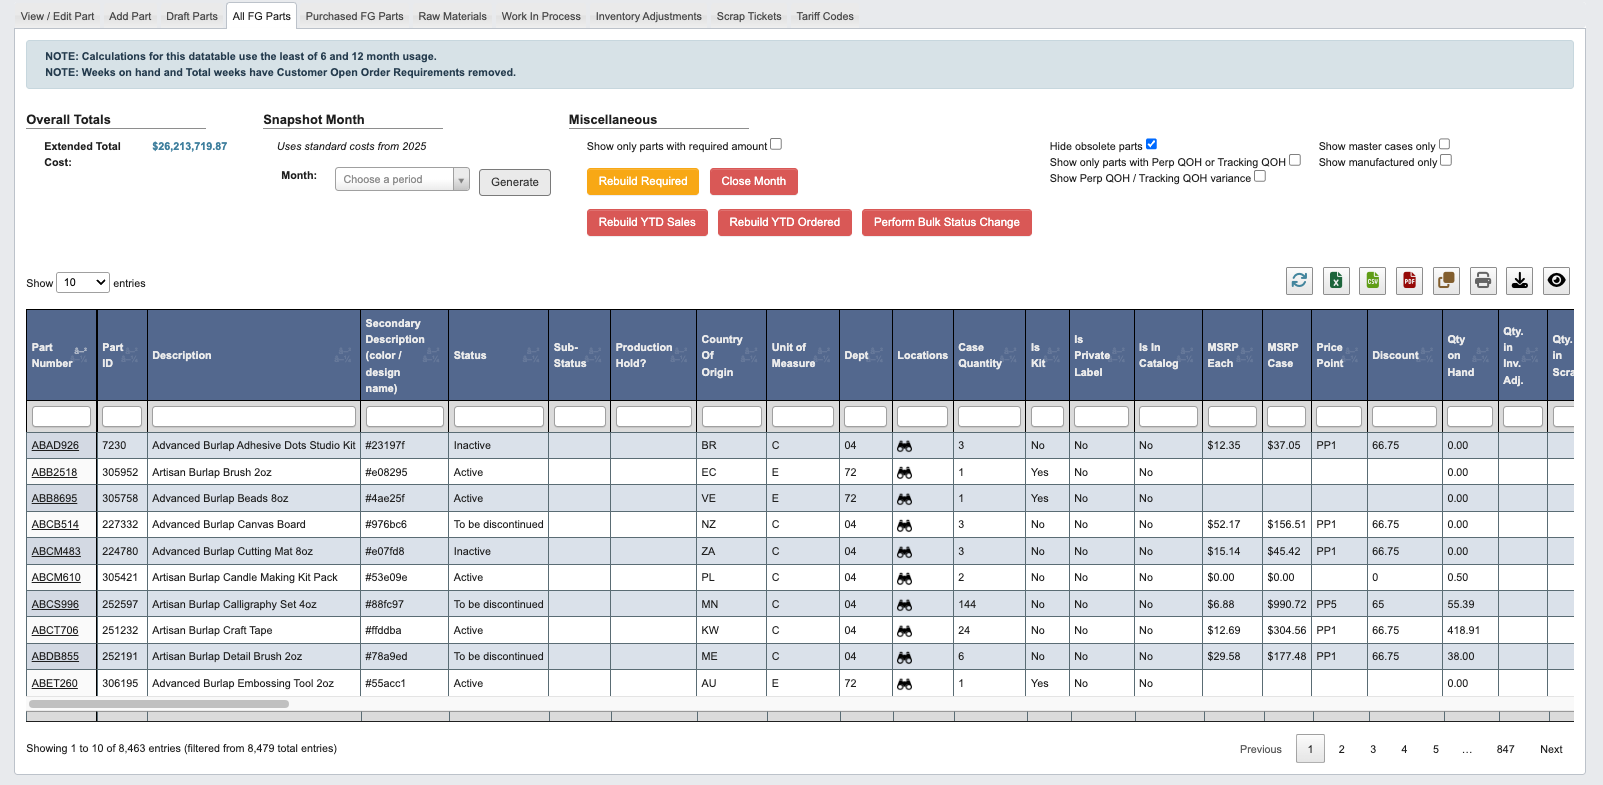 * Calculations for this data table use the least of 6 and 12 month usage.
* Weeks on hand and Total weeks have Customer Open Order Requirements removed.
Within this tab, you can:
* Click on an attribute heading (such as Part Number) to sort in ascending order. Click again to sort in descending order.
* Click on a Part Number to view or manage the associated part records in the `View / Edit Part` tab.
* Refresh, export, print, or filter data with the toolbar.
* View all FG parts and their status.
* View all FG parts extended total cost under Overall Totals.
* Generate monthly snapshot reports.
### Miscellaneous Section
This section provides additional viewing and data management options for parts. See [Manage Parts Reference](/part-information/manage-parts-reference#all-fg-parts-miscellaneous-section) for definitions.
### Generate monthly snapshots
These snapshots uses standard costs from 2025.
1. Select the desired month from the **Snapshot Month** dropdown.
2. Click `Generate` to create the monthly snapshot report.
3. Review the generated data showing all FG part inventory levels and costs for the selected period.
## Purchased FG Parts
From the Part Information → Manage Parts submodule, click on the `Purchased FG Parts` tab. This tab shows finished goods (FG) that are purchased rather than manufactured.
* Calculations for this data table use the least of 6 and 12 month usage.
* Weeks on hand and Total weeks have Customer Open Order Requirements removed.
Within this tab, you can:
* Click on an attribute heading (such as Part Number) to sort in ascending order. Click again to sort in descending order.
* Click on a Part Number to view or manage the associated part records in the `View / Edit Part` tab.
* Refresh, export, print, or filter data with the toolbar.
* View all FG parts and their status.
* View all FG parts extended total cost under Overall Totals.
* Generate monthly snapshot reports.
### Miscellaneous Section
This section provides additional viewing and data management options for parts. See [Manage Parts Reference](/part-information/manage-parts-reference#all-fg-parts-miscellaneous-section) for definitions.
### Generate monthly snapshots
These snapshots uses standard costs from 2025.
1. Select the desired month from the **Snapshot Month** dropdown.
2. Click `Generate` to create the monthly snapshot report.
3. Review the generated data showing all FG part inventory levels and costs for the selected period.
## Purchased FG Parts
From the Part Information → Manage Parts submodule, click on the `Purchased FG Parts` tab. This tab shows finished goods (FG) that are purchased rather than manufactured.
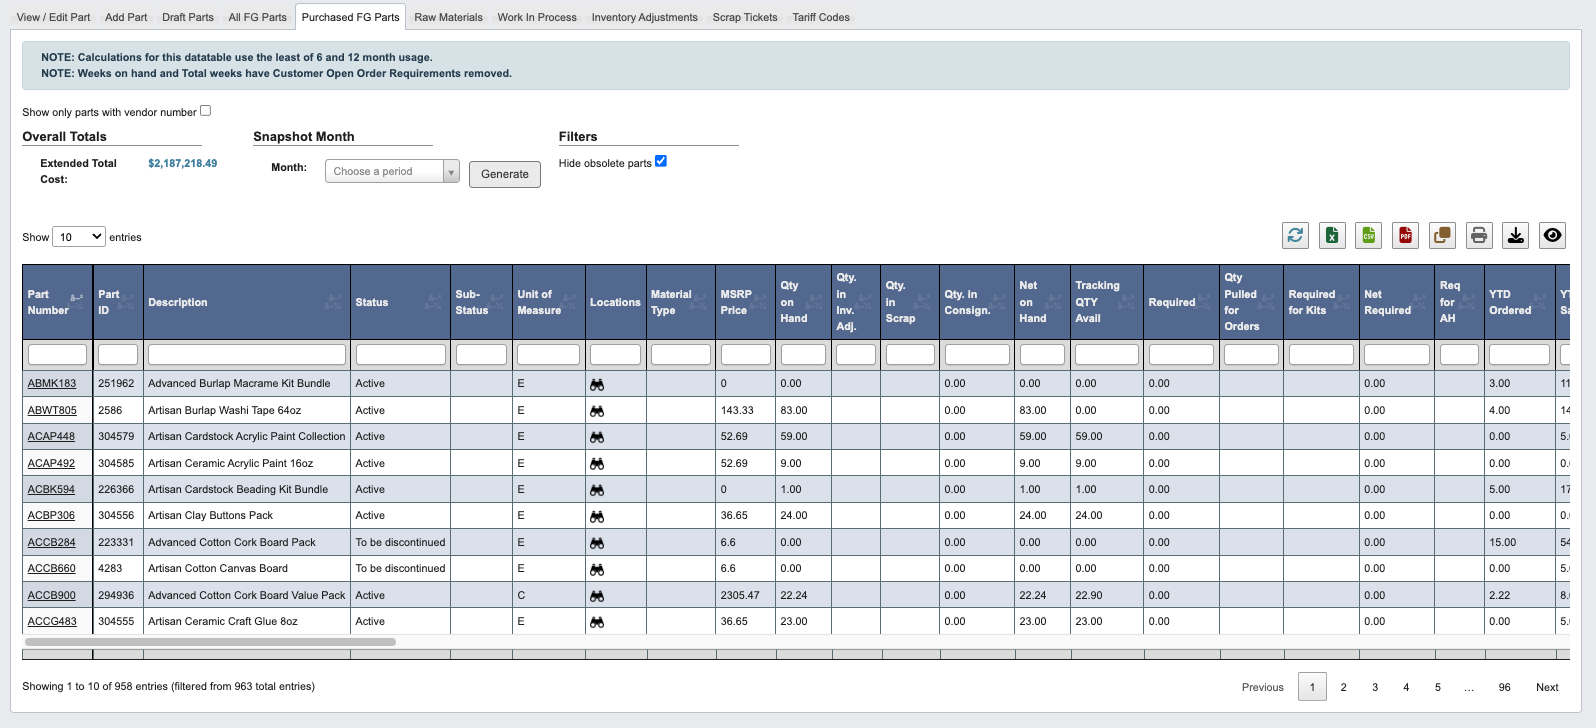 * Calculations for this data table use the least of 6 and 12 month usage.
* Weeks on hand and Total weeks have Customer Open Order Requirements removed.
Within this tab, you can:
* Click on an attribute heading (such as Part Number) to sort in ascending order. Click again to sort in descending order.
* Click on a Part Number to view or manage the associated part records in the `View / Edit Part` tab.
* Refresh, export, print, or filter data with the toolbar.
* View purchased FG and their status.
* View purchased FG extended total cost under Overall Totals.
* Generate monthly snapshot reports.
By default, the table will hide obsolete parts. Uncheck the box to see obsolete parts.
### Generate monthly snapshots
1. Select the desired month from the **Snapshot Month** dropdown.
2. Click `Generate` to create the monthly snapshot report.
3. Review the generated data showing all purchased FG inventory levels and costs for the selected period.
## Raw Materials
From the Part Information → Manage Parts submodule, click on the `Raw Materials` tab. This tab shows raw material parts used in production.
* Calculations for this data table use the least of 6 and 12 month usage.
* Weeks on hand and Total weeks have Customer Open Order Requirements removed.
Within this tab, you can:
* Click on an attribute heading (such as Part Number) to sort in ascending order. Click again to sort in descending order.
* Click on a Part Number to view or manage the associated part records in the `View / Edit Part` tab.
* Refresh, export, print, or filter data with the toolbar.
* View purchased FG and their status.
* View purchased FG extended total cost under Overall Totals.
* Generate monthly snapshot reports.
By default, the table will hide obsolete parts. Uncheck the box to see obsolete parts.
### Generate monthly snapshots
1. Select the desired month from the **Snapshot Month** dropdown.
2. Click `Generate` to create the monthly snapshot report.
3. Review the generated data showing all purchased FG inventory levels and costs for the selected period.
## Raw Materials
From the Part Information → Manage Parts submodule, click on the `Raw Materials` tab. This tab shows raw material parts used in production.
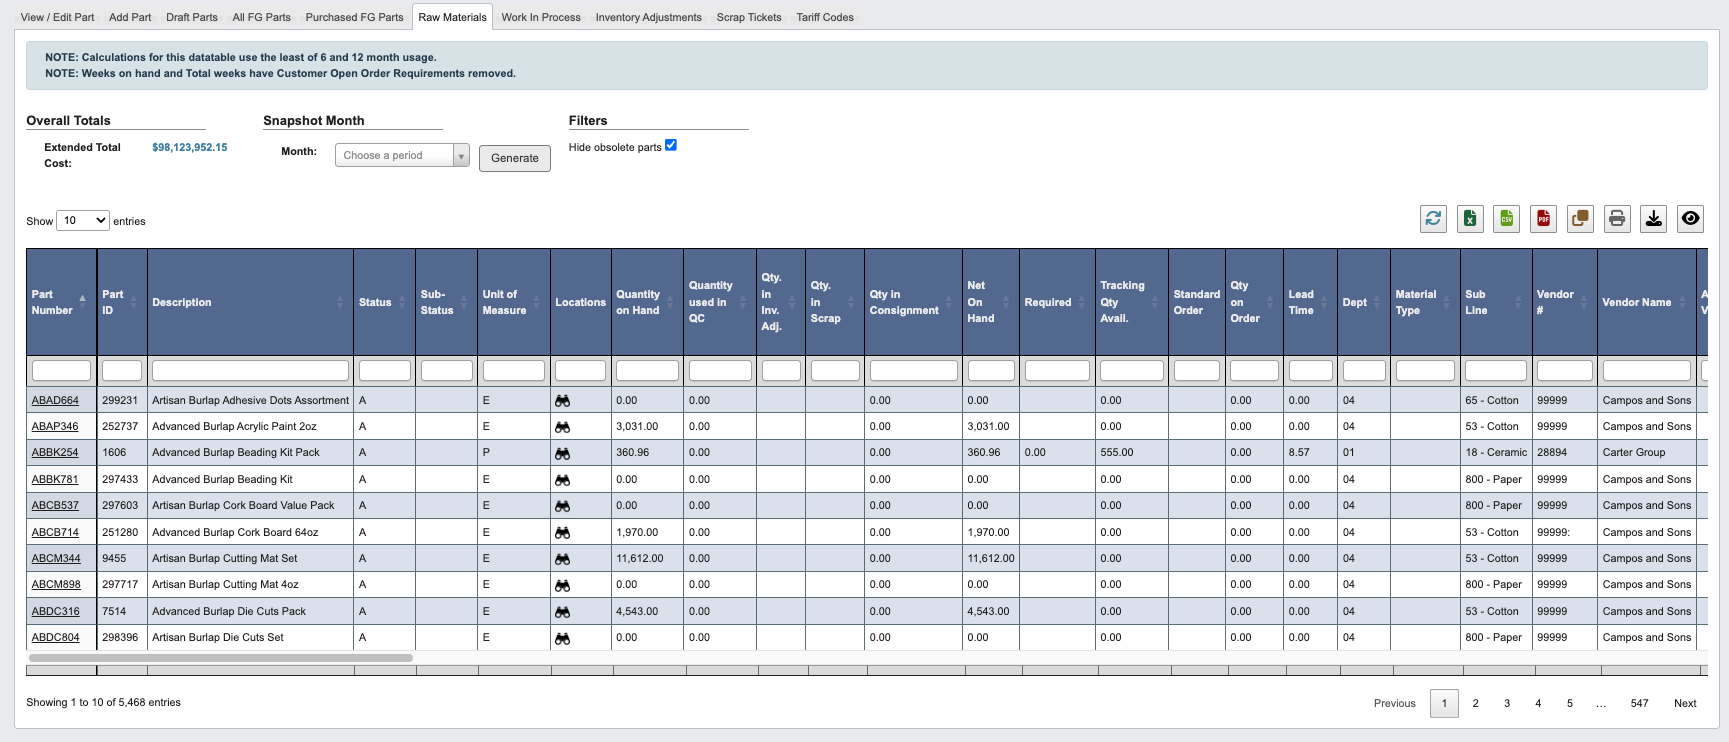 * Calculations for this data table use the least of 6 and 12 month usage.
* Weeks on hand and Total weeks have Customer Open Order Requirements removed.
Within this tab, you can:
* Click on an attribute heading (such as Part Number) to sort in ascending order. Click again to sort in descending order.
* Click on a Part Number to view or manage the associated part records in the `View / Edit Part` tab.
* Refresh, export, print, or filter data with the toolbar.
* View raw materials and their status.
* View raw materials extended total cost under Overall Totals.
* Generate monthly snapshot reports.
By default, the table will hide obsolete parts. Uncheck the box to see obsolete parts.
### Generate monthly snapshots
1. Select the desired month from the **Snapshot Month** dropdown.
2. Click `Generate` to create the monthly snapshot report.
3. Review the generated data showing raw materials inventory levels and costs for the selected period.
## Work In Process
From the Part Information → Manage Parts submodule, click on the `Work In Process` tab. This tab shows Work in Process (WIP) parts used in manufacturing processes.
* Calculations for this data table use the least of 6 and 12 month usage.
* Weeks on hand and Total weeks have Customer Open Order Requirements removed.
Within this tab, you can:
* Click on an attribute heading (such as Part Number) to sort in ascending order. Click again to sort in descending order.
* Click on a Part Number to view or manage the associated part records in the `View / Edit Part` tab.
* Refresh, export, print, or filter data with the toolbar.
* View raw materials and their status.
* View raw materials extended total cost under Overall Totals.
* Generate monthly snapshot reports.
By default, the table will hide obsolete parts. Uncheck the box to see obsolete parts.
### Generate monthly snapshots
1. Select the desired month from the **Snapshot Month** dropdown.
2. Click `Generate` to create the monthly snapshot report.
3. Review the generated data showing raw materials inventory levels and costs for the selected period.
## Work In Process
From the Part Information → Manage Parts submodule, click on the `Work In Process` tab. This tab shows Work in Process (WIP) parts used in manufacturing processes.
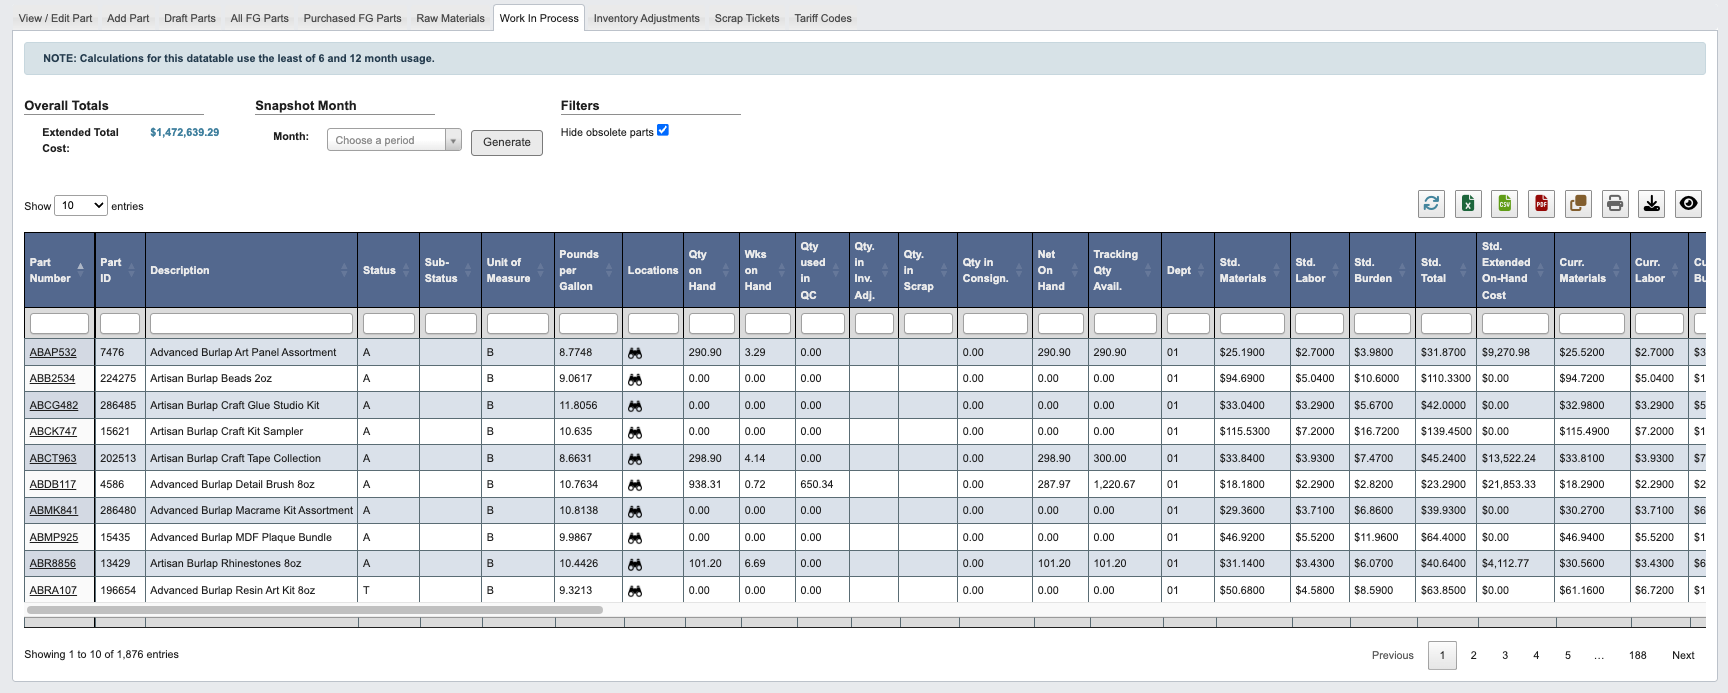 Calculations for this data table use the least of 6 and 12 month usage.
Within this tab, you can:
* Click on an attribute heading (such as Part Number) to sort in ascending order. Click again to sort in descending order.
* Click on a Part Number to view or manage the associated part records in the `View / Edit Part` tab.
* Refresh, export, print, or filter data with the toolbar.
* View WIP items and their status.
* View WIP extended total cost under Overall Totals.
* Generate monthly snapshot reports.
By default, the table will hide obsolete parts. Uncheck the box to see obsolete parts.
### Generate monthly snapshots
1. Select the desired month from the **Snapshot Month** dropdown.
2. Click `Generate` to create the monthly snapshot report.
3. Review the generated data showing WIP inventory levels and costs for the selected period.
## Inventory Adjustments
From the Part Information → Manage Parts submodule, click on the `Inventory Adjustments` tab. This tab allows you to make corrections to inventory quantities when discrepancies are found.
Calculations for this data table use the least of 6 and 12 month usage.
Within this tab, you can:
* Click on an attribute heading (such as Part Number) to sort in ascending order. Click again to sort in descending order.
* Click on a Part Number to view or manage the associated part records in the `View / Edit Part` tab.
* Refresh, export, print, or filter data with the toolbar.
* View WIP items and their status.
* View WIP extended total cost under Overall Totals.
* Generate monthly snapshot reports.
By default, the table will hide obsolete parts. Uncheck the box to see obsolete parts.
### Generate monthly snapshots
1. Select the desired month from the **Snapshot Month** dropdown.
2. Click `Generate` to create the monthly snapshot report.
3. Review the generated data showing WIP inventory levels and costs for the selected period.
## Inventory Adjustments
From the Part Information → Manage Parts submodule, click on the `Inventory Adjustments` tab. This tab allows you to make corrections to inventory quantities when discrepancies are found.
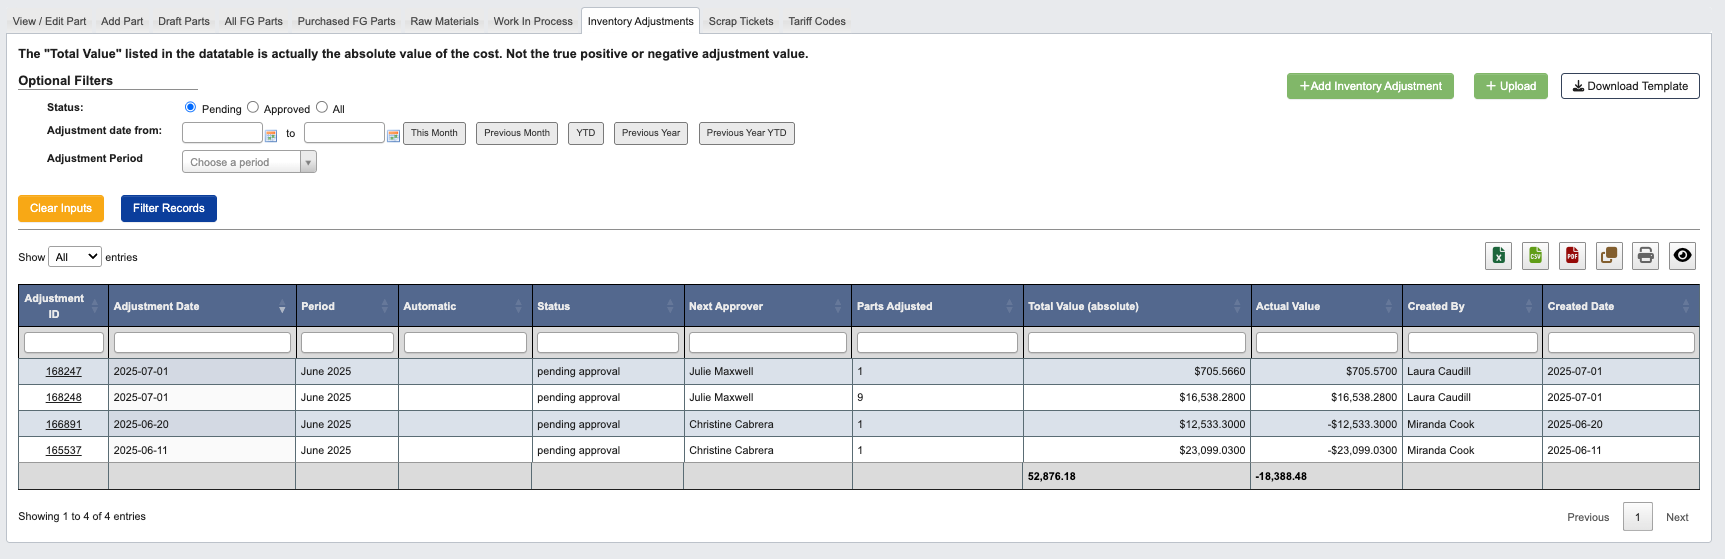 The "Total Value" listed in the data table is actually the absolute value of the cost. Not the true positive or negative adjustment value.
Within this tab, you can:
* Click on an attribute heading (such as Adjustment Date) to sort in ascending order. Click again to sort in descending order.
* Click on an Adjustment ID to review an inventory adjustment and deactivate if needed.
* Refresh, export, print, or filter data with the toolbar.
* Review pending and approved inventory adjustments.
* Create new inventory adjustments for discrepancies. See [Manage Parts Reference](/part-information/manage-parts-reference#add-inventory-adjustment) for steps.
* Upload bulk adjustments using templates. See [Manage Parts Reference](/part-information/manage-parts-reference#upload-inventory-adjustments-in-bulk) for steps.
* Filter adjustments by status and date ranges.
### Optional filters
Use the optional filters at the top of the page to narrow the list of displayed inventory adjustments.
* `Status`: Choose to show scrap tickets by status (Pending (default), Approved, All).
* `Adjustment date from`: Single day or range.
* `Adjustment Period`: Choose a period from the drop down, by month and year.
* Use `Clear Inputs` button to go back to default filters.
* Use `Filter Records` to generate the table using the filters.
**Inventory Adjustment Types:**
Different types of parts require different adjustment methods:
* **Raw Materials**: Use manual inventory adjustments.
* **WIP Parts (Bases)**: Use material handler to remove tracking tags.
* **Finished Goods**: Depends on production method (bottling vs. kits).
## Scrap Tickets
From the Part Information → Manage Parts submodule, click on the `Scrap Tickets` tab. This tab shows the scrap tickets for damaged or unusable materials.
The "Total Value" listed in the data table is actually the absolute value of the cost. Not the true positive or negative adjustment value.
Within this tab, you can:
* Click on an attribute heading (such as Adjustment Date) to sort in ascending order. Click again to sort in descending order.
* Click on an Adjustment ID to review an inventory adjustment and deactivate if needed.
* Refresh, export, print, or filter data with the toolbar.
* Review pending and approved inventory adjustments.
* Create new inventory adjustments for discrepancies. See [Manage Parts Reference](/part-information/manage-parts-reference#add-inventory-adjustment) for steps.
* Upload bulk adjustments using templates. See [Manage Parts Reference](/part-information/manage-parts-reference#upload-inventory-adjustments-in-bulk) for steps.
* Filter adjustments by status and date ranges.
### Optional filters
Use the optional filters at the top of the page to narrow the list of displayed inventory adjustments.
* `Status`: Choose to show scrap tickets by status (Pending (default), Approved, All).
* `Adjustment date from`: Single day or range.
* `Adjustment Period`: Choose a period from the drop down, by month and year.
* Use `Clear Inputs` button to go back to default filters.
* Use `Filter Records` to generate the table using the filters.
**Inventory Adjustment Types:**
Different types of parts require different adjustment methods:
* **Raw Materials**: Use manual inventory adjustments.
* **WIP Parts (Bases)**: Use material handler to remove tracking tags.
* **Finished Goods**: Depends on production method (bottling vs. kits).
## Scrap Tickets
From the Part Information → Manage Parts submodule, click on the `Scrap Tickets` tab. This tab shows the scrap tickets for damaged or unusable materials.
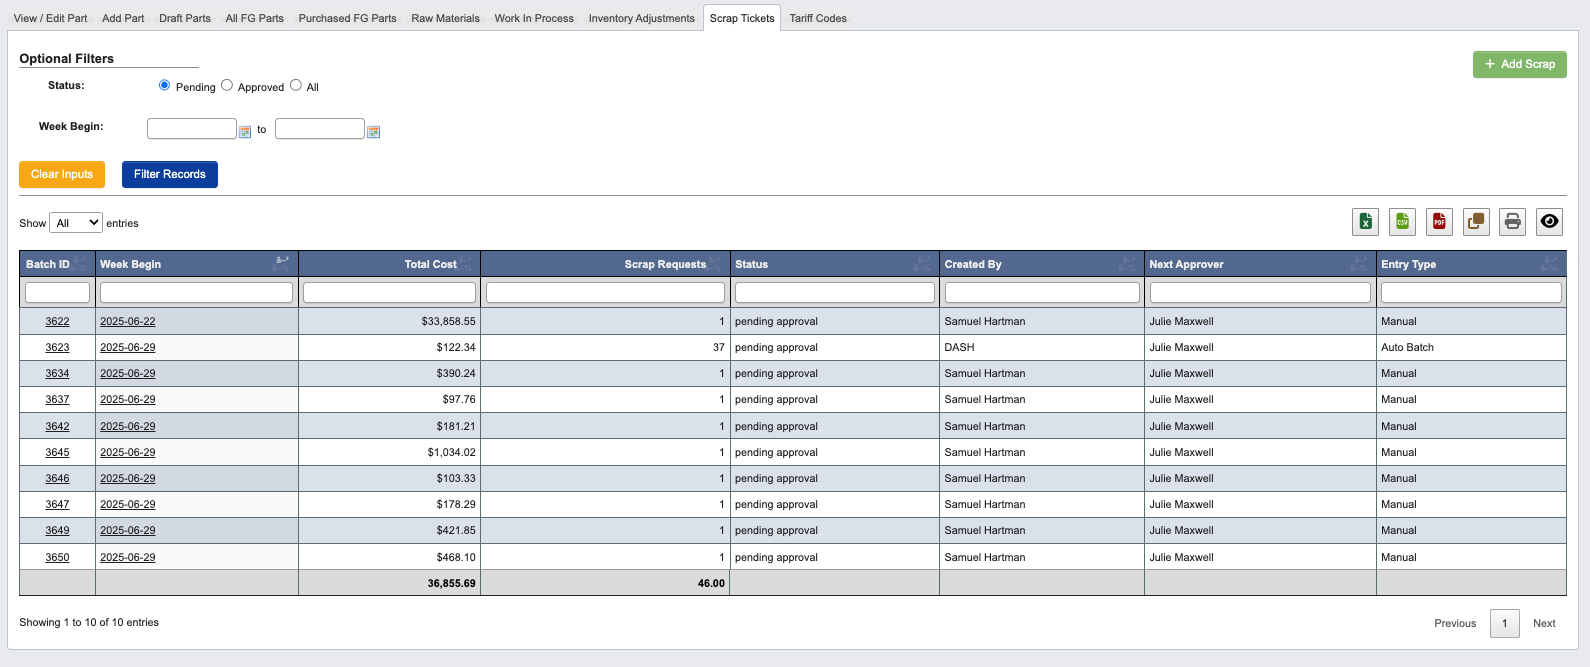 Within this tab, you can:
* Click on an attribute heading (such as Week Begin) to sort in ascending order. Click again to sort in descending order.
* Click on a Batch ID or Week Begin Date to review scrap tickets and approve if needed.
* Refresh, export, print, or filter data with the toolbar.
* Create new scrap tickets for damaged materials. See [Manage Parts Reference](/part-information/manage-parts-reference#add-scrap) for steps.
* Filter tickets by status and date ranges.
### Optional filters
Use the optional filters at the top of the page to narrow the list of displayed scrap tickets.
* `Status`: Choose to show scrap tickets by status (Pending (default), Approved, All).
* `Week Begin`: Single day or range.
* Use `Clear Inputs` button to go back to default filters.
* Use `Filter Records` to generate the table using the filters.
## Tariff Codes
From the Part Information → Manage Parts submodule, click on the `Tariff Codes` tab. This tab shows tariff classification codes for international shipping.
Within this tab, you can:
* Click on an attribute heading (such as Week Begin) to sort in ascending order. Click again to sort in descending order.
* Click on a Batch ID or Week Begin Date to review scrap tickets and approve if needed.
* Refresh, export, print, or filter data with the toolbar.
* Create new scrap tickets for damaged materials. See [Manage Parts Reference](/part-information/manage-parts-reference#add-scrap) for steps.
* Filter tickets by status and date ranges.
### Optional filters
Use the optional filters at the top of the page to narrow the list of displayed scrap tickets.
* `Status`: Choose to show scrap tickets by status (Pending (default), Approved, All).
* `Week Begin`: Single day or range.
* Use `Clear Inputs` button to go back to default filters.
* Use `Filter Records` to generate the table using the filters.
## Tariff Codes
From the Part Information → Manage Parts submodule, click on the `Tariff Codes` tab. This tab shows tariff classification codes for international shipping.
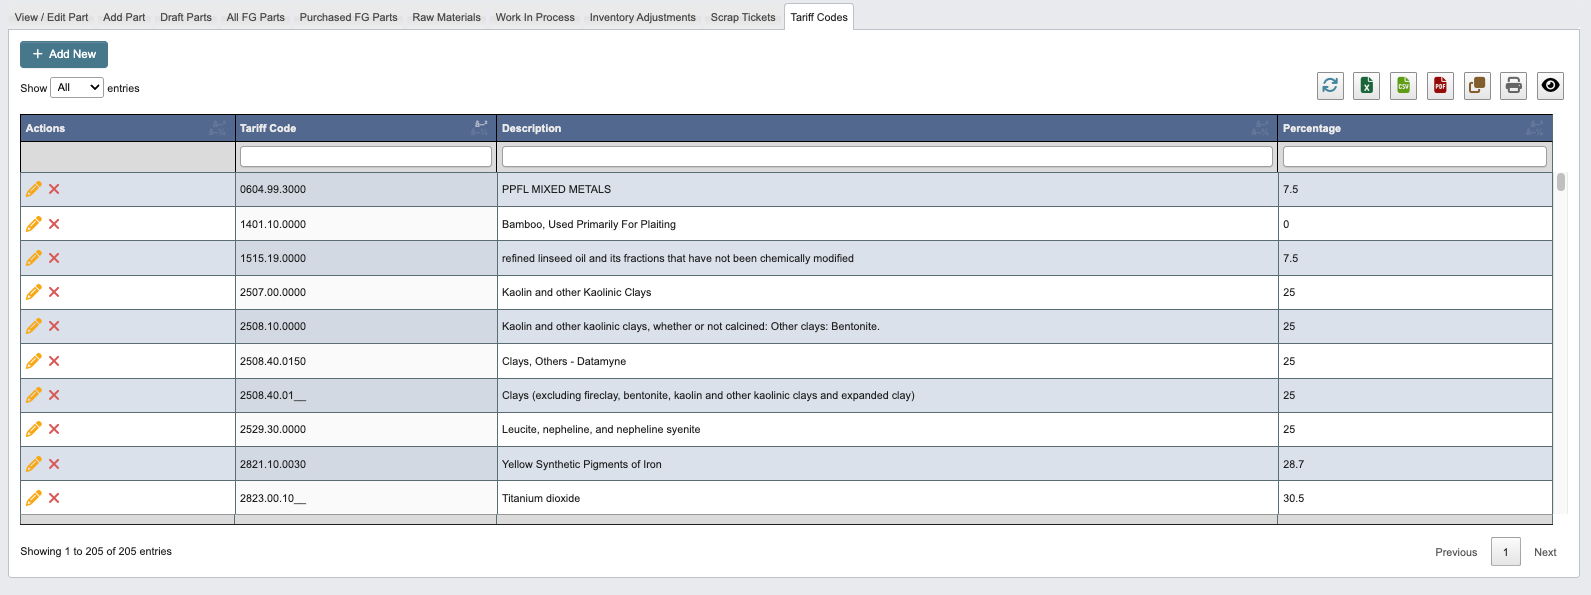 With in this tab, you can:
* Click on an attribute heading (such as Tariff Code) to sort in ascending order. Click again to sort in descending order.
* Review tariff codes, descriptions of codes and tariff code percentages.
* Refresh, export, print, or filter data with the toolbar.
* Edit or delete a tariff code. See [Manage Parts Reference](/part-information/manage-parts-reference#how-to-edit-or-delete-a-tariff-code) for steps.
* Add a tariff code. See [Manage Parts Reference](/part-information/manage-parts-reference#add-tariff-code) for steps.
With in this tab, you can:
* Click on an attribute heading (such as Tariff Code) to sort in ascending order. Click again to sort in descending order.
* Review tariff codes, descriptions of codes and tariff code percentages.
* Refresh, export, print, or filter data with the toolbar.
* Edit or delete a tariff code. See [Manage Parts Reference](/part-information/manage-parts-reference#how-to-edit-or-delete-a-tariff-code) for steps.
* Add a tariff code. See [Manage Parts Reference](/part-information/manage-parts-reference#add-tariff-code) for steps.