> ## Documentation Index
> Fetch the complete documentation index at: https://docs.decoart.com/llms.txt
> Use this file to discover all available pages before exploring further.
# Part Information - Tutorial: View / Edit Part
## Overview
This tutorial helps you view and edit existing parts in the DASH **Part Information → Manage Parts** submodule.
Viewing a part allows you to review existing parts, check costs, shipping information. Editing parts enables you to modify parts and update specifications.
Use this tutorial when you need to review existing parts or edit part information.
## View a Part
1. From the Parts Information → Manage Parts submodule, click on the `View / Edit Part` tab.
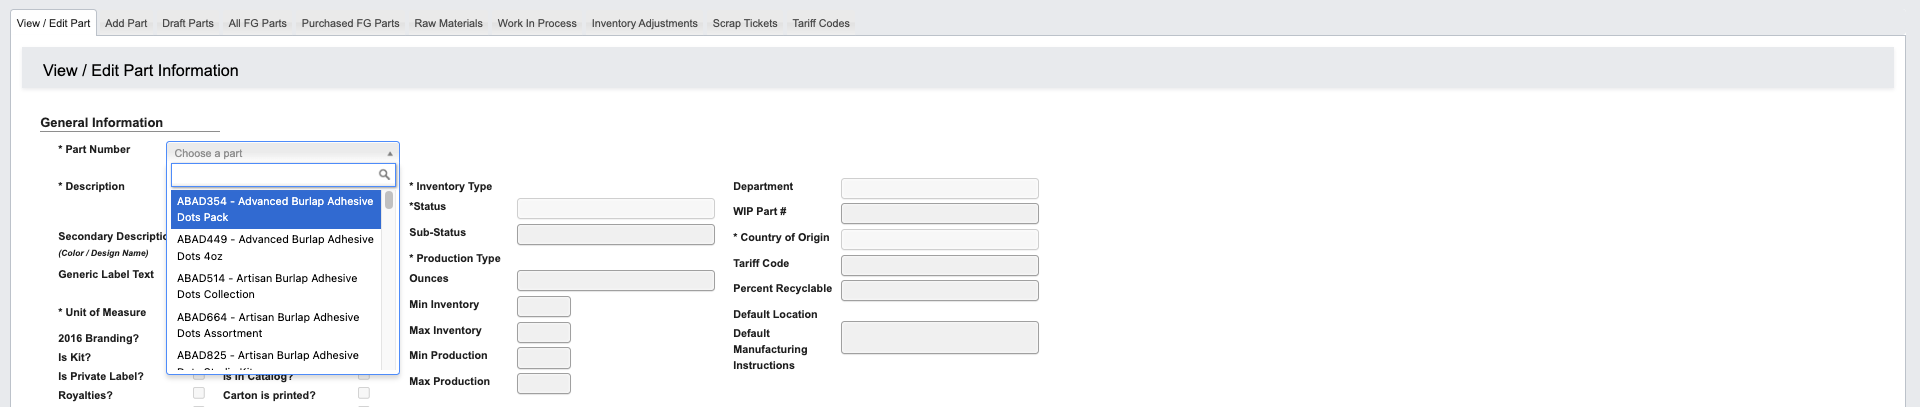
 2. Click the dropdown menu next to the `Part Number` field.
3. Enter the `Part Number`, then click to select it.
2. Click the dropdown menu next to the `Part Number` field.
3. Enter the `Part Number`, then click to select it.
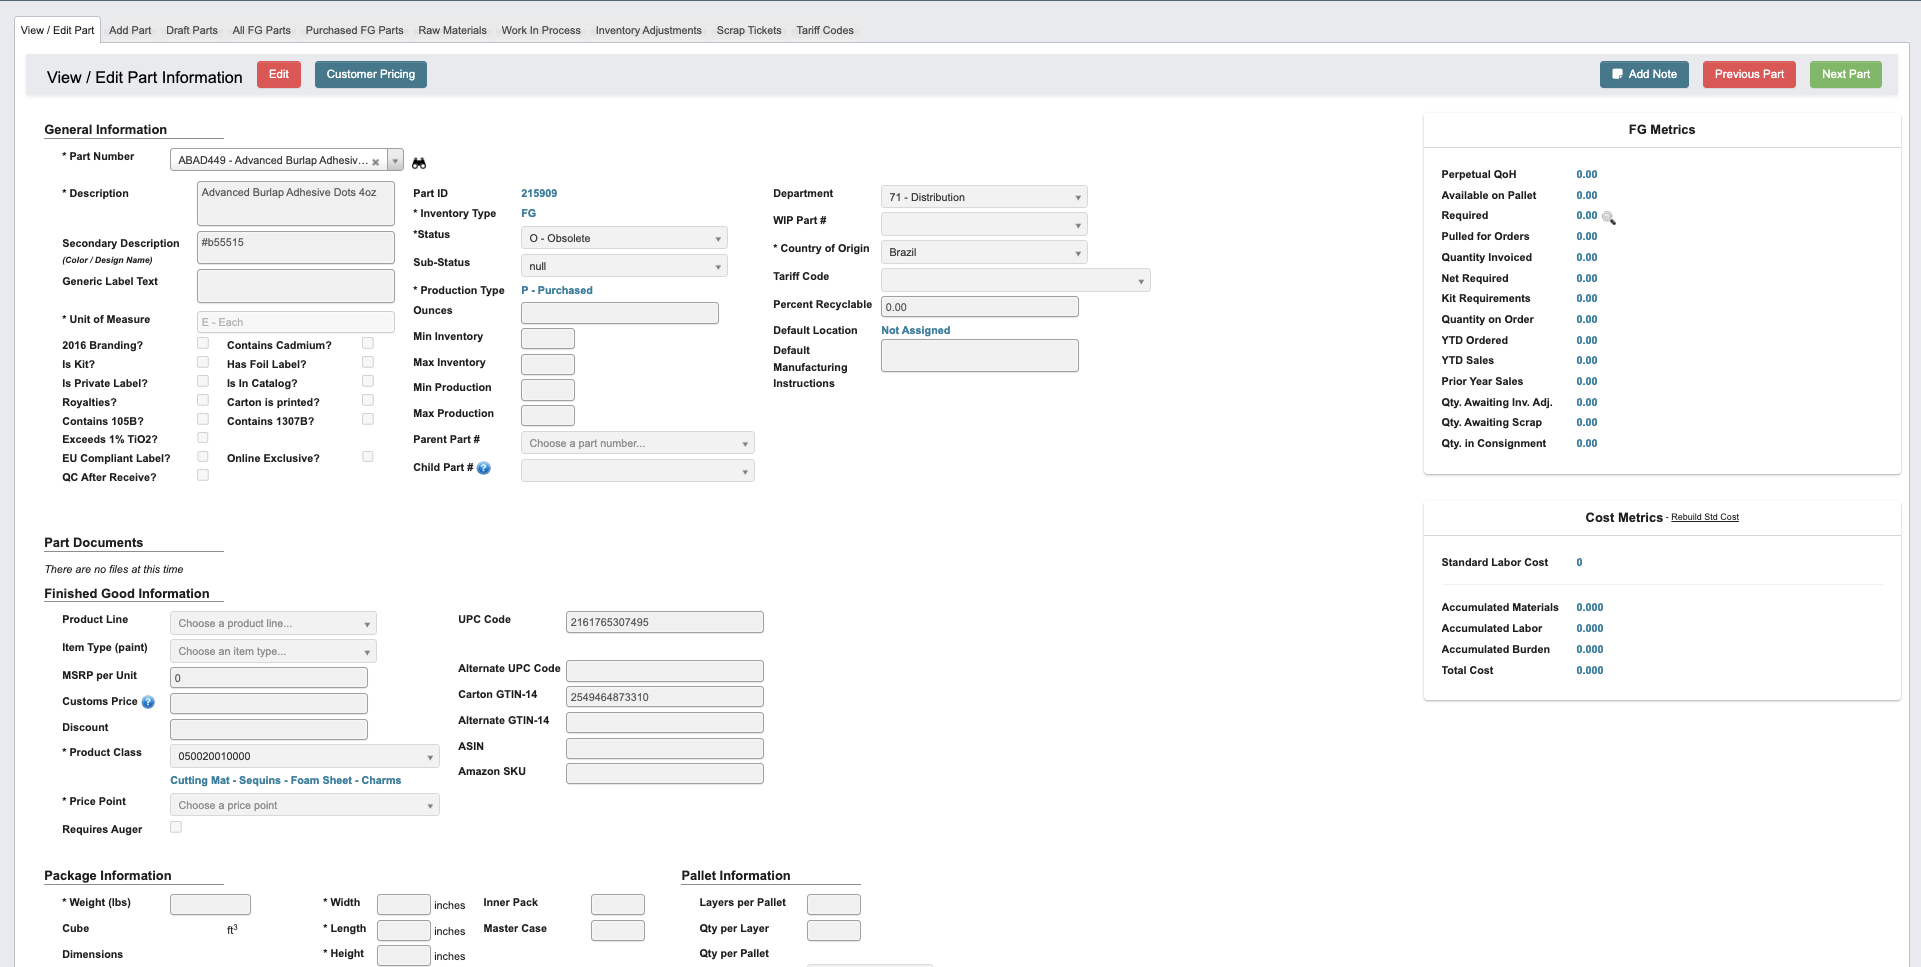
 4. You can now view the Part details across multiple sections. Each section contains specific information about the Part. For detailed field definitions and comprehensive information about each section, refer to the [View / Edit / Add Part Information Reference](/part-information/view-edit-add-part-reference).
 ## Edit a Part
1. Click `Edit` in the toolbar to update or add information to the Part. When you enter `Edit` mode, the toolbar buttons will change (see details below).
2. The `View / Edit Part` tab includes the same sections as `Add Part`. For detailed field definitions, refer to the [View / Edit / Add Part Information Reference](/part-information/view-edit-add-part-reference).
3. After a Part has been created, additional sections become available in `Edit` mode. This included the following editable sections:
* `Material Requirements (MRP System)` (Manufactured only): Defines materials management details for manufactured parts. See details below.
* `Artist's Information`: Contains technical and label properties for paint products. See details below.
* `Approved Substitutions`: Lists alternative parts that can be used in place of the primary one. See details below.
4. To attach relevant documents, use the `Part Documents` or `Cost Documents` sections:
* Click `+ Upload Document` under “Files” to open a file browser and select the document you want to attach.
* Click `Start upload` to begin uploading.
* Click `Cancel upload` if you need to cancel the upload.
5. Make any necessary edits to the form fields. For help understanding specific fields, see the [View / Edit / Add Part Information Reference](/part-information/view-edit-add-part-reference) page.
6. When finished, click `Save` at the top of the page.
### Edit Toolbar Buttons
## Edit a Part
1. Click `Edit` in the toolbar to update or add information to the Part. When you enter `Edit` mode, the toolbar buttons will change (see details below).
2. The `View / Edit Part` tab includes the same sections as `Add Part`. For detailed field definitions, refer to the [View / Edit / Add Part Information Reference](/part-information/view-edit-add-part-reference).
3. After a Part has been created, additional sections become available in `Edit` mode. This included the following editable sections:
* `Material Requirements (MRP System)` (Manufactured only): Defines materials management details for manufactured parts. See details below.
* `Artist's Information`: Contains technical and label properties for paint products. See details below.
* `Approved Substitutions`: Lists alternative parts that can be used in place of the primary one. See details below.
4. To attach relevant documents, use the `Part Documents` or `Cost Documents` sections:
* Click `+ Upload Document` under “Files” to open a file browser and select the document you want to attach.
* Click `Start upload` to begin uploading.
* Click `Cancel upload` if you need to cancel the upload.
5. Make any necessary edits to the form fields. For help understanding specific fields, see the [View / Edit / Add Part Information Reference](/part-information/view-edit-add-part-reference) page.
6. When finished, click `Save` at the top of the page.
### Edit Toolbar Buttons
 * `Cancel Editing`: Cancel editing.
* `Save`: Save the changes to the Part.
* `Clear`: Clear all information from the Part.
* `Delete Part`: Delete the Part.
* `Customer Pricing`: View pricing by customer.
* `Conformity Certificate`: Generate compliance certificates based on toxicology reports and regulatory requirements. These certificates can be sent to customer when requested or required.
* `Add Note`: Attach a note to the Part. You can optionally choose an expiration date for the note.
* `Note Type` (Required): Choose from Purchasing, Production, or General.
* `Content` (Required): Field for note text.
* `Previous Part`: Navigate to the previous Part by Part Number sequence.
* `Next Part`: Navigate to the next Part by Part Number sequence.
### Material Requirements (MRP System)
(Manufactured Only): The Materials Requirements Planning (MRP) system manages the component breakdown for manufactured parts. See more below.
This section defines all raw materials and sub-components that go into making the finished part, including paint, bottles, lids, labels, shrink sleeves, shrink wrap, master cartons, and any special labeling requirements.
* `Cancel Editing`: Cancel editing.
* `Save`: Save the changes to the Part.
* `Clear`: Clear all information from the Part.
* `Delete Part`: Delete the Part.
* `Customer Pricing`: View pricing by customer.
* `Conformity Certificate`: Generate compliance certificates based on toxicology reports and regulatory requirements. These certificates can be sent to customer when requested or required.
* `Add Note`: Attach a note to the Part. You can optionally choose an expiration date for the note.
* `Note Type` (Required): Choose from Purchasing, Production, or General.
* `Content` (Required): Field for note text.
* `Previous Part`: Navigate to the previous Part by Part Number sequence.
* `Next Part`: Navigate to the next Part by Part Number sequence.
### Material Requirements (MRP System)
(Manufactured Only): The Materials Requirements Planning (MRP) system manages the component breakdown for manufactured parts. See more below.
This section defines all raw materials and sub-components that go into making the finished part, including paint, bottles, lids, labels, shrink sleeves, shrink wrap, master cartons, and any special labeling requirements.
 #### Edit the MRP System
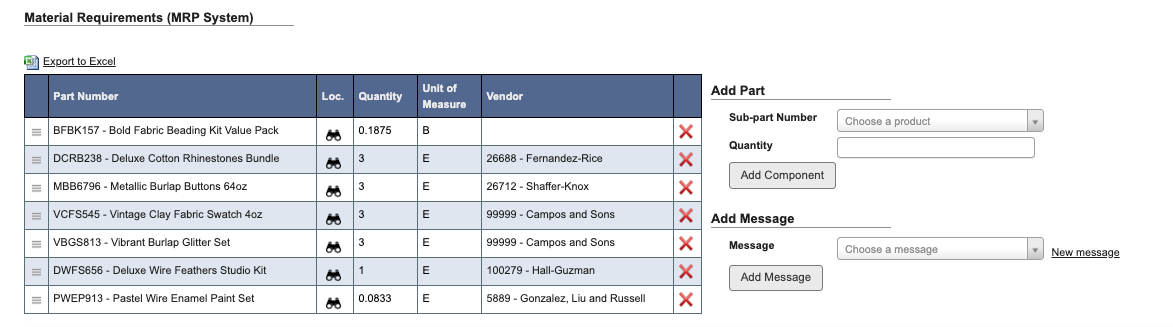 1. While in `Edit` view, you can add a part or a message to the MRP System. This allows you to link sub-parts and specify quantities or add planning notes or special instructions for production users.
2. Under `Add a Part`, fill in the following fields:
1. `Sub-part number`: Type two letters to search for and select a sub-part number.
2. `Quantity`: Enter the required quantity of the sub-part.
3. Click the `Add Component` button to add the component to the MRP System.
4. Under `Add Message`, choose a message from the drop down.
1. If you want to create a new message, click the `New message` link.
2. Enter the message in the pop-up window and click `YES, add message` when complete or `Cancel` to go back to the previous window.
5. Click the `Add Message` button to add the message to the MRP System.
6. To delete a part from the MRP System, click the delete button (red “X”) at the end of the row. The confirm with `YES, delete component` or `NO, close window` to return to the previous window.
## Artist’s Information
Label information, including technical properties like light fastness, opacity, and sheen that artists need to know.
1. While in `Edit` view, you can add a part or a message to the MRP System. This allows you to link sub-parts and specify quantities or add planning notes or special instructions for production users.
2. Under `Add a Part`, fill in the following fields:
1. `Sub-part number`: Type two letters to search for and select a sub-part number.
2. `Quantity`: Enter the required quantity of the sub-part.
3. Click the `Add Component` button to add the component to the MRP System.
4. Under `Add Message`, choose a message from the drop down.
1. If you want to create a new message, click the `New message` link.
2. Enter the message in the pop-up window and click `YES, add message` when complete or `Cancel` to go back to the previous window.
5. Click the `Add Message` button to add the message to the MRP System.
6. To delete a part from the MRP System, click the delete button (red “X”) at the end of the row. The confirm with `YES, delete component` or `NO, close window` to return to the previous window.
## Artist’s Information
Label information, including technical properties like light fastness, opacity, and sheen that artists need to know.
 ### Add Artist’s Information
 1. In the `Edit` view, enter the artist information.
1. `Color Name`: Name of the color as it will appear on labels.
2. `Hex Code`: The digital color value (e.g., #E34234) representing the color.
3. `Lightfastness`: The color’s resistance to fading or changing when exposed to light over time.
4. `Color Family`: The general hue or category the color belongs to.
5. `Opacity`: Describes how transparent or opaque the paint or pigment appears when applied.
6. `Sheen`: Indicates the surface finish or gloss level of the product once dry.
2. Click `Save` at the top the `View / Edit` tab.
## Approved Substitutions
Lists approved alternative parts that can be substituted for this Part when needed, including substitution rules and conditions.
1. In the `Edit` view, enter the artist information.
1. `Color Name`: Name of the color as it will appear on labels.
2. `Hex Code`: The digital color value (e.g., #E34234) representing the color.
3. `Lightfastness`: The color’s resistance to fading or changing when exposed to light over time.
4. `Color Family`: The general hue or category the color belongs to.
5. `Opacity`: Describes how transparent or opaque the paint or pigment appears when applied.
6. `Sheen`: Indicates the surface finish or gloss level of the product once dry.
2. Click `Save` at the top the `View / Edit` tab.
## Approved Substitutions
Lists approved alternative parts that can be substituted for this Part when needed, including substitution rules and conditions.
 ### Add a Substitution
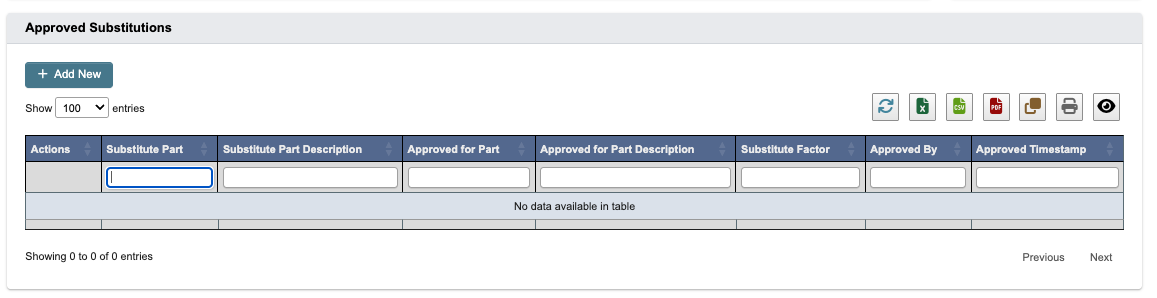 1. Click `+ Add New` button.
2. Fill in the required and optional fields in the form.
3. Click `Save` to confirm, or `Cancel` to exit without saving.
1. Click `+ Add New` button.
2. Fill in the required and optional fields in the form.
3. Click `Save` to confirm, or `Cancel` to exit without saving.