> ## Documentation Index
> Fetch the complete documentation index at: https://docs.decoart.com/llms.txt
> Use this file to discover all available pages before exploring further.
# Production Tracking - Tutorial: Production Capture
## Overview
This tutorial explains how to use the **Production Tracking → Bottling Jobs → Production Capture** interface for recording daily production activities. Production line workers use this system to log their work, track materials, and maintain production records. The production capture interface ensures accurate tracking of labor, materials, and production output for quality control and inventory management.
Use this tutorial when you need to:
* Start a new production shift and log employee information
* Set up a bottling job for production
* Record production activities and track time
* Handle downtime periods during production
* Perform line changeovers between different products
For detailed field definitions and interface reference information, see the [Production Capture Reference](/production-tracking/production-capture-reference).
## When to Use Production Capture
Various production roles use this interface throughout their shifts:
* **Production Line Operators**: Log into shifts, set up bottling jobs, and track production progress
* **Packers**: Record their participation in production activities
* **Line Supervisors**: Monitor production activities and handle changeovers
* **Quality Control**: Review production records for traceability and compliance
## Record Production Activities
 ### Step 1: Set Up Employee Information
1. Go to **Production Tracking → Bottling Jobs → Production Capture**.
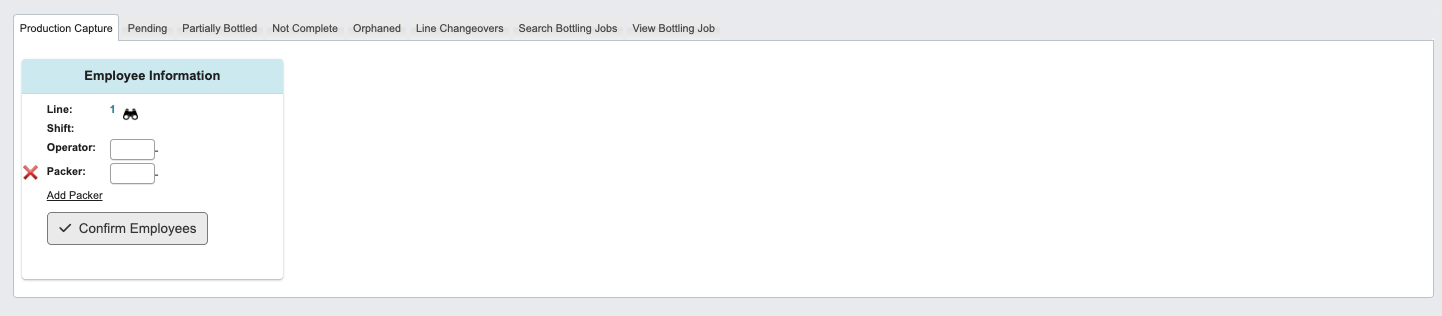
2. Complete the **Employee Information Card** by entering employee details:
* `Operator`: Enter the employee ID number for the operator.
* `Packer`: Enter the employee ID number for the packer.
* Click `Add Packer` to include additional packers if needed.
* Click the `Remove Packer` (red "x") button to remove packers.
3. Click `Confirm Employees` to proceed to the next step.
Use the binoculars icon next to the `Line` field to view available inventory at your production line location. This shows what pallets are currently available for production.
## Step 2: Configure Bottling Job
### Step 1: Set Up Employee Information
1. Go to **Production Tracking → Bottling Jobs → Production Capture**.
2. Complete the **Employee Information Card** by entering employee details:
* `Operator`: Enter the employee ID number for the operator.
* `Packer`: Enter the employee ID number for the packer.
* Click `Add Packer` to include additional packers if needed.
* Click the `Remove Packer` (red "x") button to remove packers.
3. Click `Confirm Employees` to proceed to the next step.
Use the binoculars icon next to the `Line` field to view available inventory at your production line location. This shows what pallets are currently available for production.
## Step 2: Configure Bottling Job
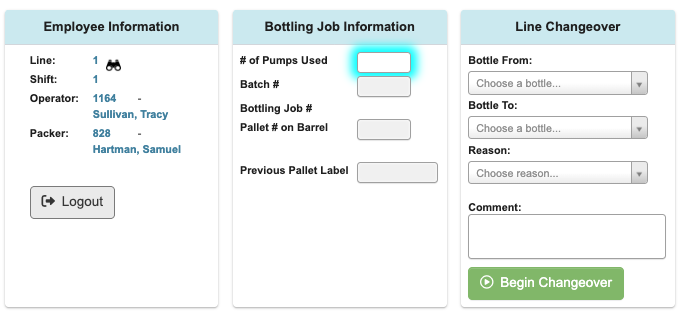 1. After confirming employees, the **Employee Information Card** will display a `Logout` button (use this to end your production tracking session).
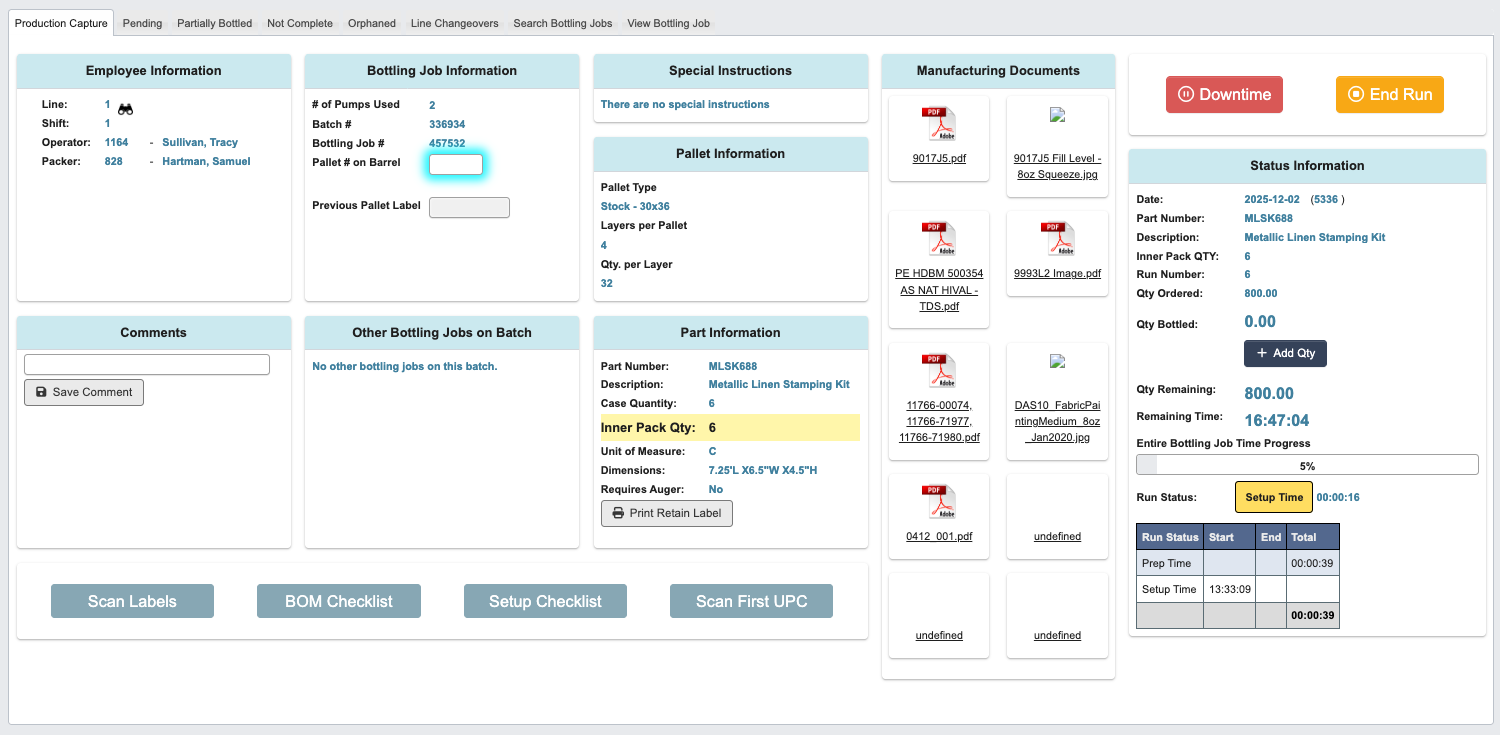
2. Complete the **Bottling Job Information Card** following the highlighted boxes.
* `# of Pumps Used`: Enter the number of pumps for this bottling job.
* `Batch #`: Enter the batch number from your production schedule.
3. After entering a `Batch #`, a popup will display available bottling jobs. Click the appropriate job card to select it. This will fill in `Bottling Job #`.
1. After confirming employees, the **Employee Information Card** will display a `Logout` button (use this to end your production tracking session).
2. Complete the **Bottling Job Information Card** following the highlighted boxes.
* `# of Pumps Used`: Enter the number of pumps for this bottling job.
* `Batch #`: Enter the batch number from your production schedule.
3. After entering a `Batch #`, a popup will display available bottling jobs. Click the appropriate job card to select it. This will fill in `Bottling Job #`.
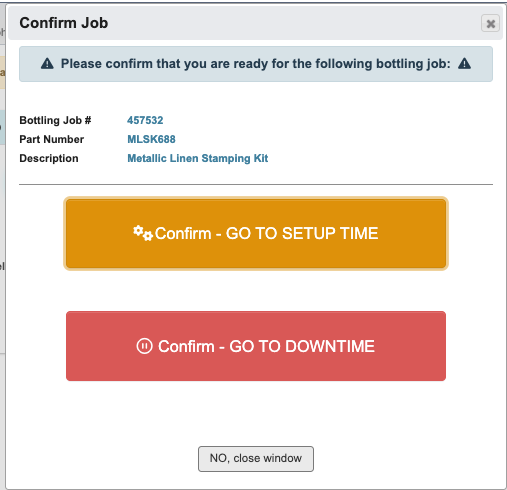
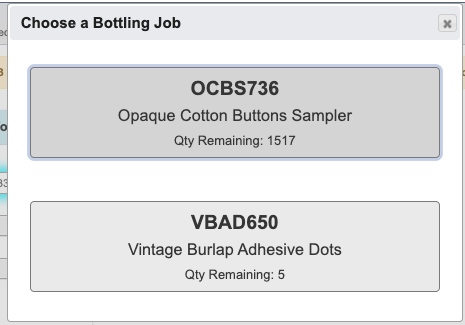 4. Select `Confirm - GO TO SETUP TIME` to continue normal production setup.
 1. Additional Options:
1. Select`Confirm - Go to Downtime` to record downtime before production.
2. Select `NO, close window` to cancel the bottling job.
5. The page will update and you are now in the setup phase. Enter the `Pallet # on Barrel` in the highlighted box.
1. Additional Options:
1. Select`Confirm - Go to Downtime` to record downtime before production.
2. Select `NO, close window` to cancel the bottling job.
5. The page will update and you are now in the setup phase. Enter the `Pallet # on Barrel` in the highlighted box.
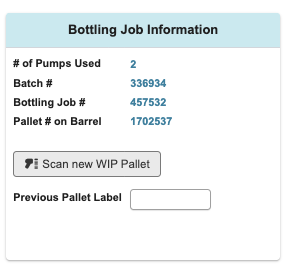
 6. Use `Scan new WIP Pallet` to add additional WIP pallets to the bottling job as needed.
 ## Step 3: Complete Setup Activities
 1. **Scan Labels**:
* Click `Scan Labels` at the bottom of the interface.
* Use `Scan new labels` to add label rolls to the job.
* Check `Have all rolls of labels been scanned?` when all labels are scanned.
All label rolls used during the production run must be scanned. If additional labels are needed during a partial batch run, scan them when you gather them.
2. **Complete BOM Checklist**:
* `Scan BOM`: Scan bill of materials items.
* `Remove Pallet`: Remove pallets as needed.
* `Print Line Location`: Print location labels.
* `Show Approvers`: View approval information.
* Check `All BOM Checked` when complete.
* Use red x buttons to remove a material from the checklist.
* Use arrow buttons to add materials to the checklist.
3. **Complete Setup Checklist** (initial each item):
* Verify Inner Pack Qty: Enter the number.
* Are there special instructions attached to this job? (Yes/No)
* Are inner pack labels required for this job? (standard) (Yes/No)
* Are master carton labels required for this job? (standard) (Yes/No)
* Is box print required for this job? (Yes/No)
* Note any problems in the comment box.
4. **Scan First UPC**: Scan the first UPC code to begin production tracking.
## Line Changeover (When Needed)
When switching production from one product to another:
1. **Scan Labels**:
* Click `Scan Labels` at the bottom of the interface.
* Use `Scan new labels` to add label rolls to the job.
* Check `Have all rolls of labels been scanned?` when all labels are scanned.
All label rolls used during the production run must be scanned. If additional labels are needed during a partial batch run, scan them when you gather them.
2. **Complete BOM Checklist**:
* `Scan BOM`: Scan bill of materials items.
* `Remove Pallet`: Remove pallets as needed.
* `Print Line Location`: Print location labels.
* `Show Approvers`: View approval information.
* Check `All BOM Checked` when complete.
* Use red x buttons to remove a material from the checklist.
* Use arrow buttons to add materials to the checklist.
3. **Complete Setup Checklist** (initial each item):
* Verify Inner Pack Qty: Enter the number.
* Are there special instructions attached to this job? (Yes/No)
* Are inner pack labels required for this job? (standard) (Yes/No)
* Are master carton labels required for this job? (standard) (Yes/No)
* Is box print required for this job? (Yes/No)
* Note any problems in the comment box.
4. **Scan First UPC**: Scan the first UPC code to begin production tracking.
## Line Changeover (When Needed)
When switching production from one product to another:
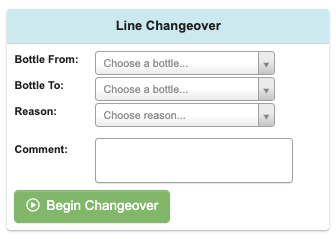 1. Complete the **Line Changeover Card**:
* `Bottle From`: Select the current product being produced
* `Bottle To`: Select the next product to be produced
* `Reason`: Choose the changeover reason from the dropdown
* `Comment`: Add notes about the changeover process
2. Click `Begin Changeover` to initiate the changeover process
This ensures proper tracking of production transitions and maintains accurate records for quality control and inventory management.
For detailed definitions and interface reference information, see the [Production Capture Reference](/production-tracking/production-capture-reference).
1. Complete the **Line Changeover Card**:
* `Bottle From`: Select the current product being produced
* `Bottle To`: Select the next product to be produced
* `Reason`: Choose the changeover reason from the dropdown
* `Comment`: Add notes about the changeover process
2. Click `Begin Changeover` to initiate the changeover process
This ensures proper tracking of production transitions and maintains accurate records for quality control and inventory management.
For detailed definitions and interface reference information, see the [Production Capture Reference](/production-tracking/production-capture-reference).