> ## Documentation Index
> Fetch the complete documentation index at: https://docs.decoart.com/llms.txt
> Use this file to discover all available pages before exploring further.
# Manage Vendors Submodule
## Overview
The **Purchase Orders → Manage Vendors** submodule lets you view and manage vendor records. This page explains common Vendor information fields and provides tutorials for managing Vendor information.
The submodule contains the following tabs:
* **View / Edit Vendor**: Manage existing vendor information.
* **Add Vendor**: Create a new vendor record and save it in the database.
* **Active Vendors**: View vendors you are currently doing business with, or mark vendors as inactive.
* **Inactive Vendors**: View vendors you are currently doing business with, or mark vendors as inactive.
* **Prospective Vendors**: Track potential vendors that may be onboarded for future purchasing needs.
* **Vendor Addresses**: Manage and update vendor address records for accurate ordering and payments.
## Understand Vendor Information
Each vendor record is broken into sections that group related information. Below is a guide to each section and some of the fields within it that have special behaviors or system-wide effects.
### General Information:
This section captures the core identity and compliance information for a vendor.
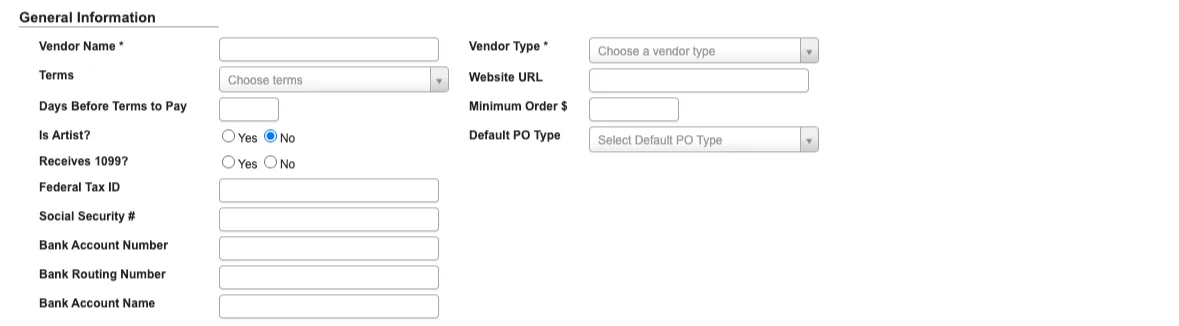 * `Vendor Name`: Required field that identifies the vendor across the system.
* `Terms`: Defines the vendor’s payment terms (e.g., Net 30, Net 60).
* `Days Before Terms to Pay`: Indicates how many days in advance the system should schedule payment before the due date.
* `Is Artist?` (Yes/No): Flags vendors classified as artists, allowing for separate reporting and treatment.
* `Receives 1099?` (Yes/No): Marks whether the vendor should be included in year-end 1099 tax reporting.
* `Federal Tax ID / Social Security #`: Captures tax identification for compliance and reporting.
* `Bank Account Number / Routing Number / Account Name`: Stores vendor payment details for ACH or direct deposit.
* `Vendor Type`: Required classification field used for grouping and reporting vendors by category.
* `Website URL`: Stores the vendor’s website for reference.
* `Minimum Order $`: Defines the minimum purchase amount required for an order to be placed with the vendor.
* `Default PO Type`: Sets the standard purchase order type (service or standard) for this vendor.
### PO Information:
This section identifies the vendor contacts who should receive purchase orders.
* `Vendor Name`: Required field that identifies the vendor across the system.
* `Terms`: Defines the vendor’s payment terms (e.g., Net 30, Net 60).
* `Days Before Terms to Pay`: Indicates how many days in advance the system should schedule payment before the due date.
* `Is Artist?` (Yes/No): Flags vendors classified as artists, allowing for separate reporting and treatment.
* `Receives 1099?` (Yes/No): Marks whether the vendor should be included in year-end 1099 tax reporting.
* `Federal Tax ID / Social Security #`: Captures tax identification for compliance and reporting.
* `Bank Account Number / Routing Number / Account Name`: Stores vendor payment details for ACH or direct deposit.
* `Vendor Type`: Required classification field used for grouping and reporting vendors by category.
* `Website URL`: Stores the vendor’s website for reference.
* `Minimum Order $`: Defines the minimum purchase amount required for an order to be placed with the vendor.
* `Default PO Type`: Sets the standard purchase order type (service or standard) for this vendor.
### PO Information:
This section identifies the vendor contacts who should receive purchase orders.
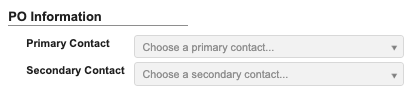 * `Primary Contact`: The main point of contact for receiving POs.
* `Secondary Contact`: A backup contact in case the primary is unavailable.
### Remittance Information:
This section defines where payment remittance notices are sent.
* `Primary Contact`: The main point of contact for receiving POs.
* `Secondary Contact`: A backup contact in case the primary is unavailable.
### Remittance Information:
This section defines where payment remittance notices are sent.
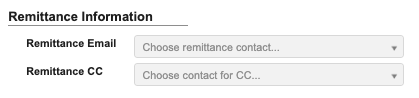 * `Remittance Email`: The primary email address for remittance details.
* `Remittance CC`: Additional recipients for remittance notifications.
### Freight Information:
This section defines the vendor’s shipping and freight policies.
* `Remittance Email`: The primary email address for remittance details.
* `Remittance CC`: Additional recipients for remittance notifications.
### Freight Information:
This section defines the vendor’s shipping and freight policies.
 * `1st Freight Carrier / 2nd Freight Carrier`: Preferred carriers used when routing shipments.
* `Freight Terms`: Defines who is responsible for shipping costs (e.g., prepaid/no charge, collect, prepaid/add).
* `Delivery Fee`: Base freight amount that preloads into Freight Total when this vendor is selected on a new purchase order. The PO amount remains editable and can be changed or removed before saving.
* `Freight Policy`: Captures vendor-specific rules or agreements governing freight and shipping.
## View / Edit Vendor
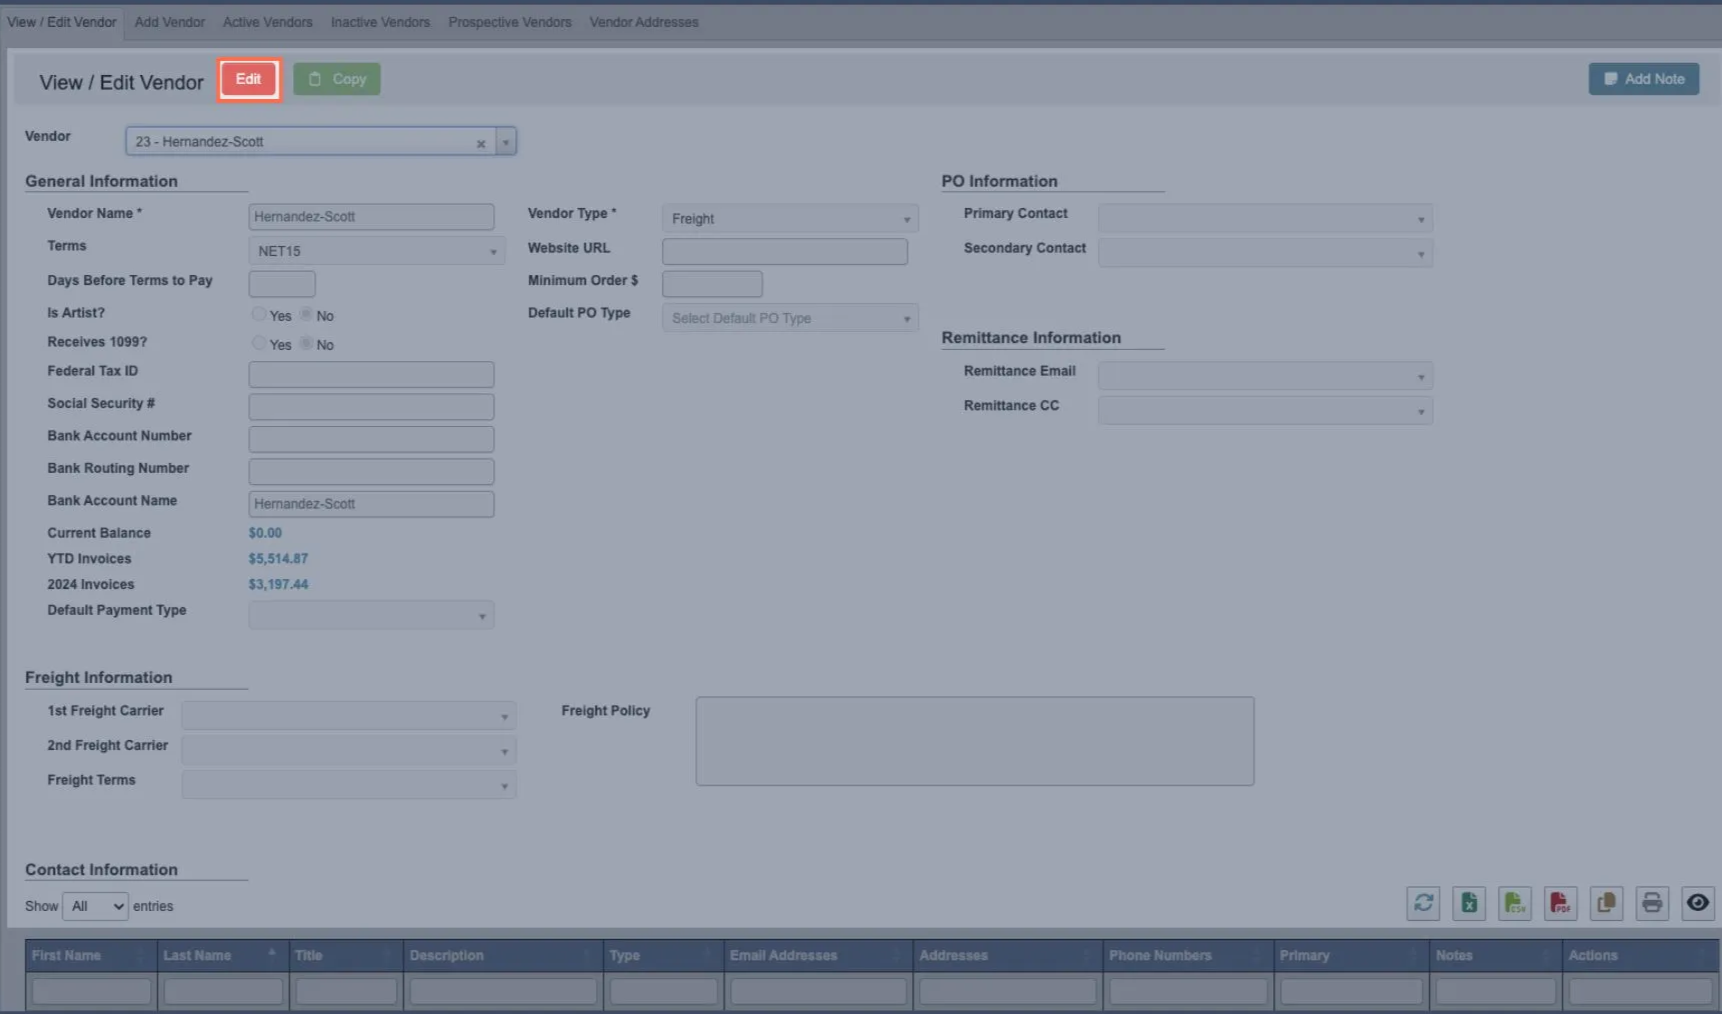
From within the View / Edit Vendor tab, you can explore and manage existing vendor information.
### Step 1: Pull up a vendor’s records
1. From the Purchase Order → Manage Vendors submodule, click on the `View / Edit Vendor` tab.
2. Click the dropdown menu next to the Vendor field.
3. Enter the vendor number or name you’re looking for, then click to select it.
* `1st Freight Carrier / 2nd Freight Carrier`: Preferred carriers used when routing shipments.
* `Freight Terms`: Defines who is responsible for shipping costs (e.g., prepaid/no charge, collect, prepaid/add).
* `Delivery Fee`: Base freight amount that preloads into Freight Total when this vendor is selected on a new purchase order. The PO amount remains editable and can be changed or removed before saving.
* `Freight Policy`: Captures vendor-specific rules or agreements governing freight and shipping.
## View / Edit Vendor
From within the View / Edit Vendor tab, you can explore and manage existing vendor information.
### Step 1: Pull up a vendor’s records
1. From the Purchase Order → Manage Vendors submodule, click on the `View / Edit Vendor` tab.
2. Click the dropdown menu next to the Vendor field.
3. Enter the vendor number or name you’re looking for, then click to select it.
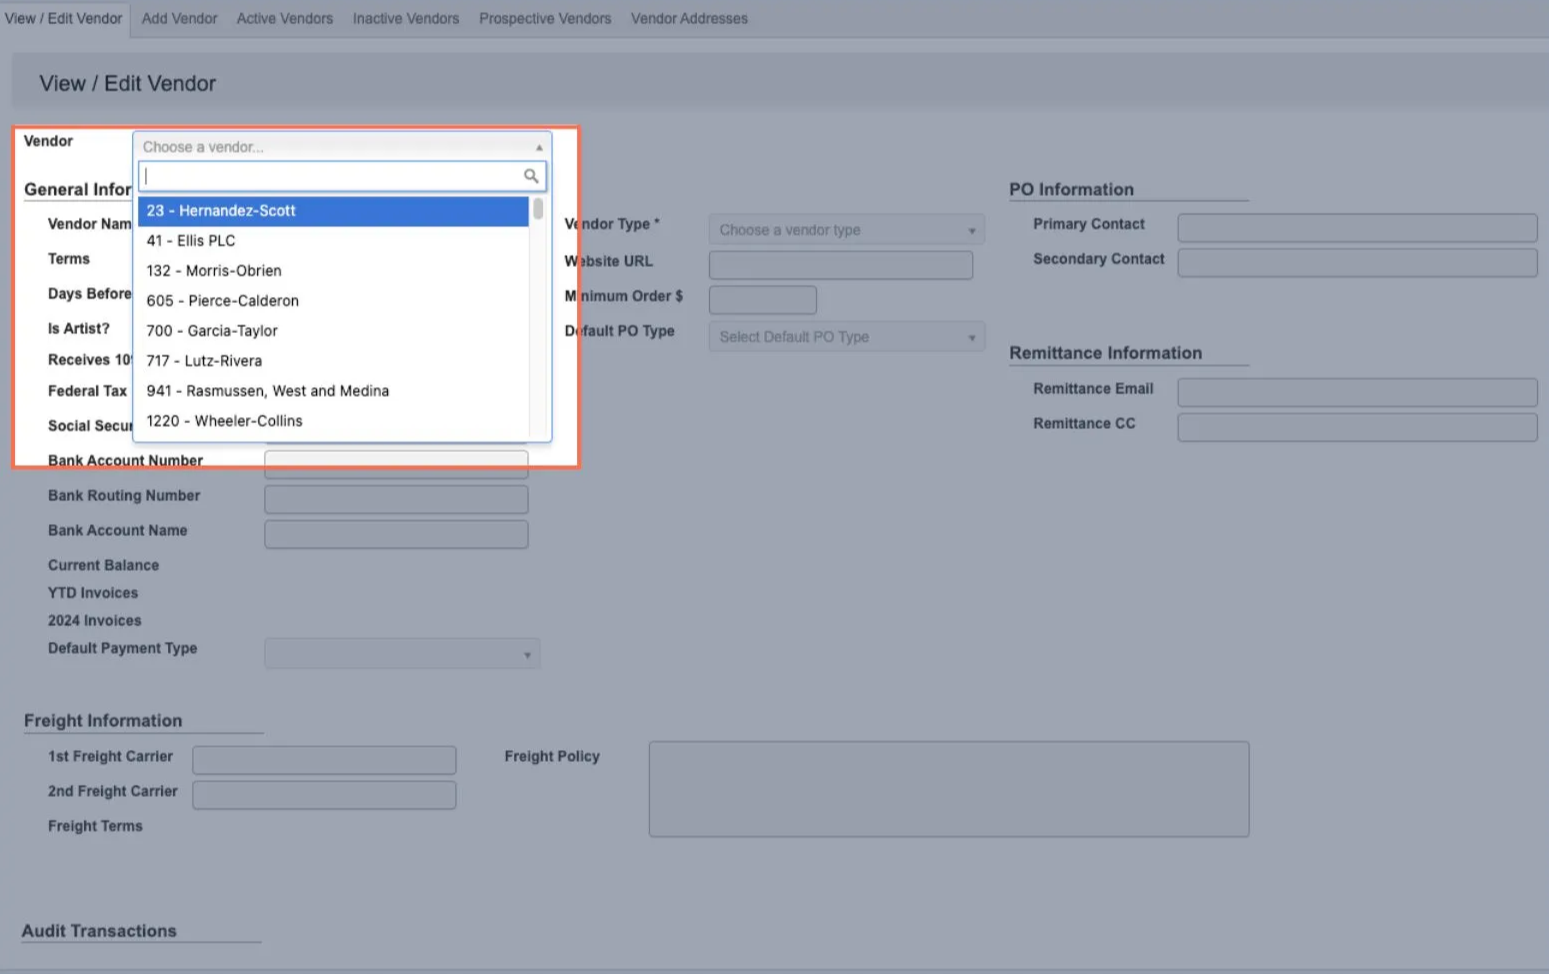 4. You can now view that vendor’s details, including business information, payment terms, contacts, and addresses.
### Step 2: Use the toolbar to manage a vendor’s records
Once you’ve pulled up a vendor’s records, you can manage their information with the following features located in the toolbar:
* `Edit`: Edit vendor information.
4. You can now view that vendor’s details, including business information, payment terms, contacts, and addresses.
### Step 2: Use the toolbar to manage a vendor’s records
Once you’ve pulled up a vendor’s records, you can manage their information with the following features located in the toolbar:
* `Edit`: Edit vendor information.
 * Once in the edit view:
 * Click `Cancel Editing` to cancel editing.
* Click `Save` to save your changes.
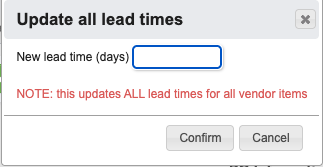
* Click `Update Lead Times` for all vendor items.
* Click `Cancel Editing` to cancel editing.
* Click `Save` to save your changes.
* Click `Update Lead Times` for all vendor items.
 * `Copy`: Copies all contacts, addresses, and price lists from the currently displayed vendor record into a new vendor profile.
 * This is useful when a vendor needs to be set up again under a new name or tax designation. Instead of re-entering all the same details manually, you can copy them into the new record and make only the necessary changes.
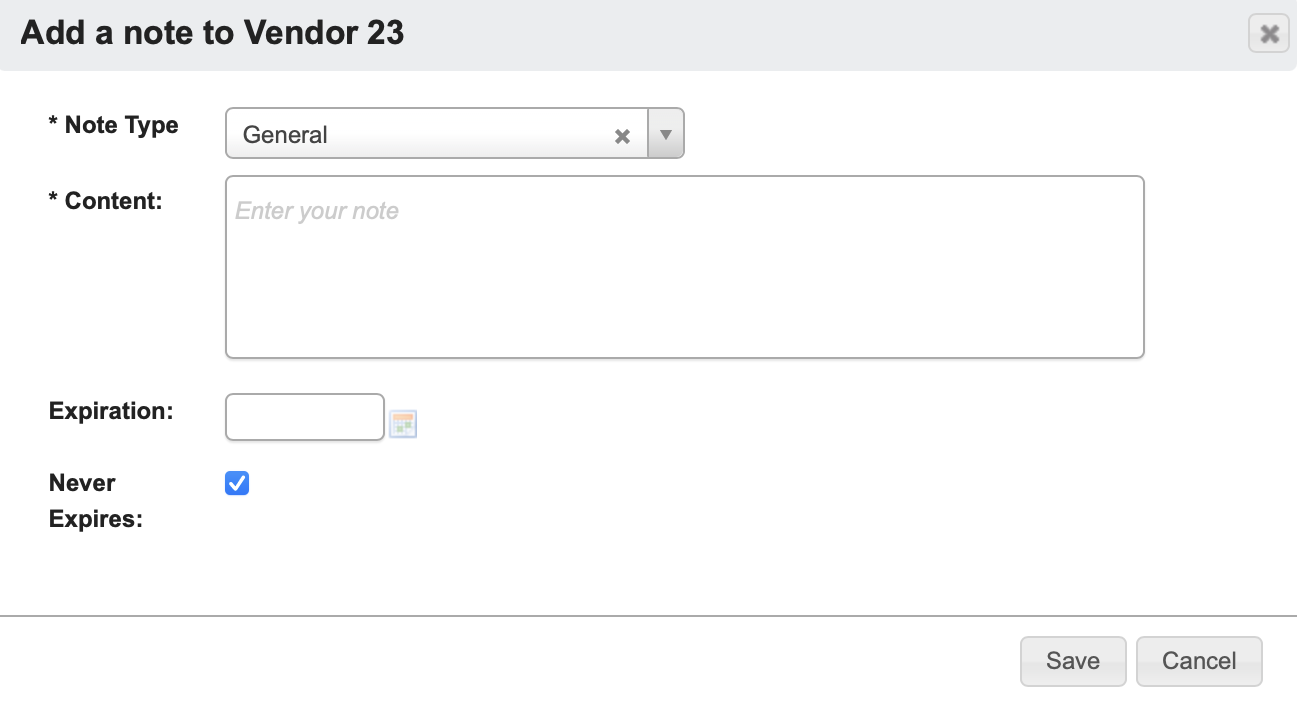
* `Add Note`: Attaches a comment to the vendor’s profile. You can optionally choose an expiration date for the note.
* This is useful when a vendor needs to be set up again under a new name or tax designation. Instead of re-entering all the same details manually, you can copy them into the new record and make only the necessary changes.
* `Add Note`: Attaches a comment to the vendor’s profile. You can optionally choose an expiration date for the note.
 ## Add Vendor
1. From the Purchase Order → Manage Vendors submodule, click on the `Add Vendor` tab.
2. Fill in `Vendor Name` with the vendor’s name.
3. Choose a `Vendor Type` .
4. (Optional) Add any additional details you have for the vendor (e.g., payment terms, freight information). You can always go back and add new information later through the `View / Edit Vendor` page.
5. Click `Save as Prospective` to create the new vendor profile.
## Add Vendor
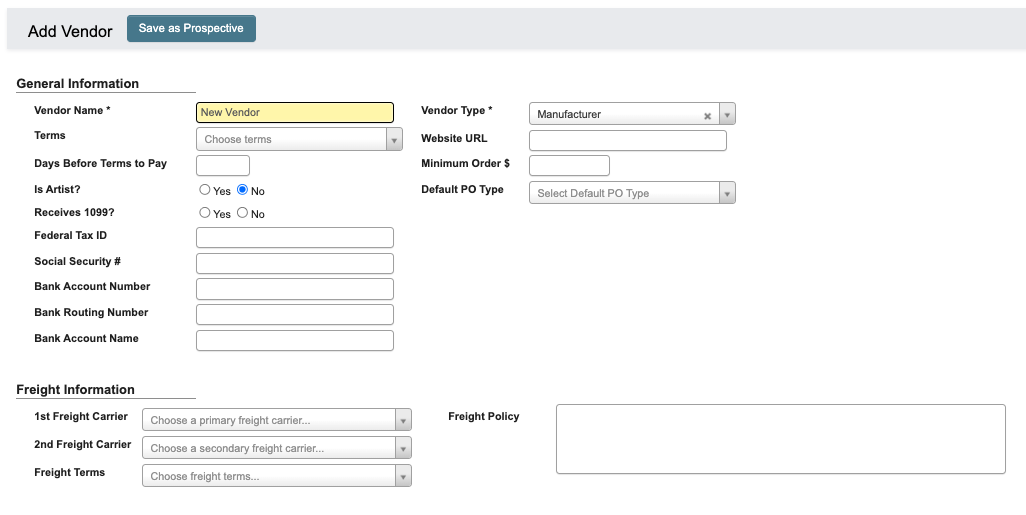
1. From the Purchase Order → Manage Vendors submodule, click on the `Add Vendor` tab.
2. Fill in `Vendor Name` with the vendor’s name.
3. Choose a `Vendor Type` .
4. (Optional) Add any additional details you have for the vendor (e.g., payment terms, freight information). You can always go back and add new information later through the `View / Edit Vendor` page.
5. Click `Save as Prospective` to create the new vendor profile.
 ## Active Vendors
From the Purchase Order → Manage Vendors submodule, click on the `Active Vendors` tab. This contains a table of summarized records for every “active” vendor.
Within this tab, you can:
* Click on an attribute heading (such as Vendor Name) to sort in ascending order. Click again to sort in descending order.
* Click on a Vendor ID or Vendor Number to view or manage the associated vendor records in the `View / Edit Vendor` tab.
* Refresh, export, print, or filter data with the toolbar.
* Remove Active Vendors.
### How to mark a vendor as inactive
1. Scroll to the far right of the table and find the `Actions` column.
2. Click the `Deactivate Vendor` (red “no”) button.
3. Click “YES, deactivate” when prompted.
## Inactive Vendors
From the Purchase Order → Manage Vendors submodule, click on the `Inactive Vendors` tab. This contains a table of summarized vendor records for every “inactive” vendor.
Just like the `Active Vendors` tab, you can:
* Click on an attribute heading (such as Vendor Name) to sort in ascending order. Click again to sort in descending order.
* Click on a Vendor ID or Vendor Number to view or manage the associated vendor records in the `View / Edit Vendor` tab.
* Refresh, export, print, or filter data with the toolbar.
### How to mark a vendor as active
1. Scroll to the far right of the table and find the `Actions` column.
2. Click the `Activate Vendor` (green checkmark) button.
3. Click “YES, activate” when prompted.
## Prospective Vendors
From the Purchase Order → Manage Vendors submodule, click on the `Prospective Vendors` tab. This tab contains records for potential vendors that are being evaluated but not yet approved for purchasing.
## Active Vendors
From the Purchase Order → Manage Vendors submodule, click on the `Active Vendors` tab. This contains a table of summarized records for every “active” vendor.
Within this tab, you can:
* Click on an attribute heading (such as Vendor Name) to sort in ascending order. Click again to sort in descending order.
* Click on a Vendor ID or Vendor Number to view or manage the associated vendor records in the `View / Edit Vendor` tab.
* Refresh, export, print, or filter data with the toolbar.
* Remove Active Vendors.
### How to mark a vendor as inactive
1. Scroll to the far right of the table and find the `Actions` column.
2. Click the `Deactivate Vendor` (red “no”) button.
3. Click “YES, deactivate” when prompted.
## Inactive Vendors
From the Purchase Order → Manage Vendors submodule, click on the `Inactive Vendors` tab. This contains a table of summarized vendor records for every “inactive” vendor.
Just like the `Active Vendors` tab, you can:
* Click on an attribute heading (such as Vendor Name) to sort in ascending order. Click again to sort in descending order.
* Click on a Vendor ID or Vendor Number to view or manage the associated vendor records in the `View / Edit Vendor` tab.
* Refresh, export, print, or filter data with the toolbar.
### How to mark a vendor as active
1. Scroll to the far right of the table and find the `Actions` column.
2. Click the `Activate Vendor` (green checkmark) button.
3. Click “YES, activate” when prompted.
## Prospective Vendors
From the Purchase Order → Manage Vendors submodule, click on the `Prospective Vendors` tab. This tab contains records for potential vendors that are being evaluated but not yet approved for purchasing.
 Within this tab, you can:
* Click on an attribute heading (such as Vendor Name) to sort in ascending order. Click again to sort in descending order.
* Track prospective vendors until they are approved and moved to `Active Vendors.`
* Click on a Vendor ID or Vendor Number to view or manage the associated vendor records in the `View / Edit Vendor` tab.
* Refresh, export, print, or filter data with the toolbar.
* Remove Prospective Vendors.
### How to mark a prospective vendor as active
1. Click the `Vendor ID` for the vendor.
2. You will be taken to the `View / Edit Vendor` tab. A green header shows that this is a ‘Prospective Vendor.’
Within this tab, you can:
* Click on an attribute heading (such as Vendor Name) to sort in ascending order. Click again to sort in descending order.
* Track prospective vendors until they are approved and moved to `Active Vendors.`
* Click on a Vendor ID or Vendor Number to view or manage the associated vendor records in the `View / Edit Vendor` tab.
* Refresh, export, print, or filter data with the toolbar.
* Remove Prospective Vendors.
### How to mark a prospective vendor as active
1. Click the `Vendor ID` for the vendor.
2. You will be taken to the `View / Edit Vendor` tab. A green header shows that this is a ‘Prospective Vendor.’
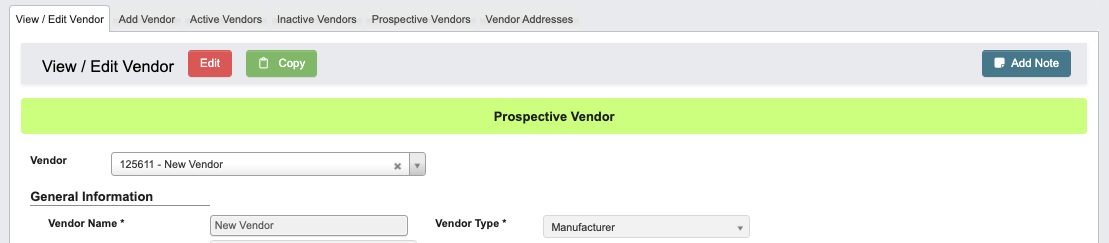 3. To convert to an ‘Active Vendor’ click `Edit`.
4. Click `Convert & Save` to convert the Vendor from ‘Prospective Vendor’ to ‘Active Vendor.’
3. To convert to an ‘Active Vendor’ click `Edit`.
4. Click `Convert & Save` to convert the Vendor from ‘Prospective Vendor’ to ‘Active Vendor.’
 ### How to mark a prospective vendor as inactive
1. Scroll to the far right of the table and find the `Actions` column.
2. Click the `Deactivate Vendor` (red “no”) button.
3. Click “YES, deactivate” when prompted.
## Vendor Addresses
From the Purchase Order → Manage Vendors submodule, click on the `Vendor Addresses` tab. This contains records for all vendor addresses stored in the system.
### How to mark a prospective vendor as inactive
1. Scroll to the far right of the table and find the `Actions` column.
2. Click the `Deactivate Vendor` (red “no”) button.
3. Click “YES, deactivate” when prompted.
## Vendor Addresses
From the Purchase Order → Manage Vendors submodule, click on the `Vendor Addresses` tab. This contains records for all vendor addresses stored in the system.