> ## Documentation Index
> Fetch the complete documentation index at: https://docs.decoart.com/llms.txt
> Use this file to discover all available pages before exploring further.
# Purchase Orders - Tutorial: Create a Purchase Order (PO)
## Overview
This tutorial helps you create a new Purchase Order (PO) in the DASH **Purchase Order → Manage Purchase Orders** submodule.
Purchase Orders serve as formal requests to vendors and are tied to receiving, reconciliation, and reporting workflows. By creating a PO, you establish the official record of what’s being ordered, from which vendor, and in what quantities.
Use this page when you need to order items from a supplier, replenish stock, support production needs, or initiate procurement for projects.
## Create a Purchase Order
### Step 1: Start a New PO
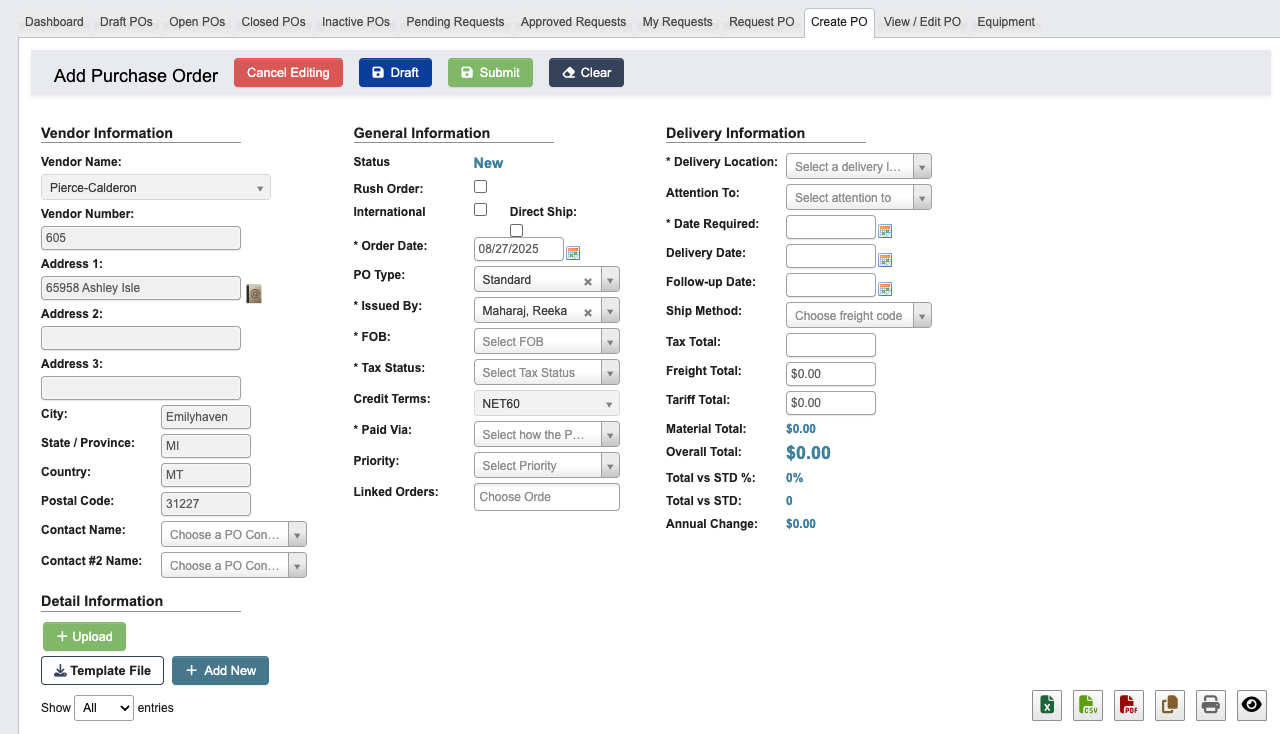
1. Go to **Purchase Order →** **Manage Purchase Orders → Create PO.**
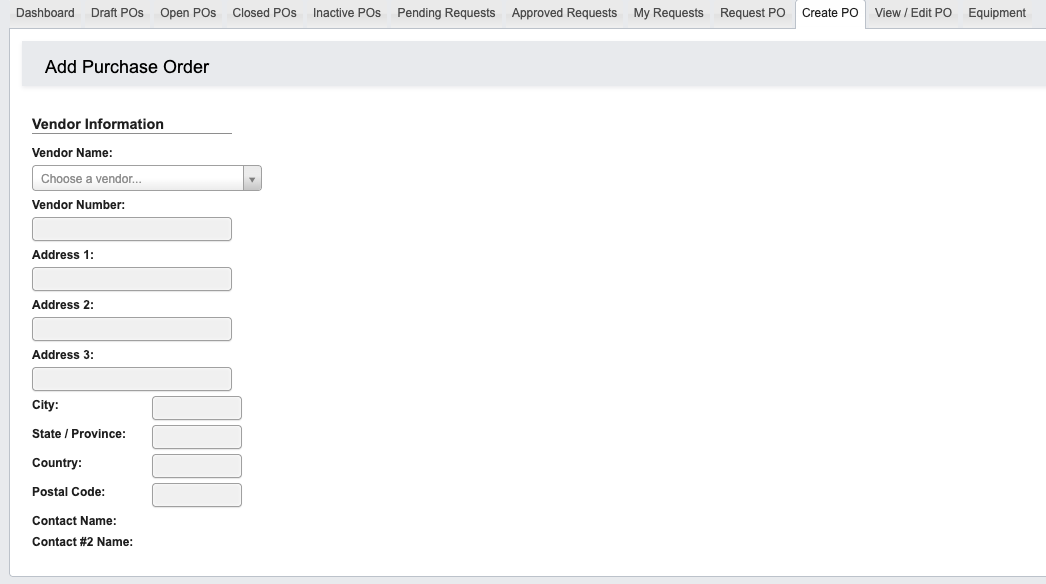 2. From the `Vendor Name` dropdown, search for the vendor.
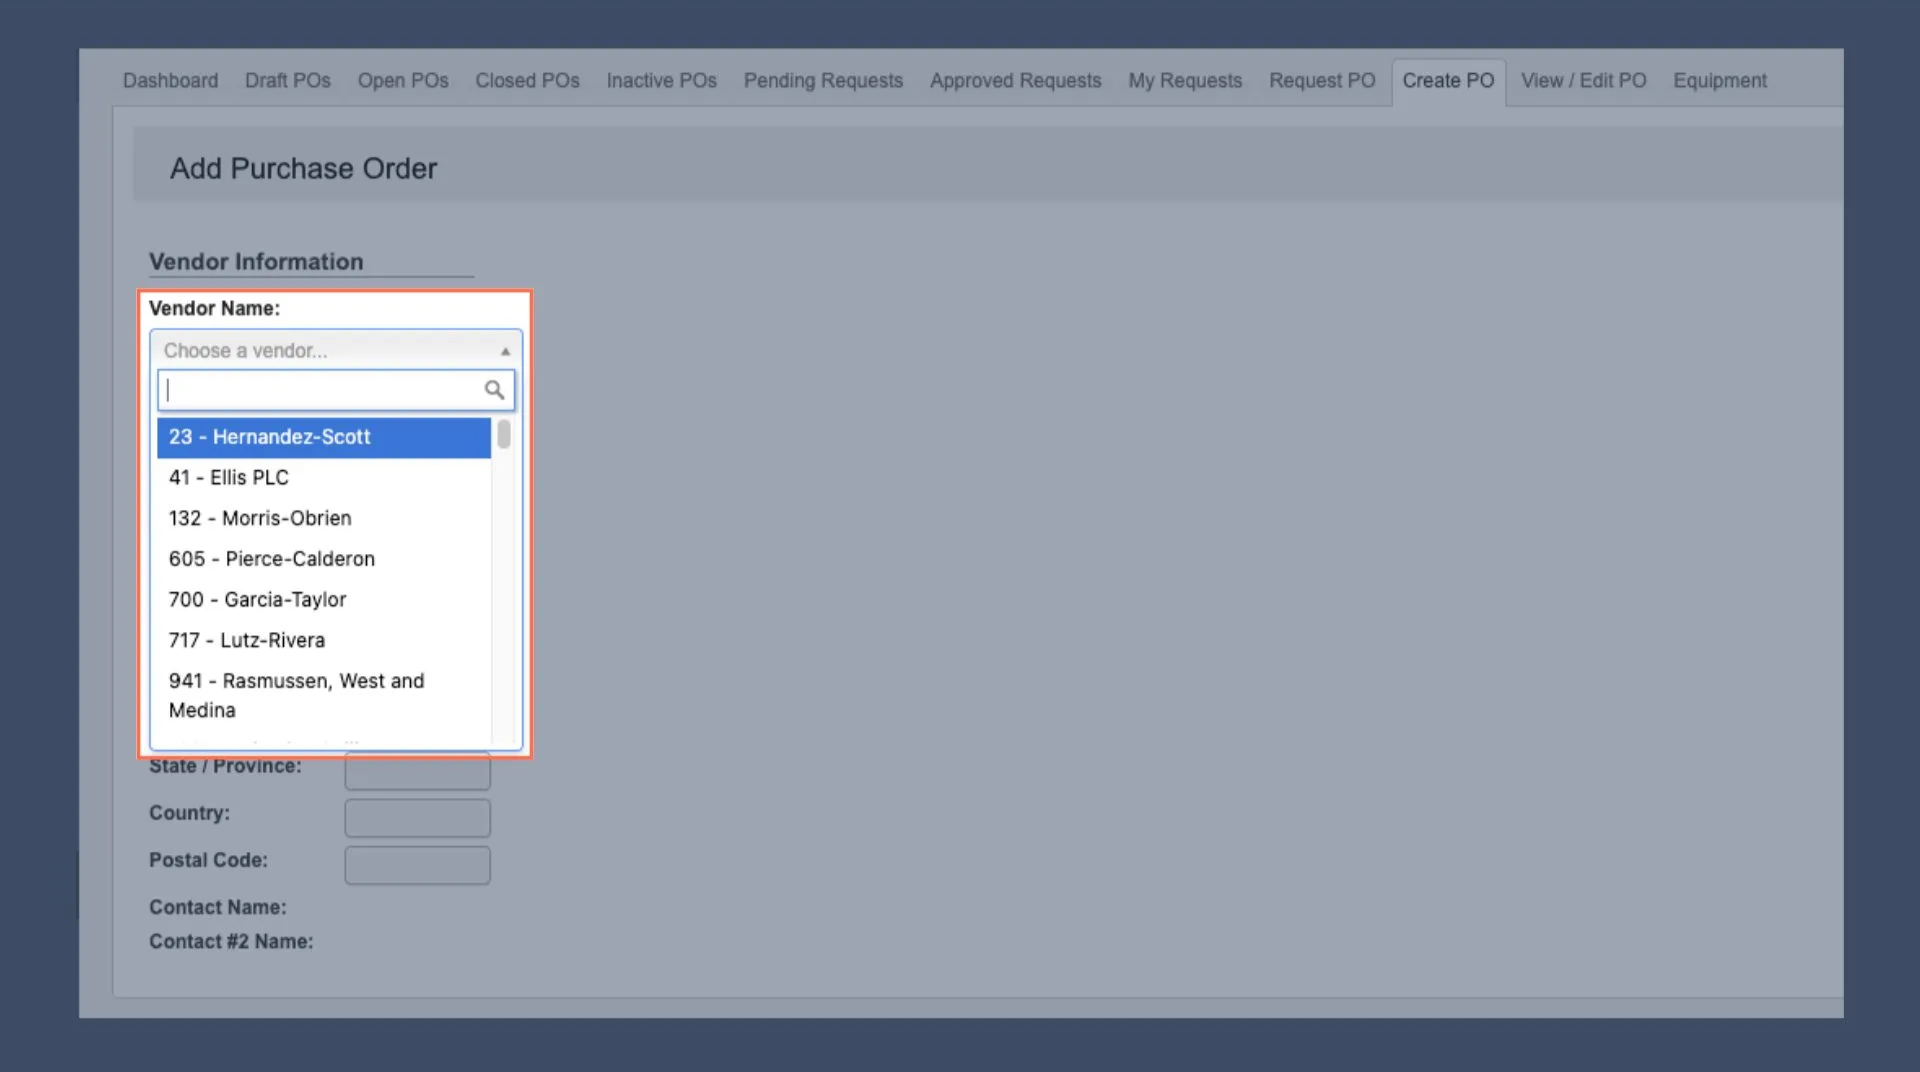 3. When selected:
1. For vendor POs, some information will autofill.
2. For non-vendor orders (e.g., office supplies), you will have to enter details manually.
3. When selected:
1. For vendor POs, some information will autofill.
2. For non-vendor orders (e.g., office supplies), you will have to enter details manually.
 ### Step 2: Select Vendor Contacts
1. Use the `Contact Name` dropdown to select the primary contact who will receive the PO after approval.
2. If possible, select a `Contact #2` as backup, in case the primary is unavailable.
### Step 2: Select Vendor Contacts
1. Use the `Contact Name` dropdown to select the primary contact who will receive the PO after approval.
2. If possible, select a `Contact #2` as backup, in case the primary is unavailable.
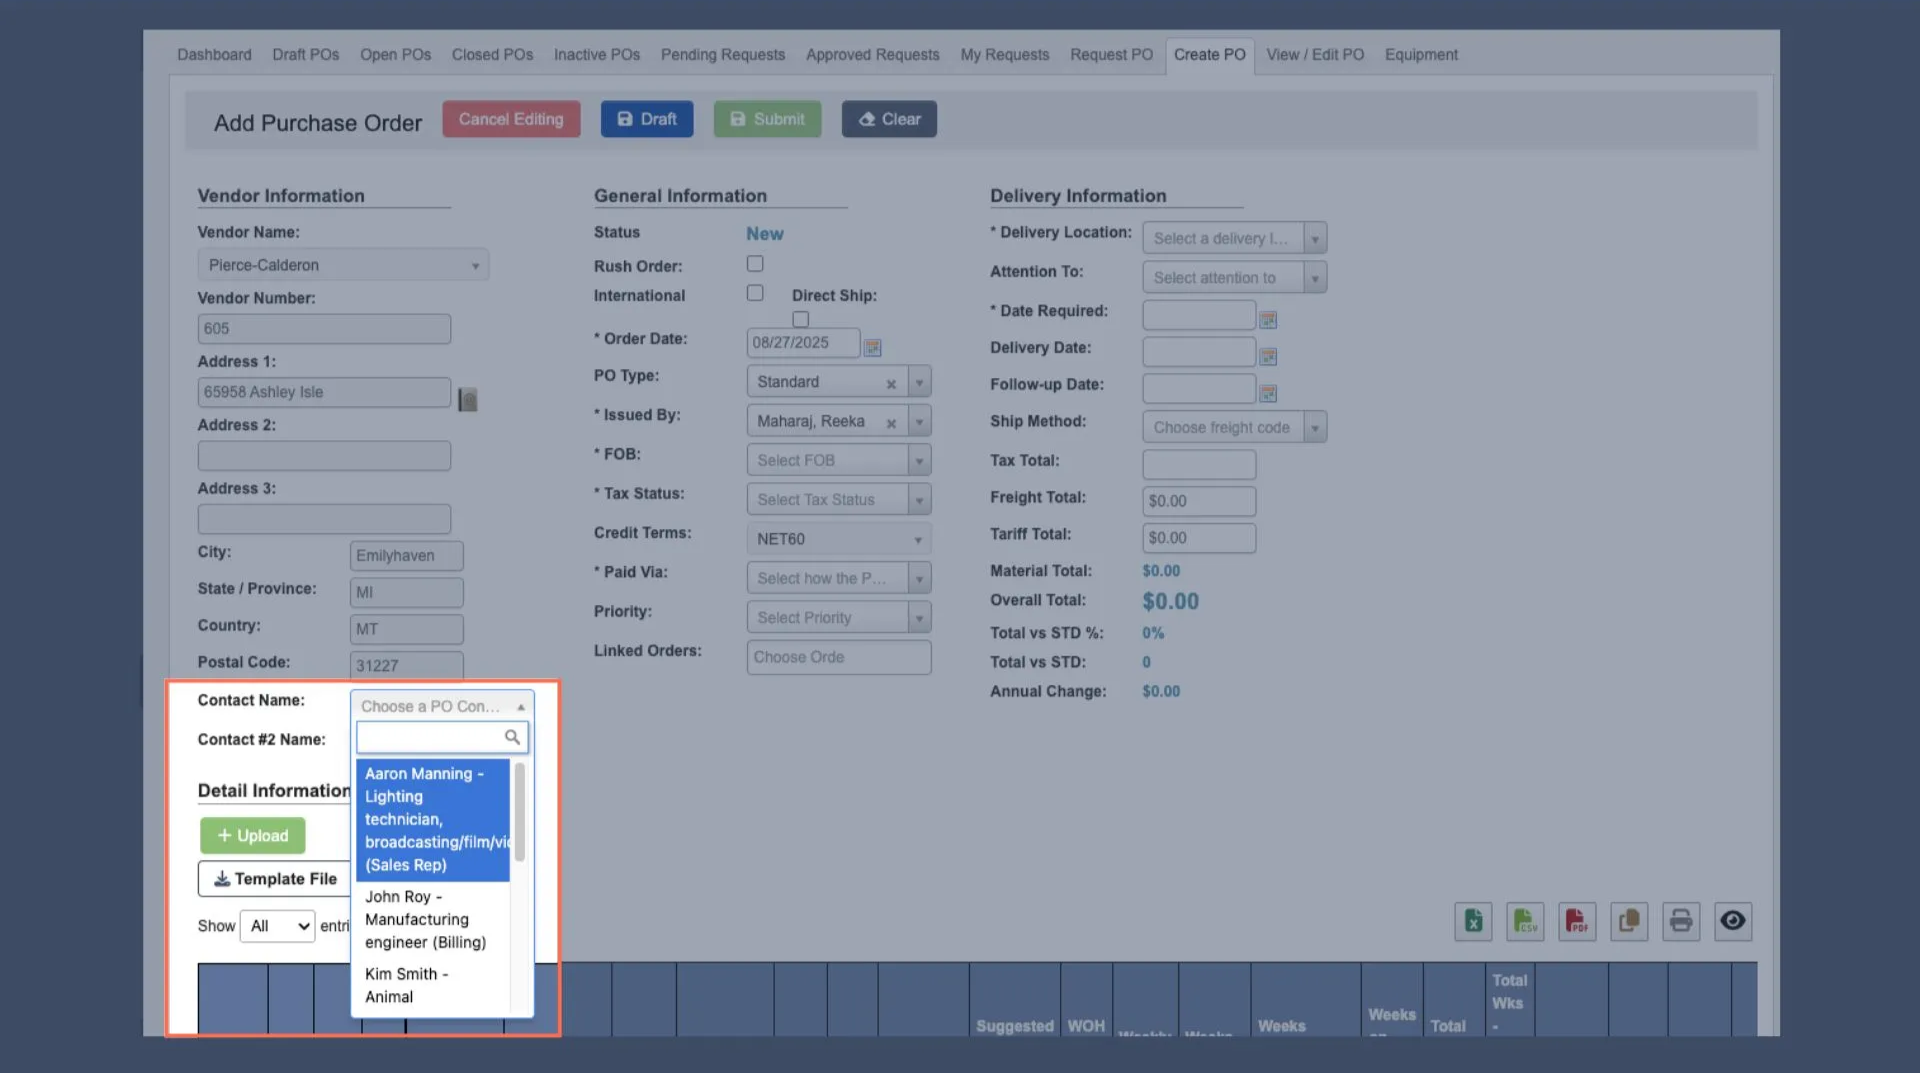 Contact information is pulled from the vendor record, which you can view in [Manage Vendors](/purchase-orders/manage-vendors).
### Step 3: Add Parts to PO
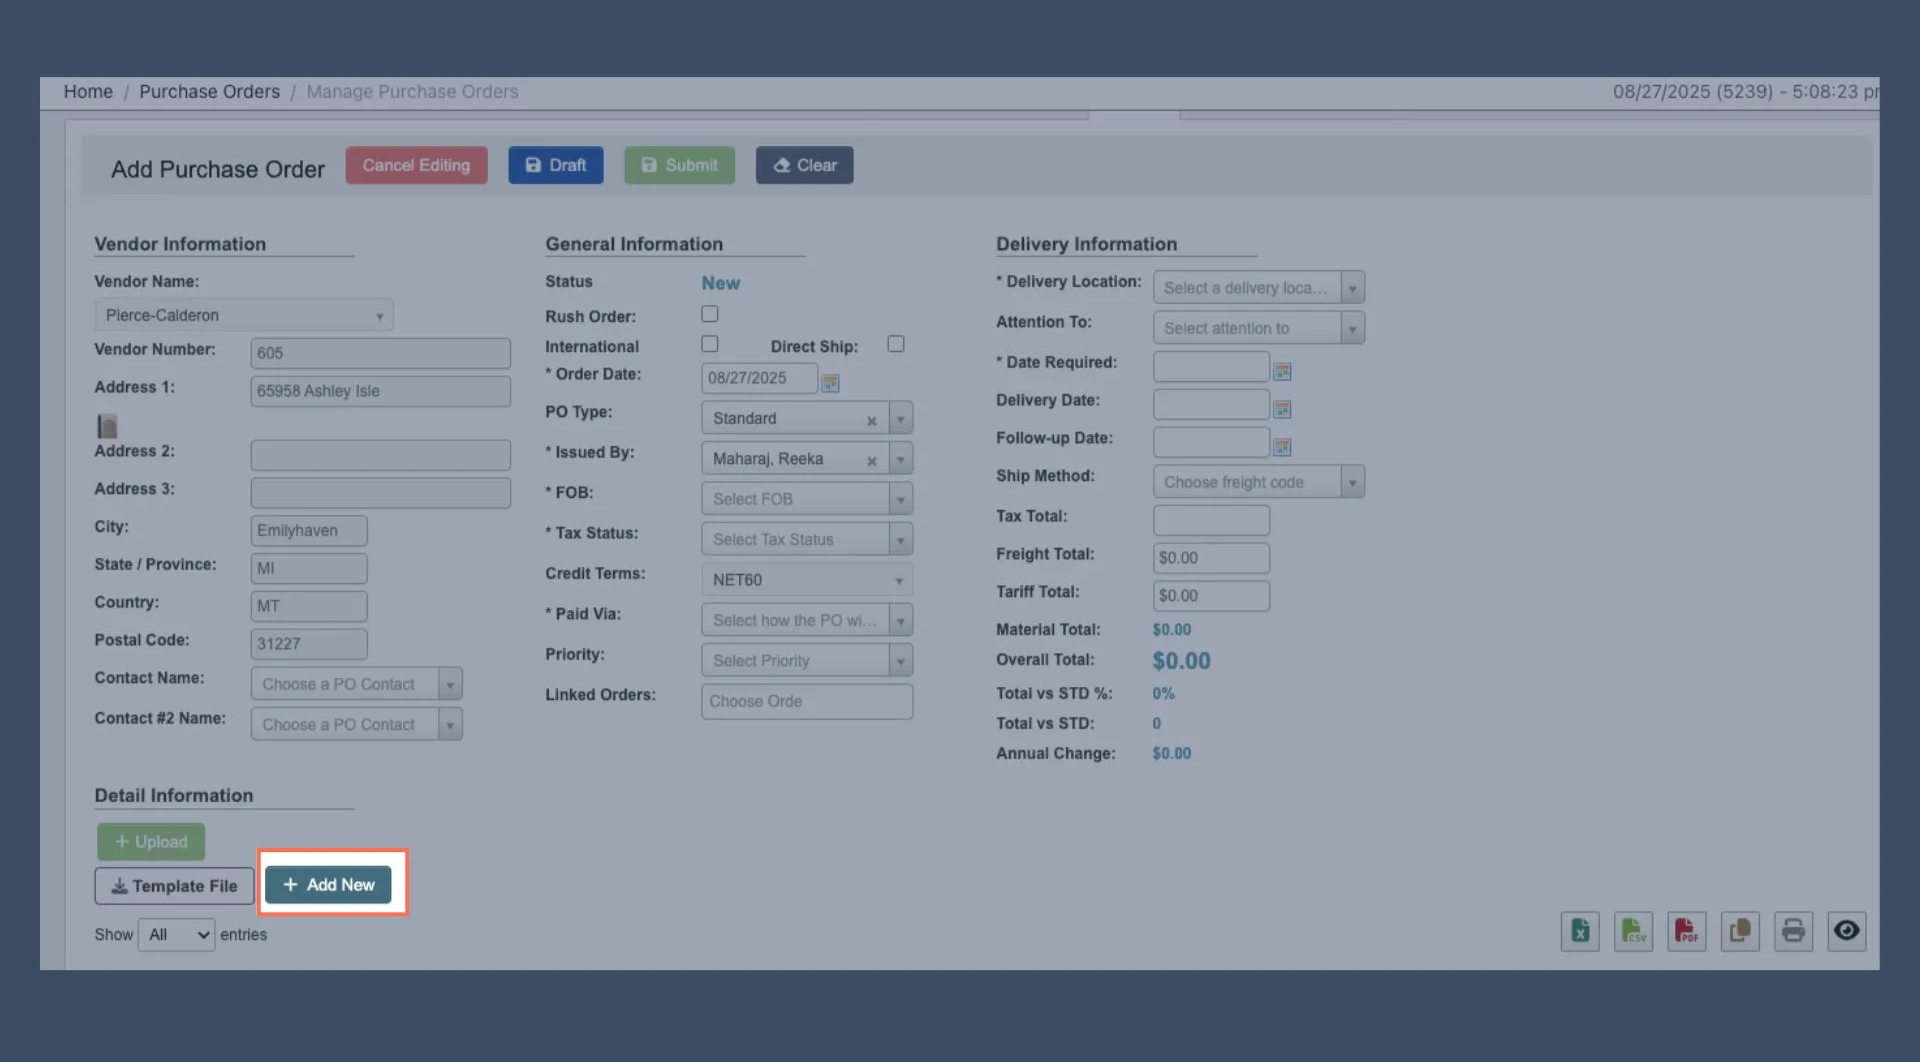
1. Click `+ Add New` under “Detail information” to add parts to order.
Contact information is pulled from the vendor record, which you can view in [Manage Vendors](/purchase-orders/manage-vendors).
### Step 3: Add Parts to PO
1. Click `+ Add New` under “Detail information” to add parts to order.
 If you need to enter bulk line items or attach supporting documents, the “Detail information” section provides two options:
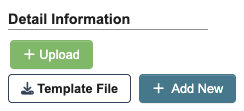 * `Template File`: Download an Excel template that shows the available columns and an example row. Fill out the template.
* `+ Upload`: Attach the template file to mass-enter PO line items.
This is especially useful when creating POs with many parts. Bulk entry like this is available in several places in DASH.
2. A new window will pop up with the following fields:
* `Template File`: Download an Excel template that shows the available columns and an example row. Fill out the template.
* `+ Upload`: Attach the template file to mass-enter PO line items.
This is especially useful when creating POs with many parts. Bulk entry like this is available in several places in DASH.
2. A new window will pop up with the following fields:
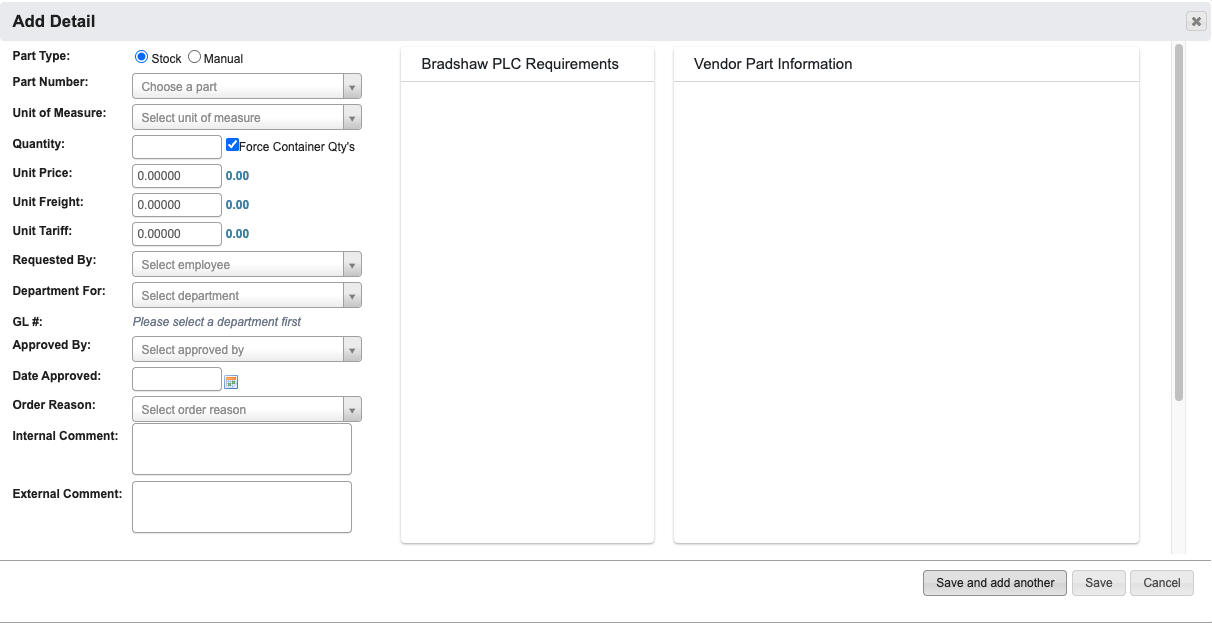 * `Part Type`: Determines whether you are choosing from existing stock (**Stock**) or manually entering a custom part (**Manual**). Defaults to Stock.
* If you select **Manual**, you will have to fill in many of the following fields manually, without dropdown menus available.
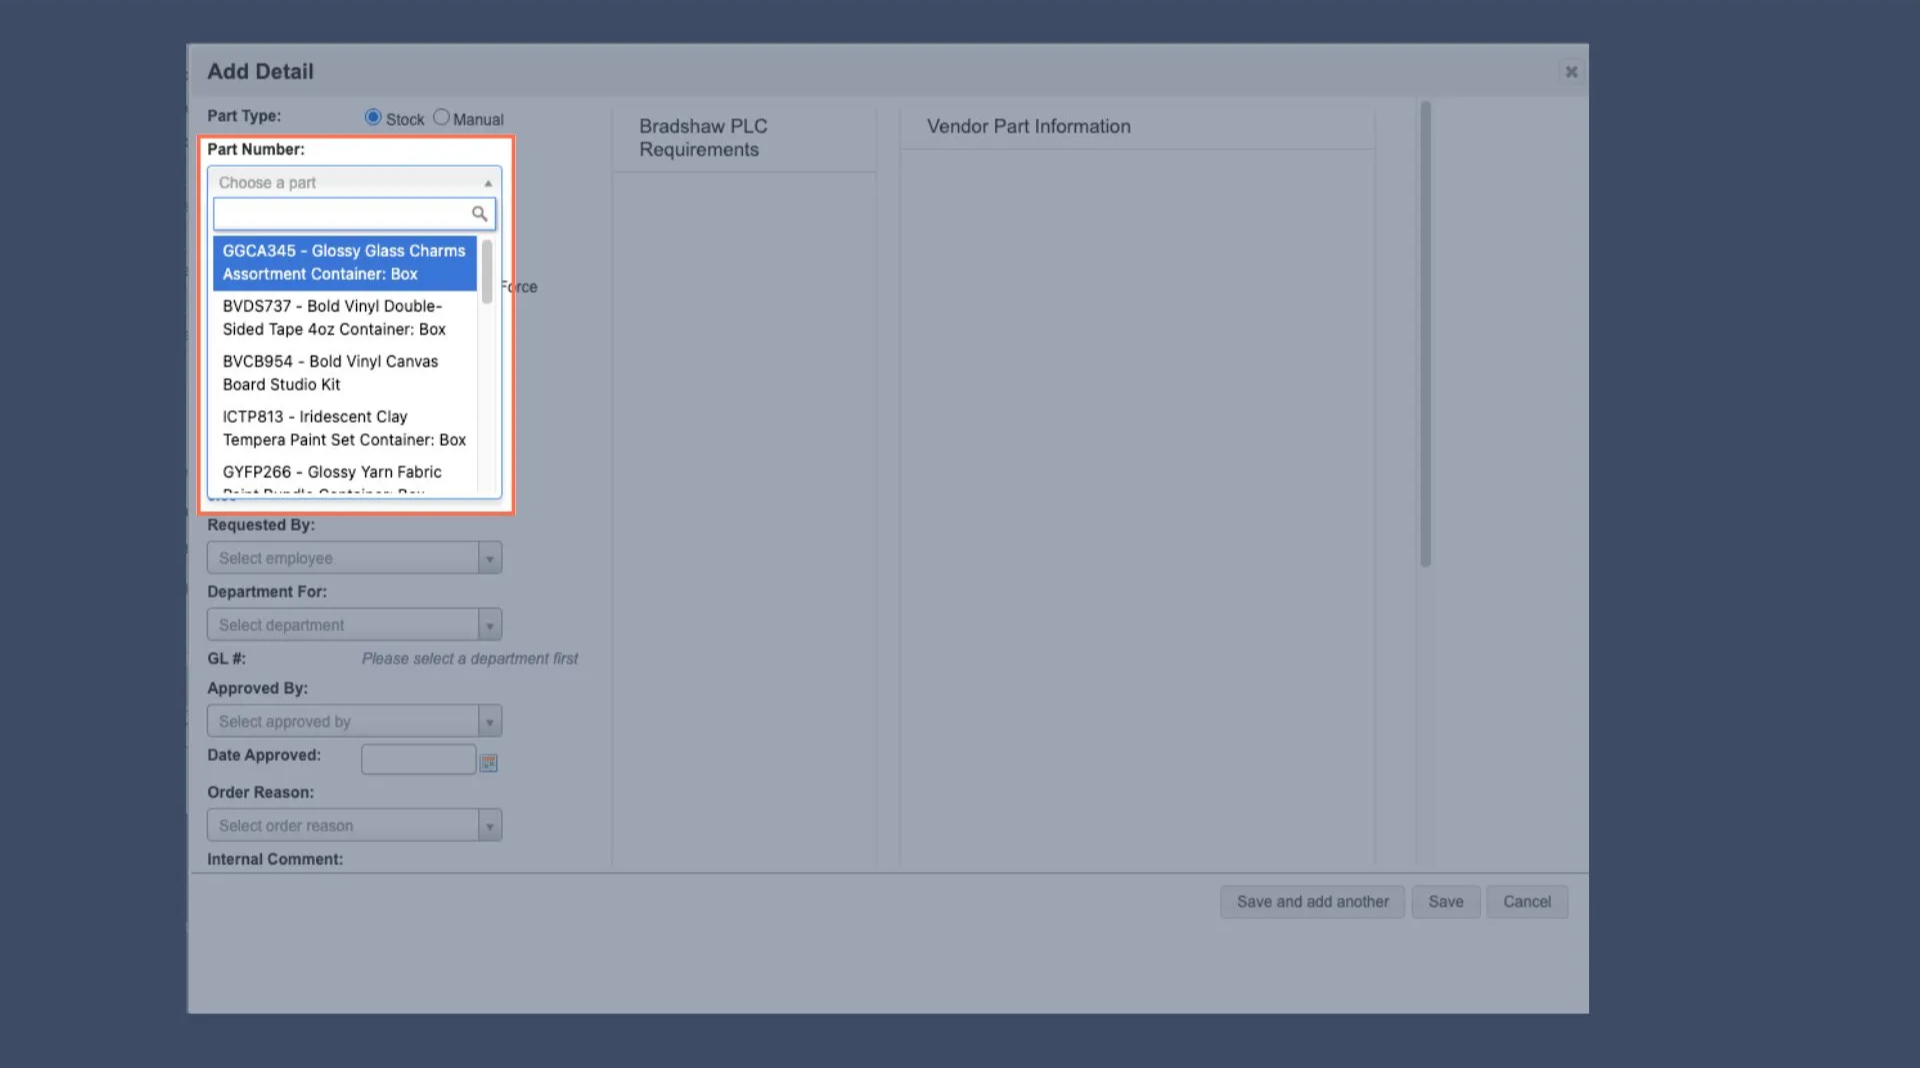
* `Part Number`: Enter the Part ID corresponding to your Part.
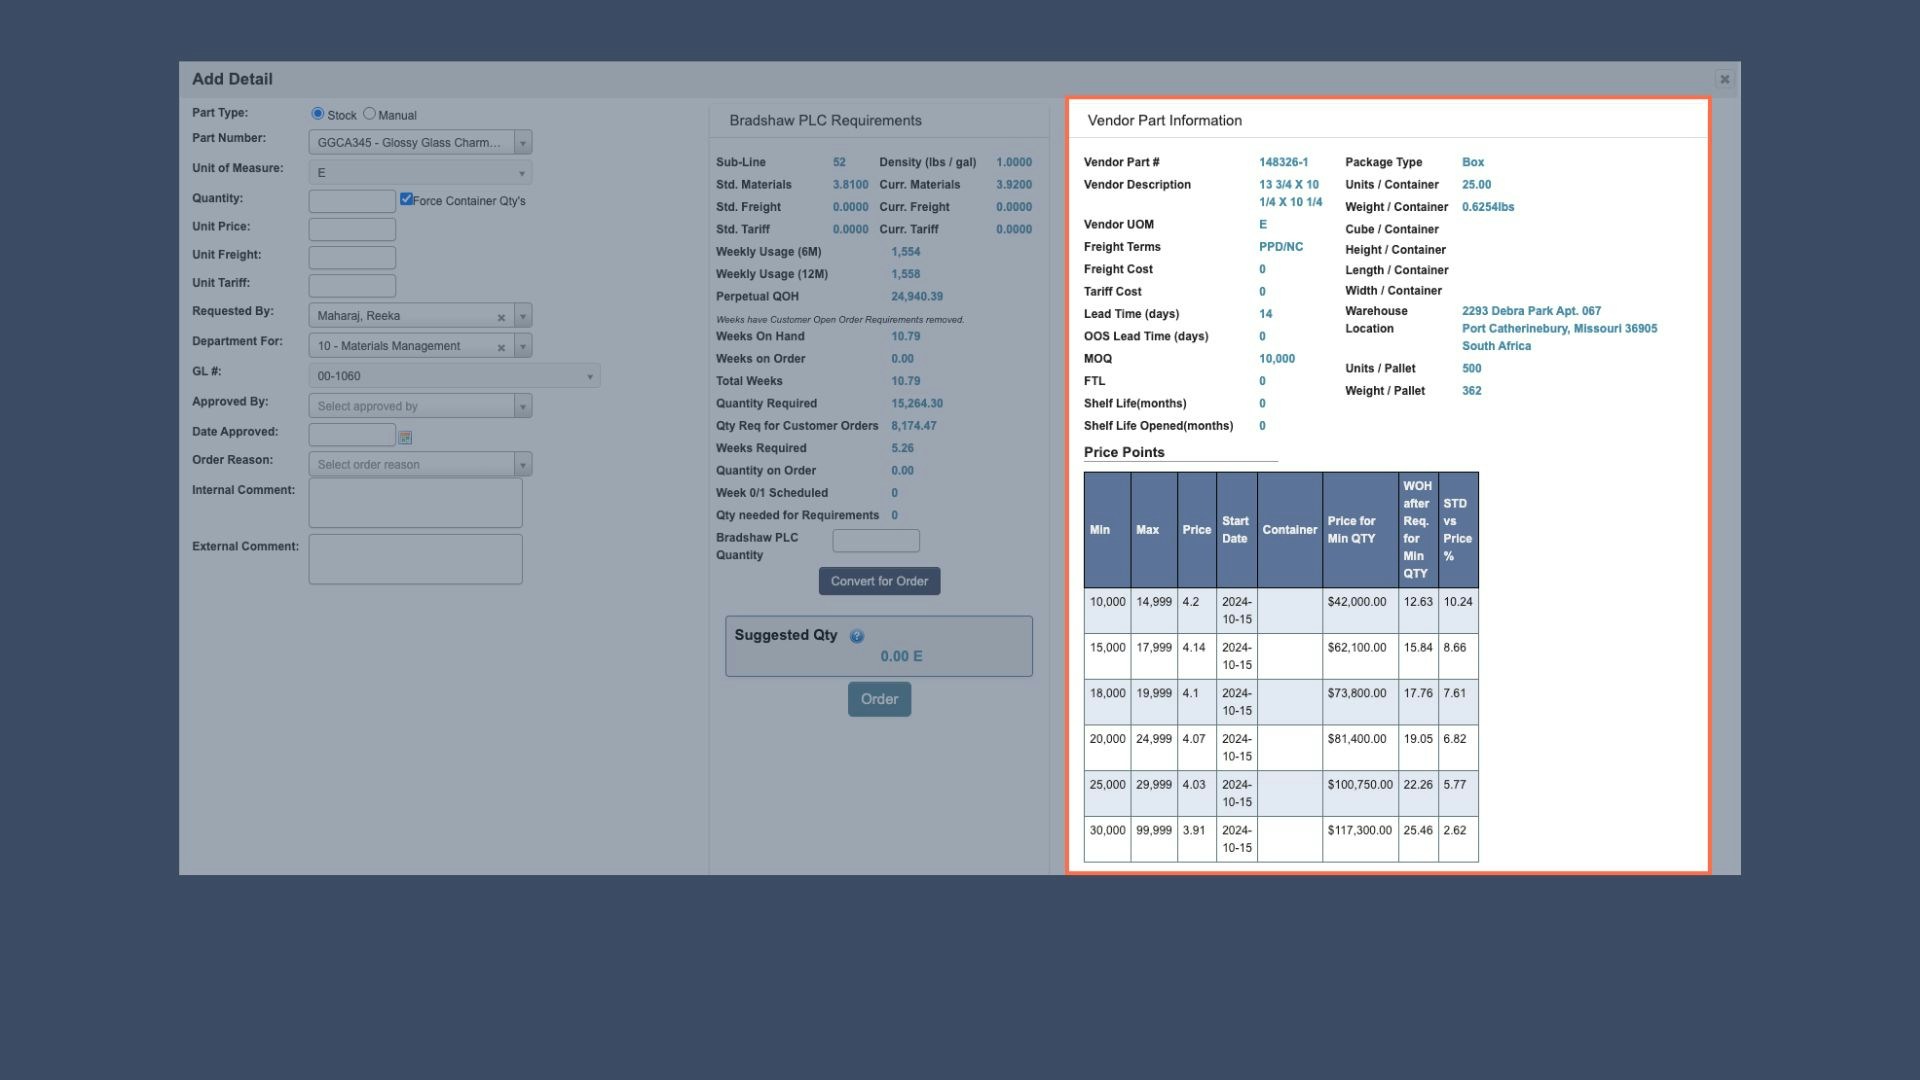
* After selected several panels will populate with information. See the Reference section further down this page for a detailed overview.
* `Part Type`: Determines whether you are choosing from existing stock (**Stock**) or manually entering a custom part (**Manual**). Defaults to Stock.
* If you select **Manual**, you will have to fill in many of the following fields manually, without dropdown menus available.
* `Part Number`: Enter the Part ID corresponding to your Part.
* After selected several panels will populate with information. See the Reference section further down this page for a detailed overview.
 * `Quantity`: Enter the number to order (use Vendor Part Information to confirm min/max range).
* `Unit Price`, `Unit Freight`, `Unit Tariff`: The price and transportation costs for this Part. These fields will autofill based on the vendor record.
* `Requested By`: Autofills with the person who creates the PO.
* `Department For`: The department the PO is for.
* `GL #` : General ledger (GL) account number that autofills corresponding to the selected department.
* `Approved By` : The person (you) authorizing the request. Fill in with your name.
* `Date Approved`: Fill in with the Date the PO was created.
* `Order Reason`: Select a pre-defined reason for the PO from the drop down menu.
* `Internal Comment` (Optional): Notes for approvers or any information that may be relevant to this PO in the future. These notes are only visible internally.
* `External Comment` (Optional): Notes for vendor that will appear on the PO and will be sent to the vendor.
3. When you have filled in all Part Details, click:
1. `Save and add another` to add another part number to this PO.
2. `Save` to save the details and go back to the PO creation page.
3. `Cancel` to close the window and take you back to the PO creation page.
### Step 4: Upload Supporting Document (Optional)
Use this step to attach relevant documents to the PO, such as vendor quotes or email correspondence. Uploaded documents will appear on the PO.
* `Quantity`: Enter the number to order (use Vendor Part Information to confirm min/max range).
* `Unit Price`, `Unit Freight`, `Unit Tariff`: The price and transportation costs for this Part. These fields will autofill based on the vendor record.
* `Requested By`: Autofills with the person who creates the PO.
* `Department For`: The department the PO is for.
* `GL #` : General ledger (GL) account number that autofills corresponding to the selected department.
* `Approved By` : The person (you) authorizing the request. Fill in with your name.
* `Date Approved`: Fill in with the Date the PO was created.
* `Order Reason`: Select a pre-defined reason for the PO from the drop down menu.
* `Internal Comment` (Optional): Notes for approvers or any information that may be relevant to this PO in the future. These notes are only visible internally.
* `External Comment` (Optional): Notes for vendor that will appear on the PO and will be sent to the vendor.
3. When you have filled in all Part Details, click:
1. `Save and add another` to add another part number to this PO.
2. `Save` to save the details and go back to the PO creation page.
3. `Cancel` to close the window and take you back to the PO creation page.
### Step 4: Upload Supporting Document (Optional)
Use this step to attach relevant documents to the PO, such as vendor quotes or email correspondence. Uploaded documents will appear on the PO.
 * Click `+ Upload Document` under “Files” to open a file browser and select the document you want to attach.
* Click `Start upload` to begin uploading.
* Click `Cancel upload` if you need to cancel the upload.
### Step 5: Review PO information
After adding parts, you will be returned to the PO creation page to finish filling out General and Delivery information.
* Click `+ Upload Document` under “Files” to open a file browser and select the document you want to attach.
* Click `Start upload` to begin uploading.
* Click `Cancel upload` if you need to cancel the upload.
### Step 5: Review PO information
After adding parts, you will be returned to the PO creation page to finish filling out General and Delivery information.
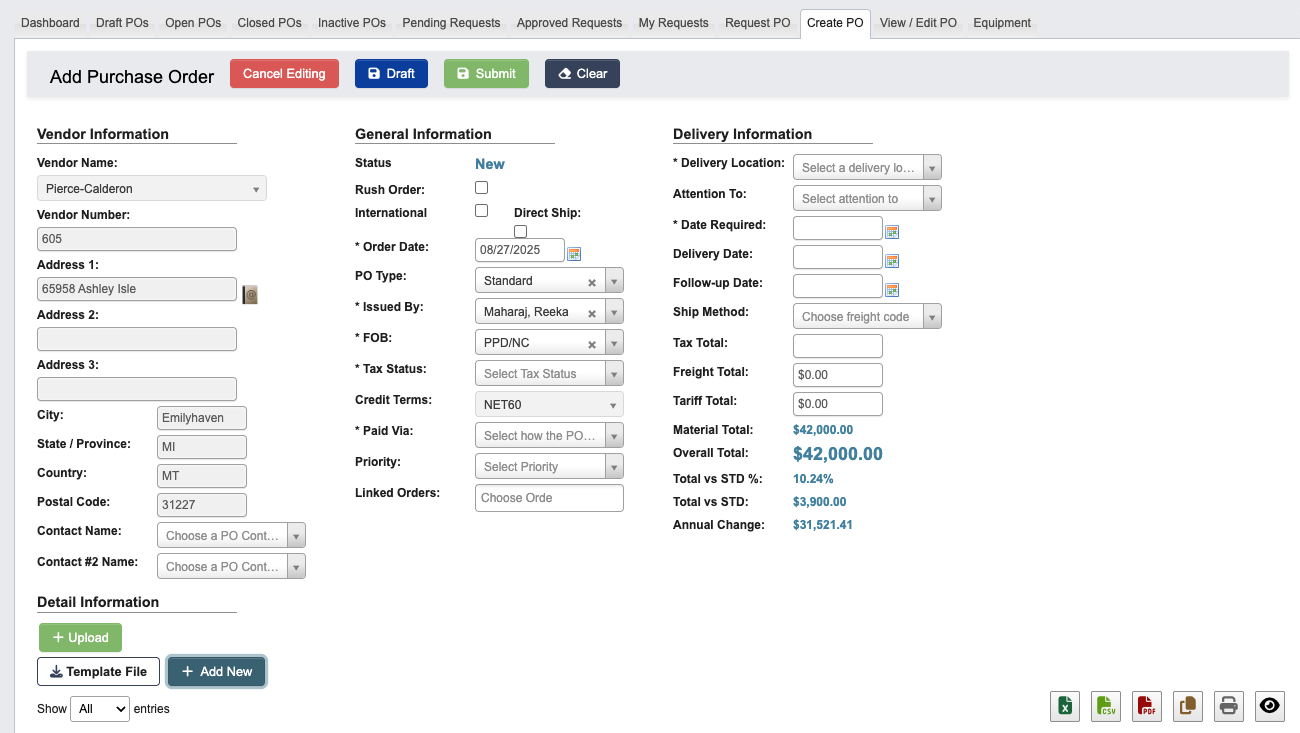 1. The following fields are below General Information:
* `Status`: Shows the current PO status.
* `Rush Order` (Optional): Check the box if the PO should be a rush order.
* `International` (Optional): Check box for international shipments.
* `Direct Ship` (Optional): Check box for direct shipments.
* `Order Date`: Defaults to the date you began creating the PO.
* `PO Type` (Optional): Choose either **Service** or **Standard**.
* `Issued By`: Autofills with the PO creator (you).
* `FOB`: Autofills with the Part’s Free On Board (FOB) point, where ownership and liability transfer.
* `Tax Status`: Choose either **Exempt** or **Taxable**.
* `Credit Terms`: Autofills with terms set by the vendor.
* `Paid via`: Choose the PO’s payment method.
* `Priority` (Optional): Signals this PO as Low, Medium, High, or Urgent priority. This provides visibility for other teams to prioritize or track processing accordingly.
* `Linked Orders` (Optional): Choose PO’s to link.
2. The following fields are below Delivery Information:
* `Delivery Location`: Choose a PO delivery location from the list of available options.
* `Attention to` (Optional): Input the direct recipient’s name, if applicable.
* `Date Required`: Input the requested delivery date.
* `Delivery Date`: The expected date for the PO’s delivery. Autofills from Date Required.
* `Follow-up Date` (Optional): Choose a date for reviewing the PO’s status, used for tracking on PO detail reports.
* `Shipping Method`: Choose freight method if needed
* Example FOB: PPD/NC = Prepaid, no charge (no shipping method required).
* `Tax Total`: Total tax paid for this PO. Autofills based on vendor details.
* `Freight Total`: Total freight costs paid for this PO. When the selected vendor has a Delivery Fee, this field preloads with that base fee and can still be edited or cleared before saving.
* `Tariff Total`: Total tariffs paid for this PO. Autofills based on line items.
* `Material Total`: Total material cost (all ordered items) for this PO.
* `Overal Total`: Sum of Tax + Freight + Tariff + Material totals.
* `Total vs STD %`: % difference from the standard total (year-to-date).
* `Total vs STD`: \$ difference from the standard total (year-to-date).
* `Annual Change`: Yearly variance in overall total.
3. Complete all required fields in the General and Delivery information sections. Also fill in any optional fields that apply to your specific PO.
### Step 6: Finalize & Submit the PO
1. At the top of the Add Purchase Order page, click `Submit` to send the PO for approval. Other choices to finish the PO include:
1. The following fields are below General Information:
* `Status`: Shows the current PO status.
* `Rush Order` (Optional): Check the box if the PO should be a rush order.
* `International` (Optional): Check box for international shipments.
* `Direct Ship` (Optional): Check box for direct shipments.
* `Order Date`: Defaults to the date you began creating the PO.
* `PO Type` (Optional): Choose either **Service** or **Standard**.
* `Issued By`: Autofills with the PO creator (you).
* `FOB`: Autofills with the Part’s Free On Board (FOB) point, where ownership and liability transfer.
* `Tax Status`: Choose either **Exempt** or **Taxable**.
* `Credit Terms`: Autofills with terms set by the vendor.
* `Paid via`: Choose the PO’s payment method.
* `Priority` (Optional): Signals this PO as Low, Medium, High, or Urgent priority. This provides visibility for other teams to prioritize or track processing accordingly.
* `Linked Orders` (Optional): Choose PO’s to link.
2. The following fields are below Delivery Information:
* `Delivery Location`: Choose a PO delivery location from the list of available options.
* `Attention to` (Optional): Input the direct recipient’s name, if applicable.
* `Date Required`: Input the requested delivery date.
* `Delivery Date`: The expected date for the PO’s delivery. Autofills from Date Required.
* `Follow-up Date` (Optional): Choose a date for reviewing the PO’s status, used for tracking on PO detail reports.
* `Shipping Method`: Choose freight method if needed
* Example FOB: PPD/NC = Prepaid, no charge (no shipping method required).
* `Tax Total`: Total tax paid for this PO. Autofills based on vendor details.
* `Freight Total`: Total freight costs paid for this PO. When the selected vendor has a Delivery Fee, this field preloads with that base fee and can still be edited or cleared before saving.
* `Tariff Total`: Total tariffs paid for this PO. Autofills based on line items.
* `Material Total`: Total material cost (all ordered items) for this PO.
* `Overal Total`: Sum of Tax + Freight + Tariff + Material totals.
* `Total vs STD %`: % difference from the standard total (year-to-date).
* `Total vs STD`: \$ difference from the standard total (year-to-date).
* `Annual Change`: Yearly variance in overall total.
3. Complete all required fields in the General and Delivery information sections. Also fill in any optional fields that apply to your specific PO.
### Step 6: Finalize & Submit the PO
1. At the top of the Add Purchase Order page, click `Submit` to send the PO for approval. Other choices to finish the PO include:
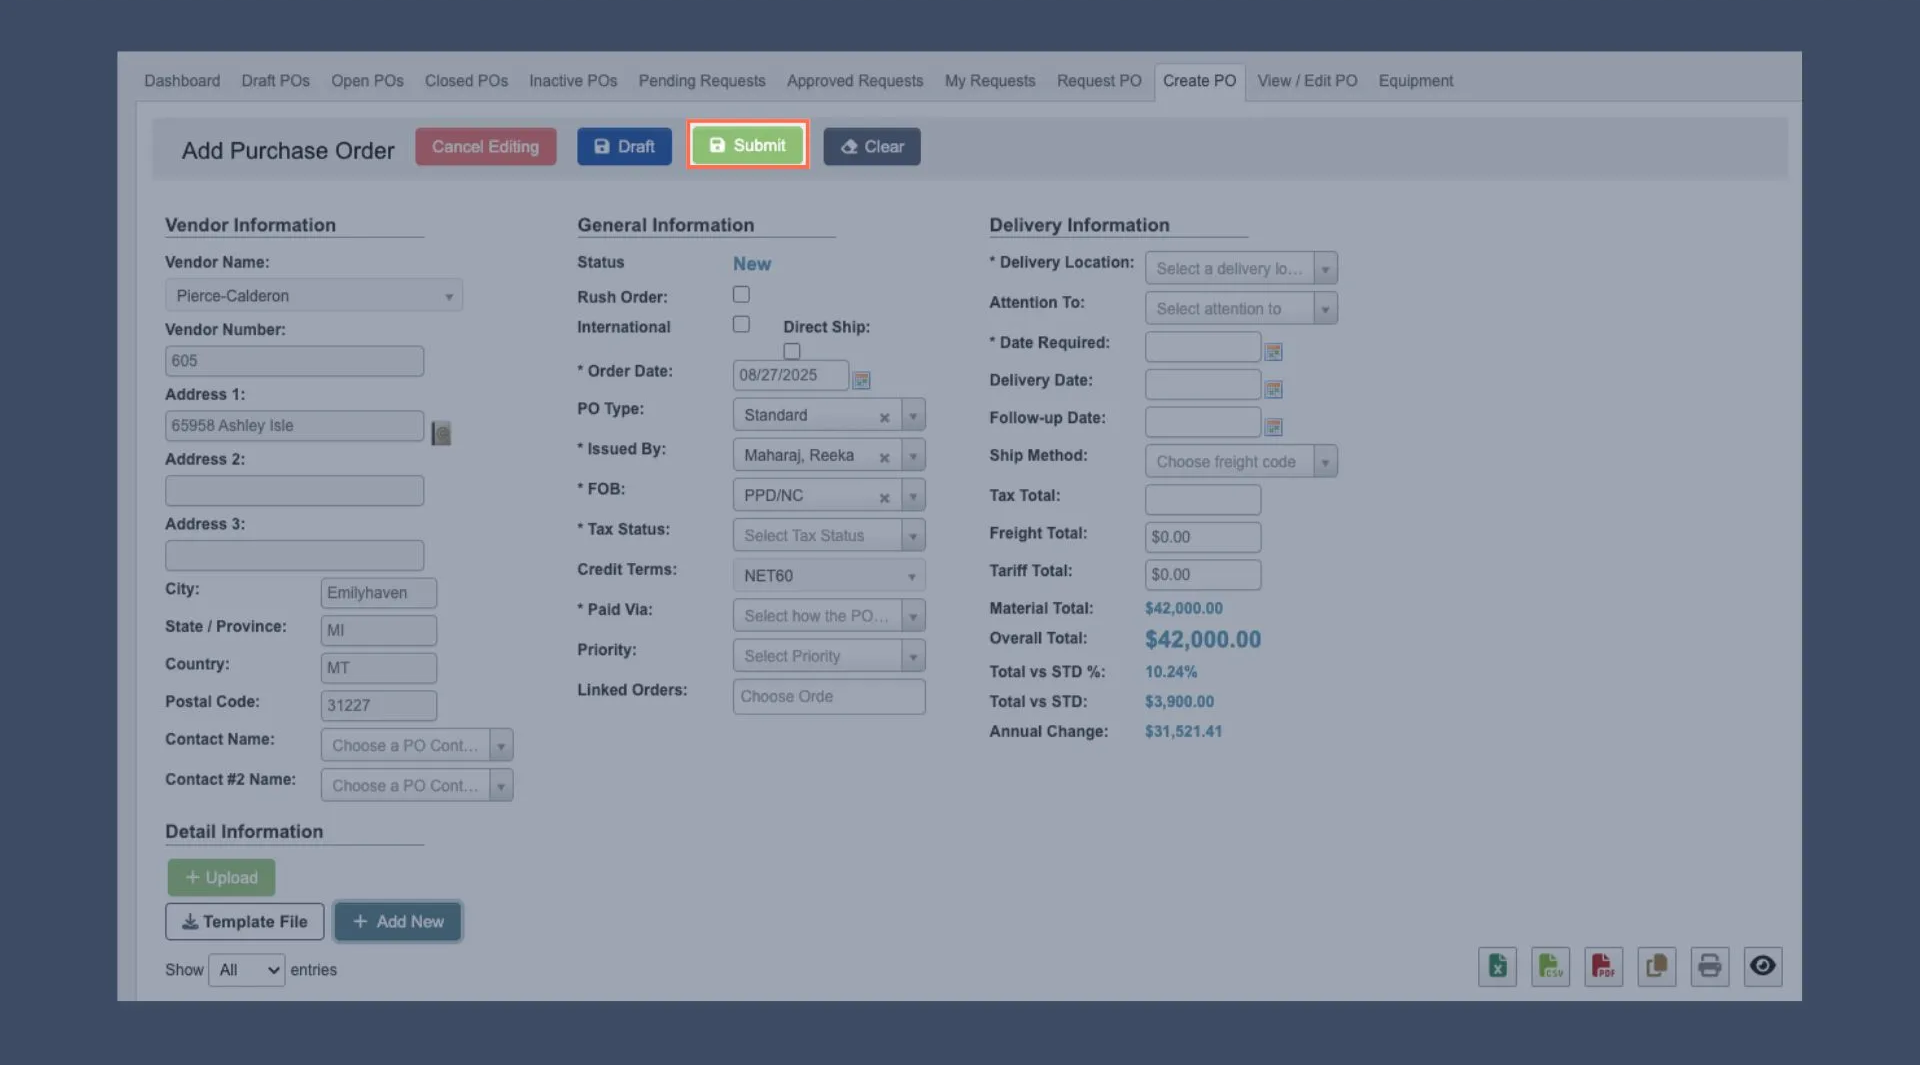 * `Cancel Editing` : Cancel the PO and lose all progress.
* `Draft`: Save the PO as a draft, and come back to it later to complete.
* `Clear`: Clear the PO contents and start over.
2. After submission:
1. Under **General Information** you will see that `Status` has changed from “New” to “Pending Approval”
2. You will also see that the PO has changed from “Create PO” to “View / Edit PO”
* `Cancel Editing` : Cancel the PO and lose all progress.
* `Draft`: Save the PO as a draft, and come back to it later to complete.
* `Clear`: Clear the PO contents and start over.
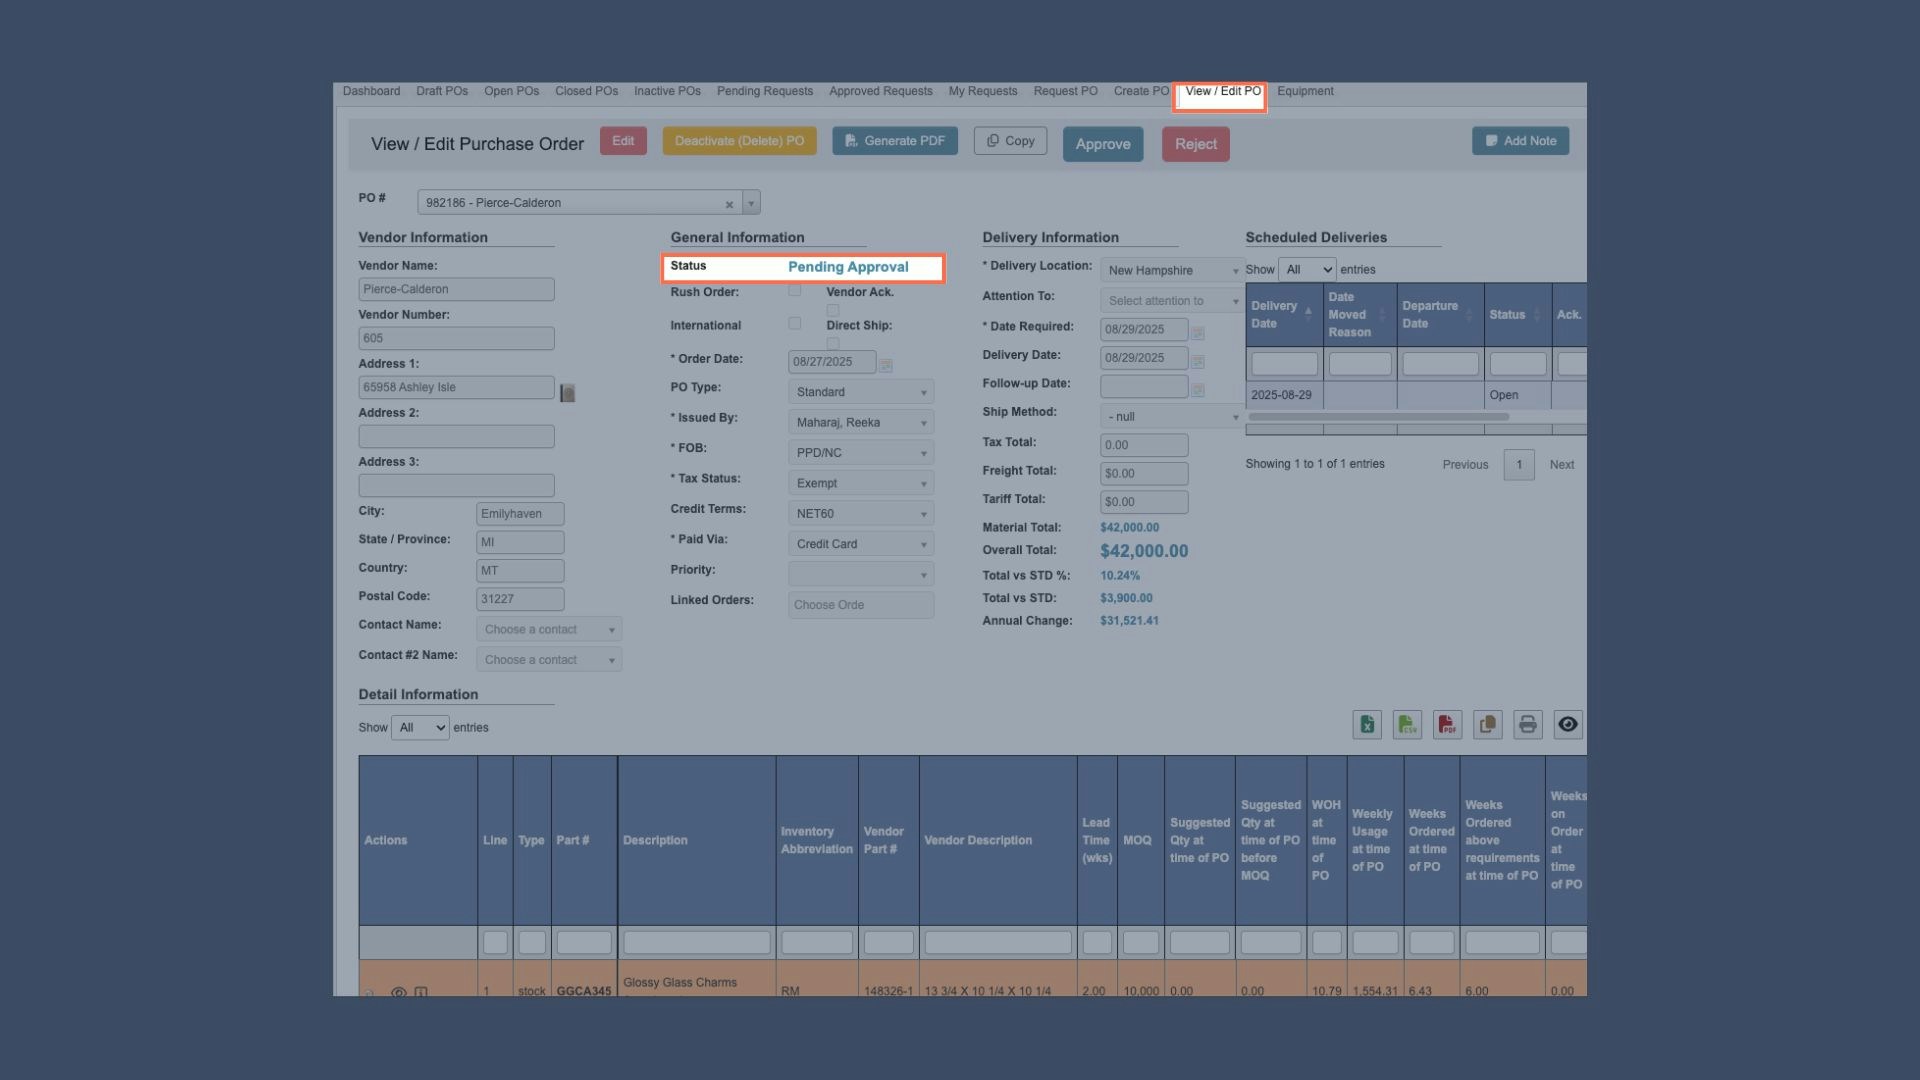
2. After submission:
1. Under **General Information** you will see that `Status` has changed from “New” to “Pending Approval”
2. You will also see that the PO has changed from “Create PO” to “View / Edit PO”
 ### Reference: Add Detail Panels
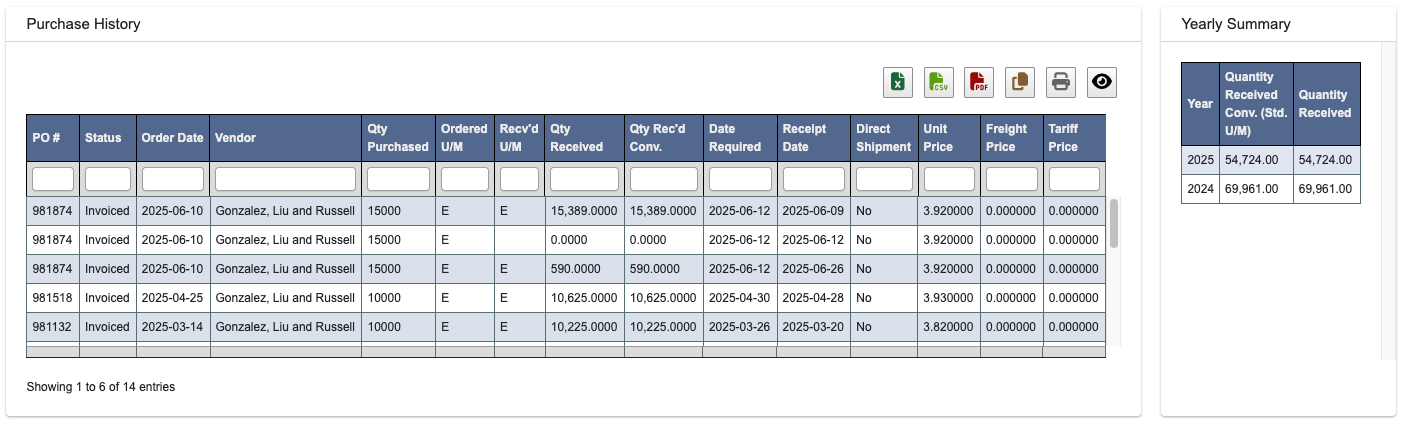
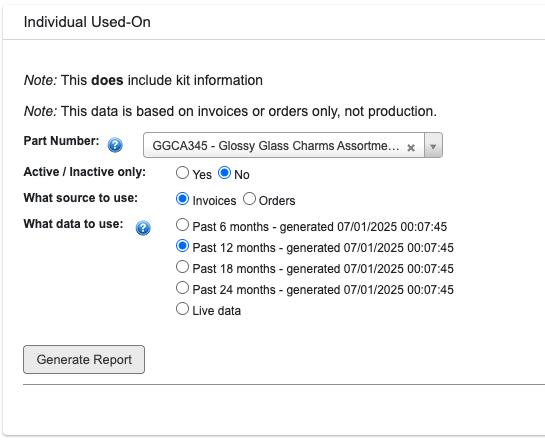
When adding parts (Step 3), several panels display additional information:
### Reference: Add Detail Panels
When adding parts (Step 3), several panels display additional information:
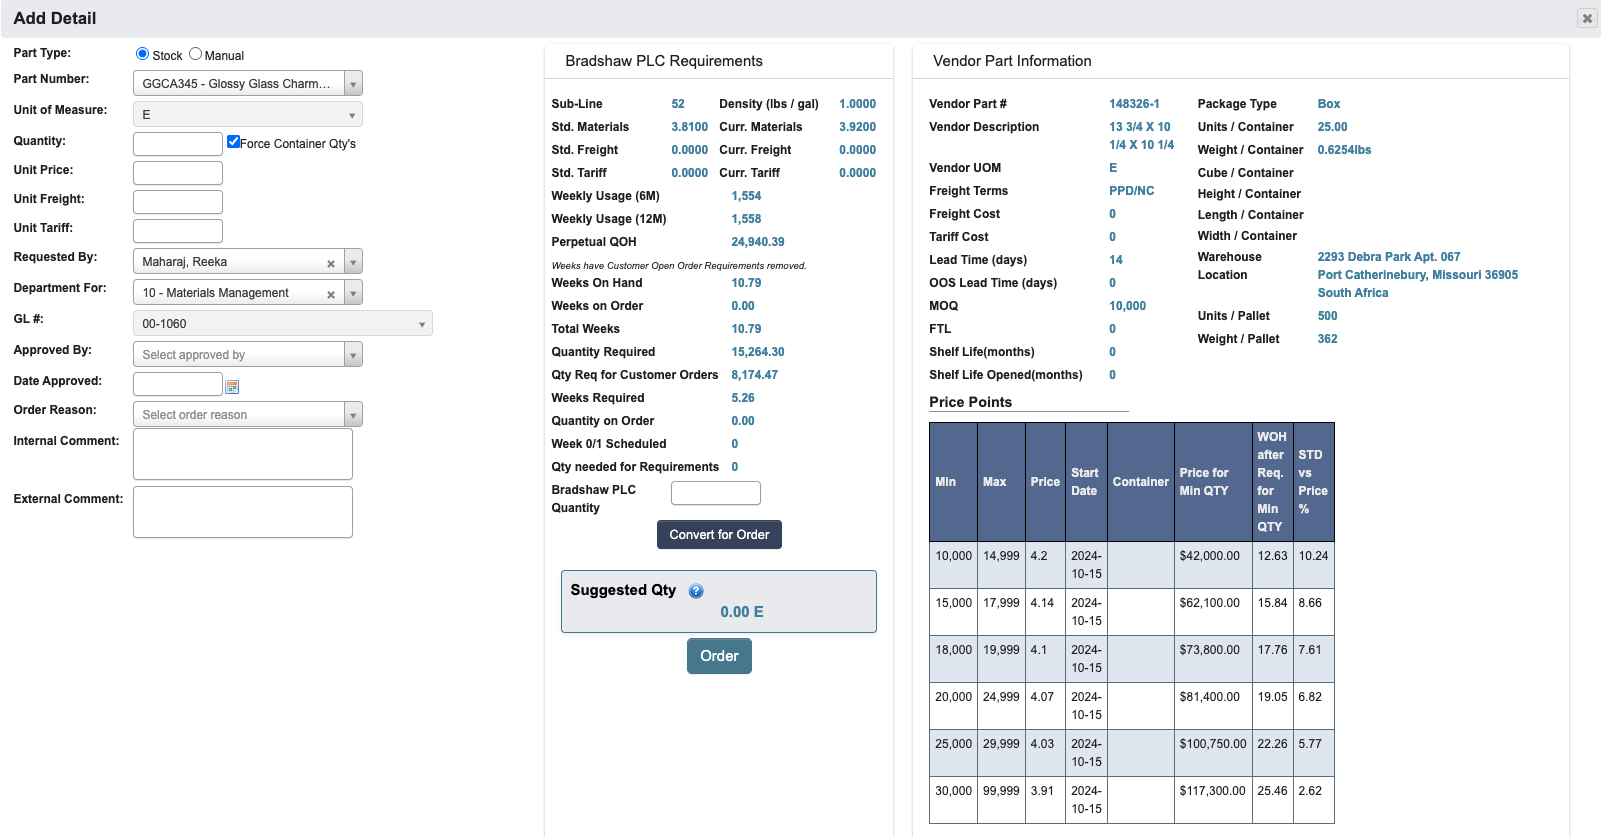 * **Requirements (Chemicals Only):** Shows weekly order, current stock, and total weeks. Meanwhile, the **Suggested QTY** helps calculate recommended reorder amounts.
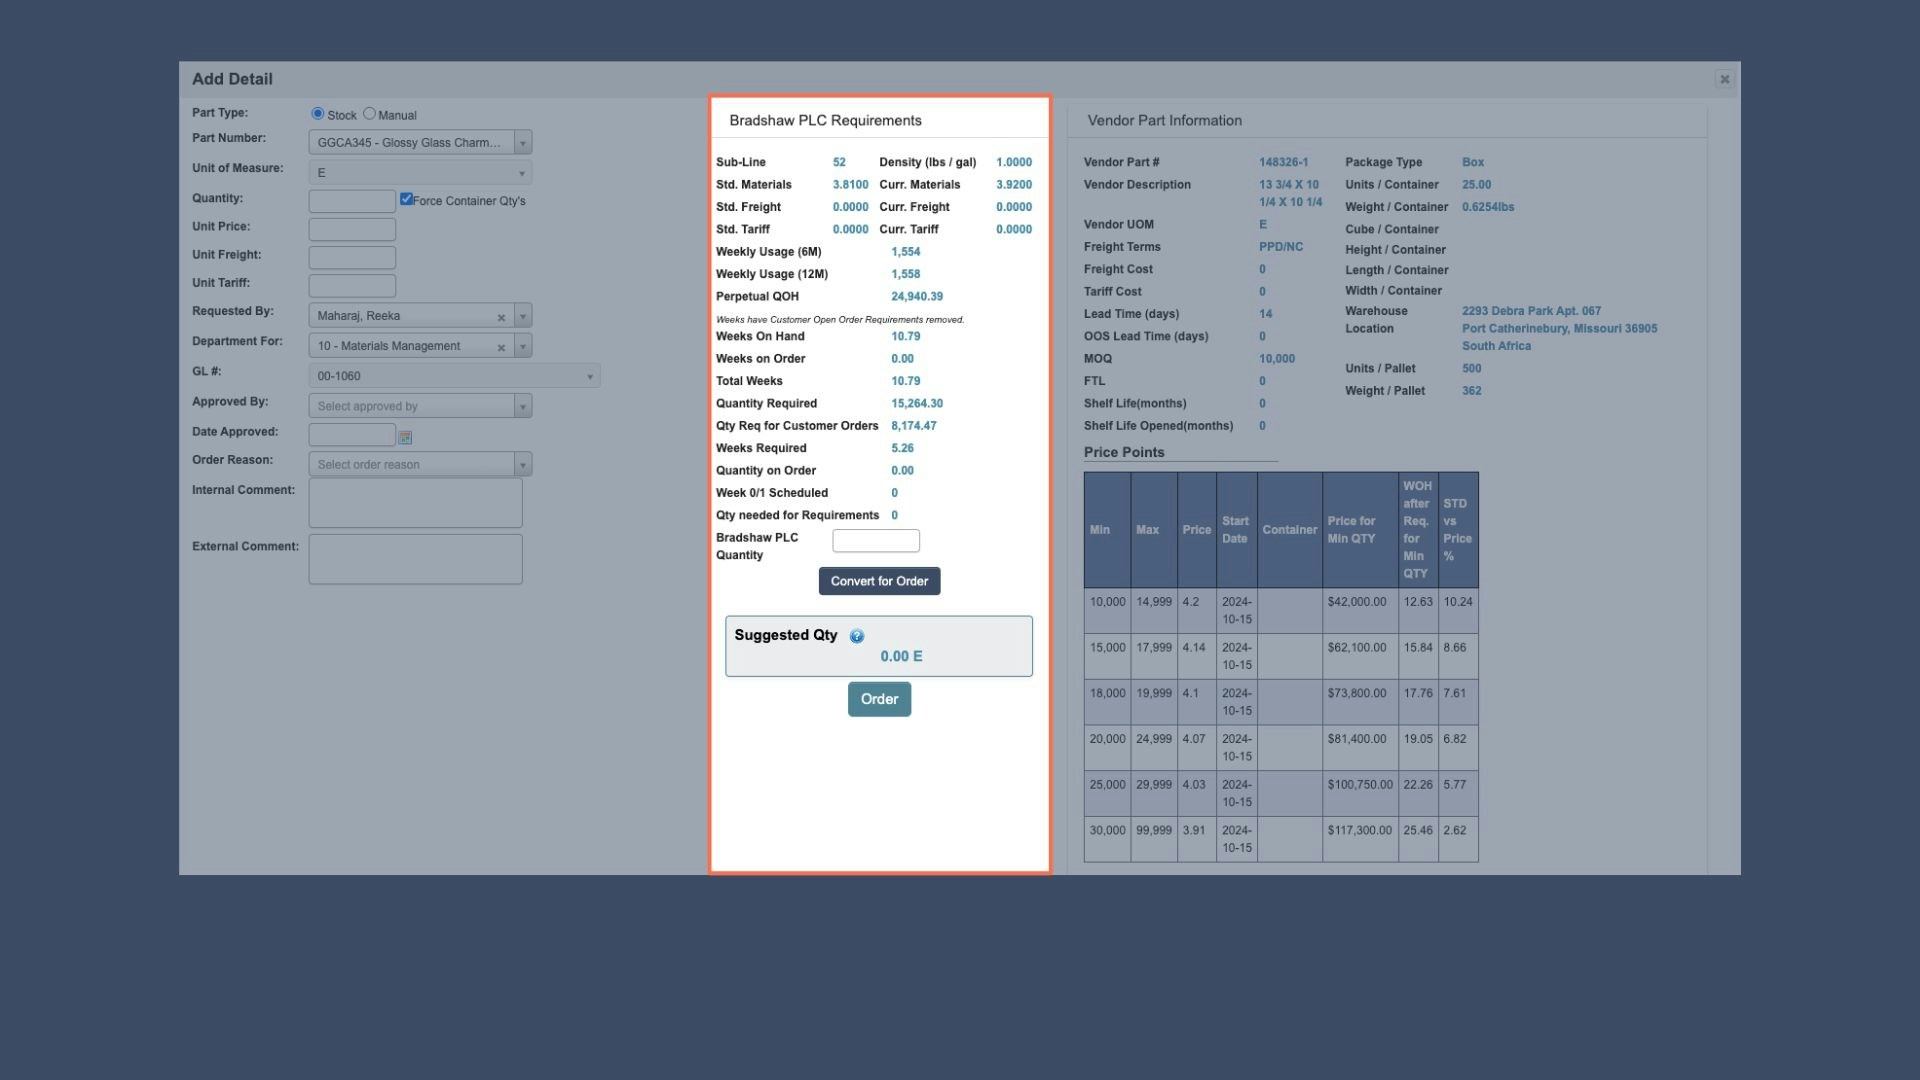 * **Vendor Part Information:** Pulls data directly from the vendor details, including price points and vendor-specific details like freight cost and tariffs.
 * **Purchase History & Yearly Summary:** Displays past orders and yearly totals.
 * **Individual Used-On Report:** Generate report to see other items tied to the Part.
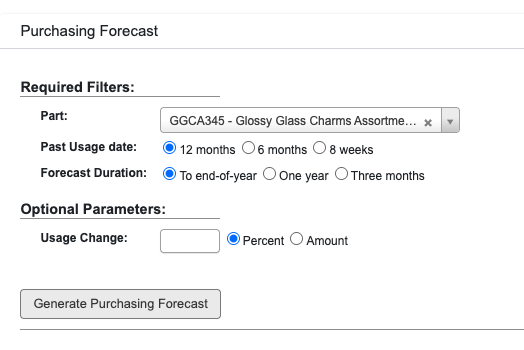
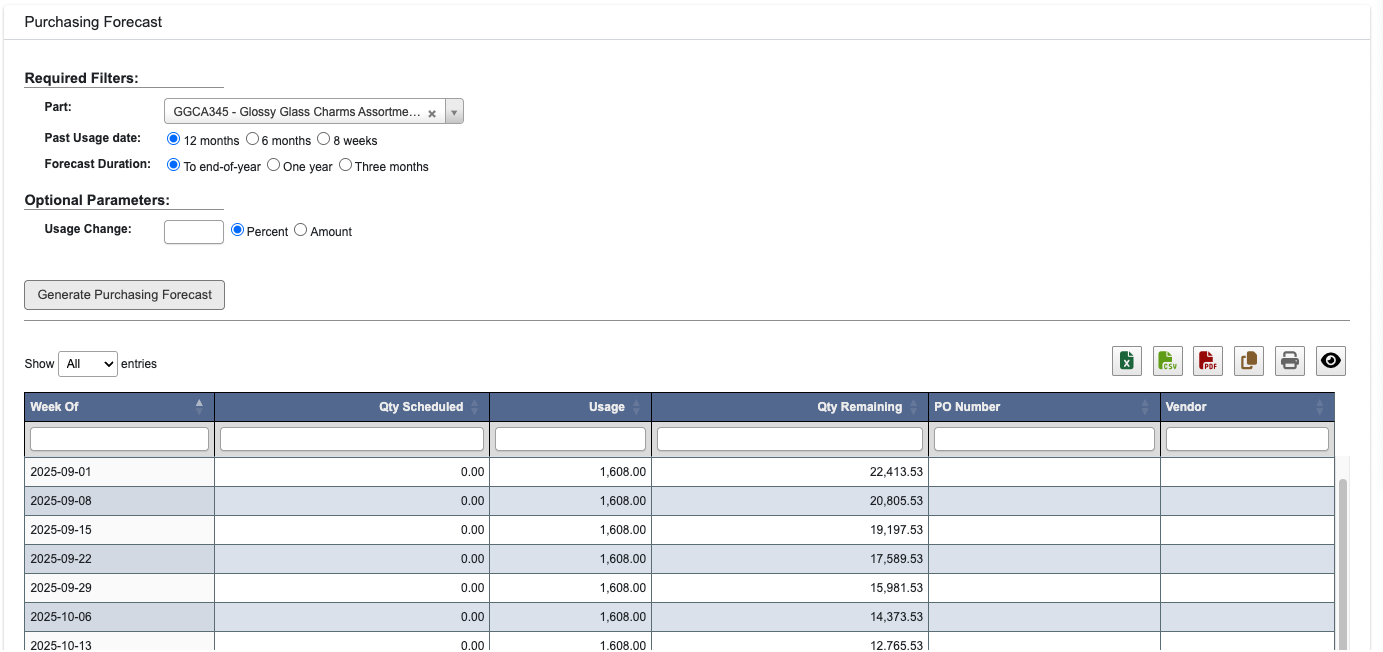
 * **Purchasing Forecast**: Forecasts order needs based on past data. Includes the option to generate forecast on demand.