> ## Documentation Index
> Fetch the complete documentation index at: https://docs.decoart.com/llms.txt
> Use this file to discover all available pages before exploring further.
# Purchase Orders - Tutorial: View / Edit Vendor
## Overview
This tutorial helps you view and edit an existing Vendor in the DASH **Purchase Order → Manage Vendors** submodule.
Viewing a Vendor lets you check vendor details, contacts, addresses, price lists, purchase order (PO) line items, accounts payable (AP) invoices and more. Editing a Vendor lets you update contact information, addresses, tax settings, or deactivate a vendor if needed.
Use this page when you need to confirm vendor details prior to issuing or updating POs, or when you need to keep vendor records up to date.
## When you should use View / Edit a Vendor
While accounting usually handles the initial setup of a vendor, purchasing often supplements those records with freight details, payment terms, additional contacts, and multiple addresses (billing, production, shipping).
* Over time, vendor records may need to be updated to reflect personnel changes, new production or shipping locations, or revised communication details.
* Vendor profiles are also where teams manage pricing and commercial terms, such as part numbers with pricing tiers, negotiated payment terms, and multiple price points across vendors. Maintain this information to ensure that purchase orders (POs), invoices, and reports reflect the most accurate details.
By keeping vendor records accurate, DASH enables clean data flow across purchase orders, reporting, and performance analysis, making it easier for accounting, operations, and purchasing to collaborate effectively.
## View vs Edit Mode
The information shown on a vendor record may differ depending on whether you’re in View mode or Edit mode.
* In View mode, most information is presented in a read-only format. Tables like Contacts, Addresses, and Price Lists can be expanded for review, but not changed.
* In Edit mode, you’ll see additional toolbar options and editable fields across sections, along with `+ Add New`, `Edit`, and `Delete` buttons where applicable. Be sure to switch to Edit mode when you need to update vendor details, add new entries, or remove outdated information.
## View a vendor
From within the `View / Edit Vendor` tab, you can explore and view existing Vendors.
1. From the Purchase Order → Manage Vendors submodule, click on the `View / Edit Vendor` tab.
 2. Click the dropdown menu next to the `Vendor` field.
3. Enter the vendor number or name you’re looking for, then click to select it.
2. Click the dropdown menu next to the `Vendor` field.
3. Enter the vendor number or name you’re looking for, then click to select it.
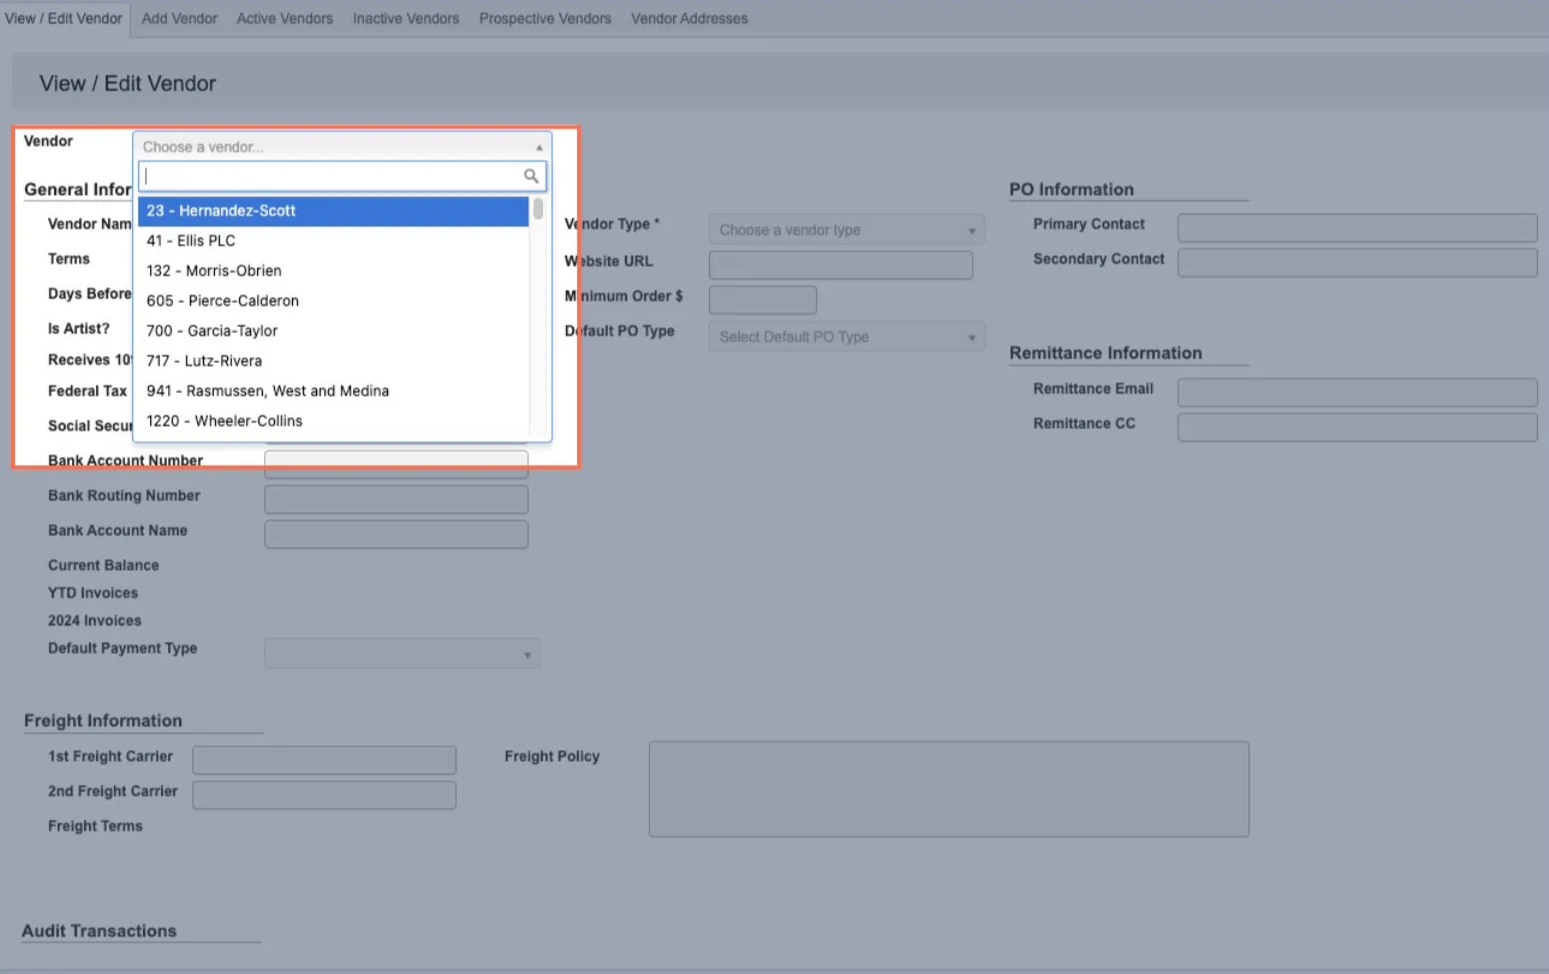 4. You can now view comprehensive vendor details including shipping information, contact details, price lists, open PO line items, accounts payable history, audit logs, and other essential information.
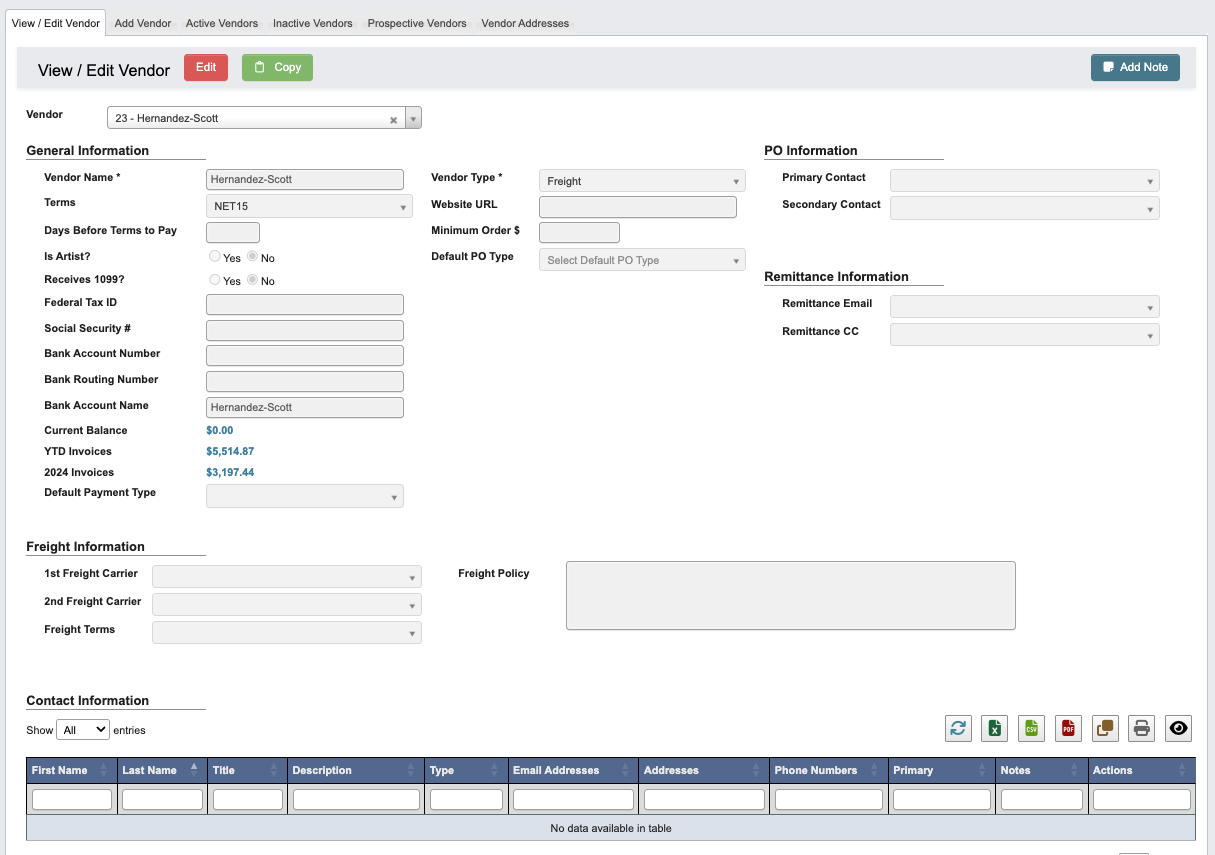 ## Manage a vendor
From within the `View / Edit Vendor` tab, you can explore manage existing Vendors.
### Edit Vendor information
1. Click `Edit` in the toolbar to update or add information to the Vendor, the toolbar will now look like this:
## Manage a vendor
From within the `View / Edit Vendor` tab, you can explore manage existing Vendors.
### Edit Vendor information
1. Click `Edit` in the toolbar to update or add information to the Vendor, the toolbar will now look like this:
 * `Cancel Editing`: Cancel editing.
* `Save`: Save changed to Vendor.
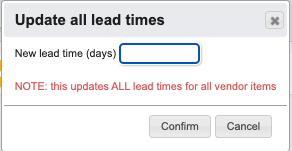
* `Update Lead Times`: To update all lead times for all vendor items.
* `Cancel Editing`: Cancel editing.
* `Save`: Save changed to Vendor.
* `Update Lead Times`: To update all lead times for all vendor items.
 2. In the `Edit` view you can update Vendor information. The top has the following sections:
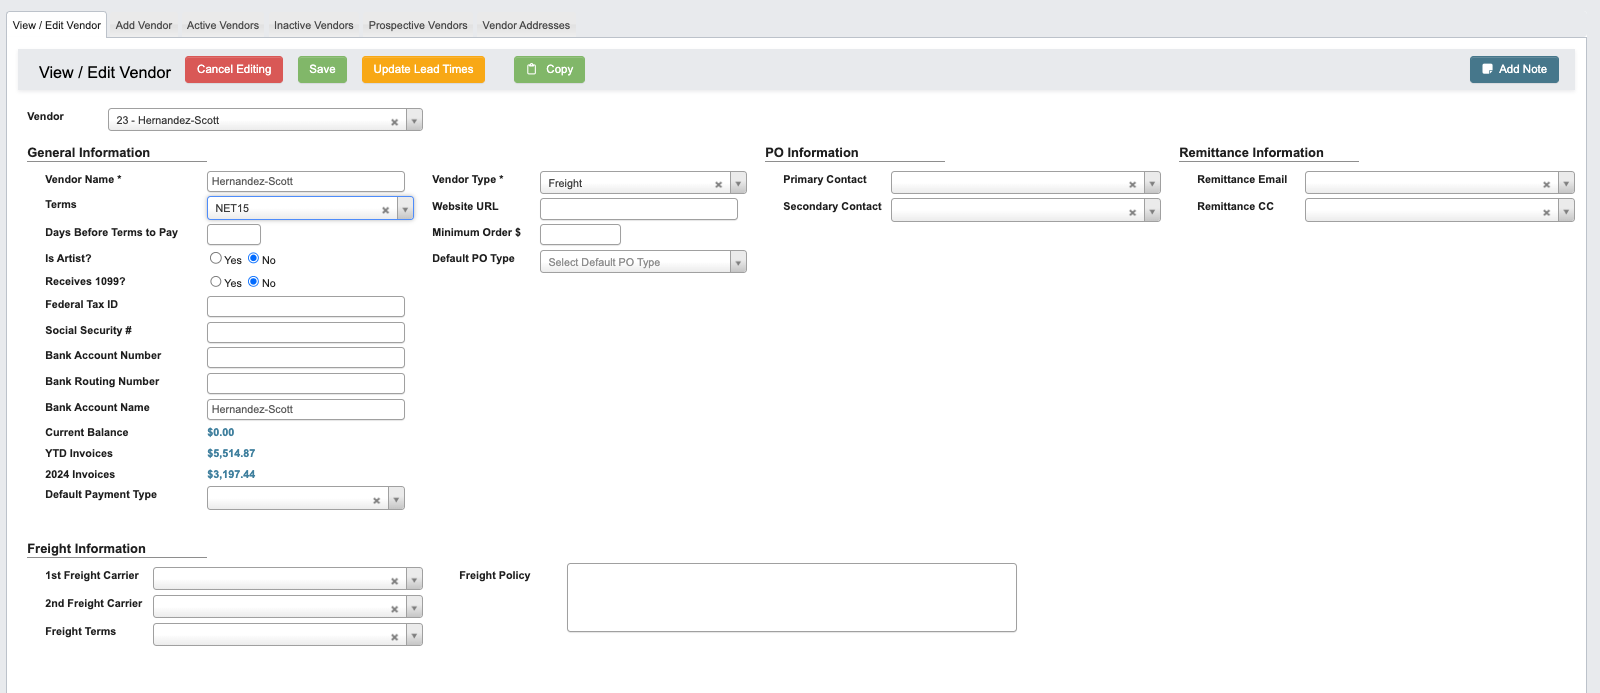 * `General Information`: This section captures the core identity and compliance information for a vendor.
* `PO Information`: This section identifies the vendor contacts who should receive purchase orders.
* `Remittance Information`: This section defines where payment remittance notices are sent.
* `Freight Information`: This section defines the vendor’s shipping and freight policies.
3. Fill in the required and optional fields in the form. For a full list of field definitions, see the [Vendor Fields reference page](/purchase-orders/purchase-orders-vendor-reference).
4. As you make changes, you can click `Save` at any point to preserve your work. This does not lock the vendor record, you’re free to continue updating other sections like Contacts, Addresses, and Price Lists after saving.
## Contact Information
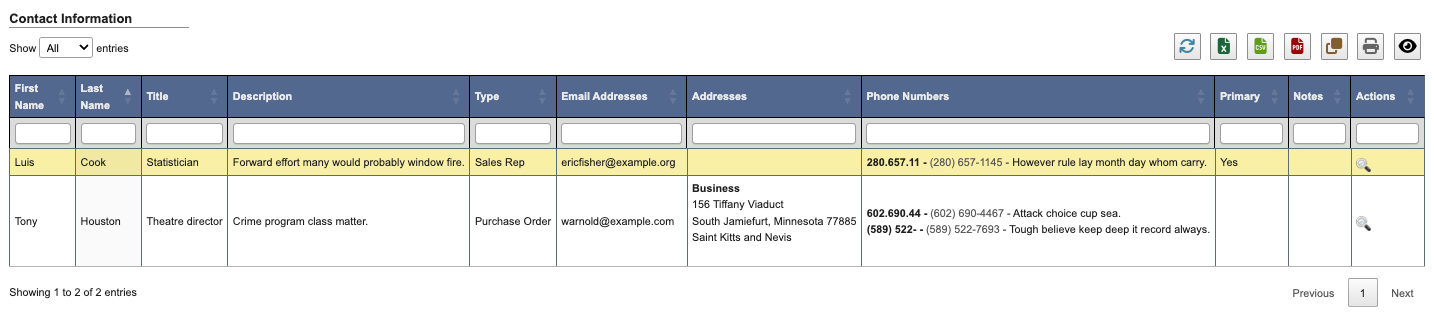
This section lists the people associated with the vendor record. Contact information ensures purchase orders, invoices, and other communications are routed to the correct individuals.
### View Contact Information
When viewing a vendor record, the contact information will display in a read-only format, showing names, titles, and roles for each contact.
To expand the details, click the `View` (”magnify”) button under `Actions`.
* `General Information`: This section captures the core identity and compliance information for a vendor.
* `PO Information`: This section identifies the vendor contacts who should receive purchase orders.
* `Remittance Information`: This section defines where payment remittance notices are sent.
* `Freight Information`: This section defines the vendor’s shipping and freight policies.
3. Fill in the required and optional fields in the form. For a full list of field definitions, see the [Vendor Fields reference page](/purchase-orders/purchase-orders-vendor-reference).
4. As you make changes, you can click `Save` at any point to preserve your work. This does not lock the vendor record, you’re free to continue updating other sections like Contacts, Addresses, and Price Lists after saving.
## Contact Information
This section lists the people associated with the vendor record. Contact information ensures purchase orders, invoices, and other communications are routed to the correct individuals.
### View Contact Information
When viewing a vendor record, the contact information will display in a read-only format, showing names, titles, and roles for each contact.
To expand the details, click the `View` (”magnify”) button under `Actions`.
 ### Add Contact Information
When editing a vendor page, you can add new contacts.
### Add Contact Information
When editing a vendor page, you can add new contacts.
 1. Click the `+ Add New` button.
2. Fill in the required and optional fields in the form. If the vendor uses the same location for `Billing` and `Shipping`, enable the checkbox labeled `Also create a Shipping address with the same details` or `Also create a Billing address with the same details` while the `Address Type` is set to `Billing` or `Shipping` to create both address records from one entry. For a full list of field definitions, see the [Vendor Fields reference page](/purchase-orders/purchase-orders-vendor-reference).
1. Click the `+ Add New` button.
2. Fill in the required and optional fields in the form. If the vendor uses the same location for `Billing` and `Shipping`, enable the checkbox labeled `Also create a Shipping address with the same details` or `Also create a Billing address with the same details` while the `Address Type` is set to `Billing` or `Shipping` to create both address records from one entry. For a full list of field definitions, see the [Vendor Fields reference page](/purchase-orders/purchase-orders-vendor-reference).
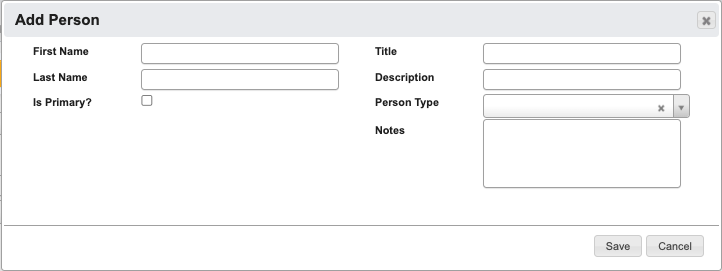 3. Click `Save` to confirm, or `Cancel` to exit without saving.
1. After saving, you may add additional details. This step is optional, if skipped, you can return later by clicking the `Edit` (”pencil”) button in the `Actions` column.
3. Click `Save` to confirm, or `Cancel` to exit without saving.
1. After saving, you may add additional details. This step is optional, if skipped, you can return later by clicking the `Edit` (”pencil”) button in the `Actions` column.
 ### Edit Contact Information
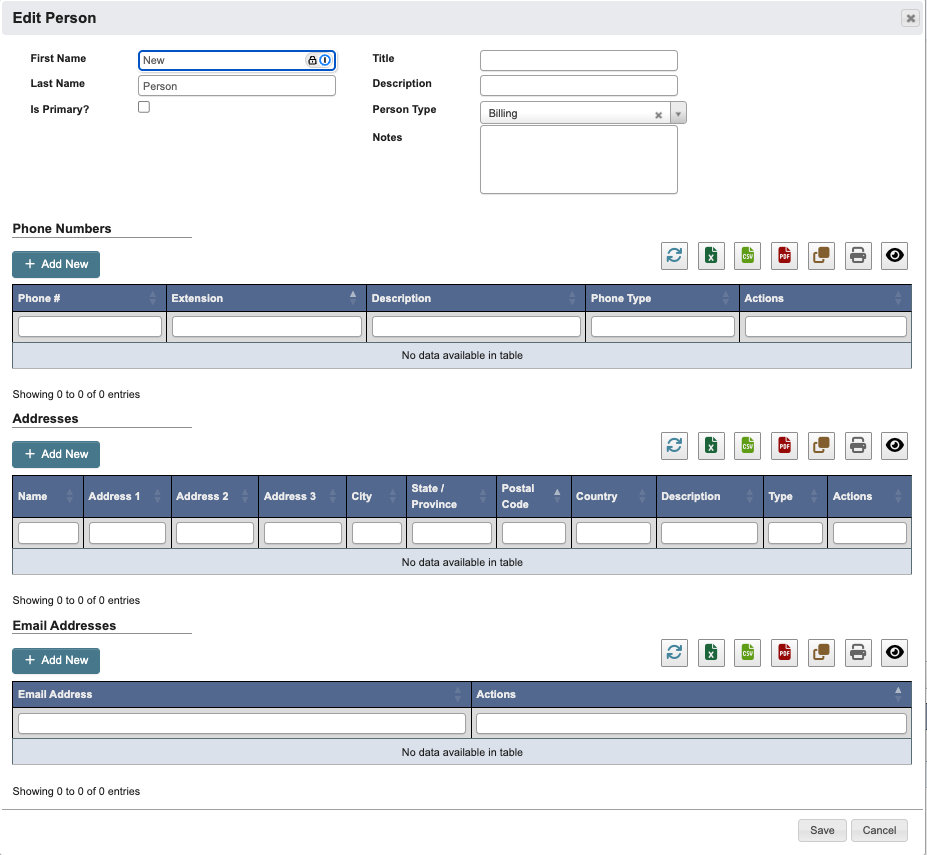
When editing a vendor page, you can update existing contacts.
1. Locate the contact in the Contact Information table.
2. Click the `Edit` (”pencil”) button in the `Actions` column and a window will pop up.
3. Update the fields as needed.
4. Click `Save` to apply changes or `Cancel` to discard them.
### Delete Contact Information
When editing a vendor page, you can delete existing contacts.
1. Locate the contact in the Contact Information table.
2. Click the `Delete` (”red X”) button in the `Actions` column and a window will pop up.
3. Click `YES, delete` to remove the contact, or `Cancel` to keep it.
## Addresses
This section lists the addresses associated with the vendor record. Addresses are used for shipping, billing, and other official correspondence with the vendor.
### View Addresses
When viewing a vendor record, the addresses appear in a read-only format, showing names, locations, and address types.
To expand the details, click the `View` (magnifying glass) button under `Actions`.
### Edit Contact Information
When editing a vendor page, you can update existing contacts.
1. Locate the contact in the Contact Information table.
2. Click the `Edit` (”pencil”) button in the `Actions` column and a window will pop up.
3. Update the fields as needed.
4. Click `Save` to apply changes or `Cancel` to discard them.
### Delete Contact Information
When editing a vendor page, you can delete existing contacts.
1. Locate the contact in the Contact Information table.
2. Click the `Delete` (”red X”) button in the `Actions` column and a window will pop up.
3. Click `YES, delete` to remove the contact, or `Cancel` to keep it.
## Addresses
This section lists the addresses associated with the vendor record. Addresses are used for shipping, billing, and other official correspondence with the vendor.
### View Addresses
When viewing a vendor record, the addresses appear in a read-only format, showing names, locations, and address types.
To expand the details, click the `View` (magnifying glass) button under `Actions`.
 ### Add Addresses
When editing a vendor page, you can add new addresses.
### Add Addresses
When editing a vendor page, you can add new addresses.
 1. Click `+ Add New` button.
2. Fill in the required and optional fields in the form. For a full list of field definitions, see the [Vendor Fields reference page](/purchase-orders/purchase-orders-vendor-reference).
1. Click `+ Add New` button.
2. Fill in the required and optional fields in the form. For a full list of field definitions, see the [Vendor Fields reference page](/purchase-orders/purchase-orders-vendor-reference).
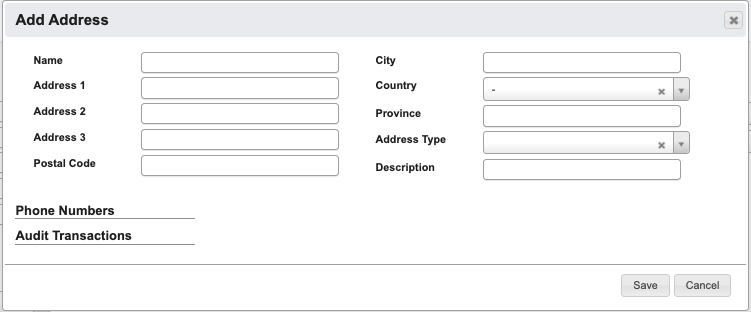 3. Click `Save` to confirm, or `Cancel` to exit without saving.
1. After saving, you may add additional details. This step is optional, if skipped, you can return later by clicking the `Edit` (”pencil”) button in the `Actions` column.
3. Click `Save` to confirm, or `Cancel` to exit without saving.
1. After saving, you may add additional details. This step is optional, if skipped, you can return later by clicking the `Edit` (”pencil”) button in the `Actions` column.
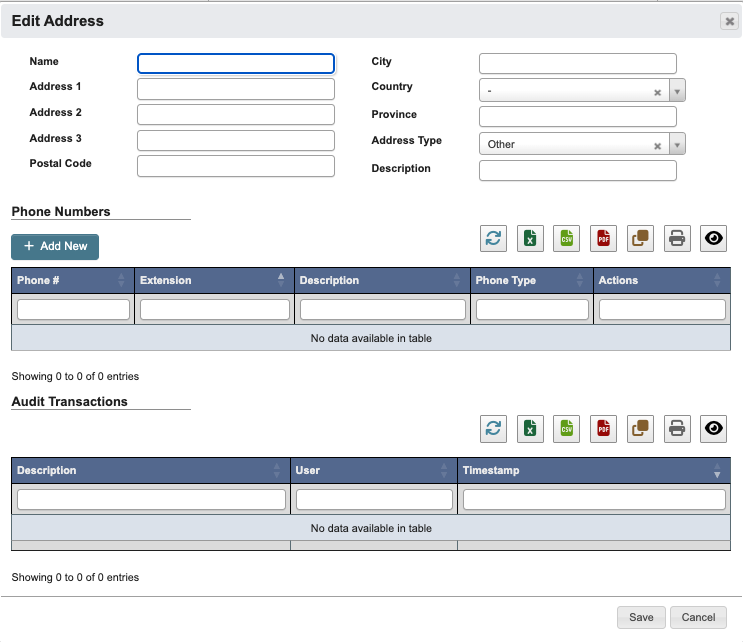 ### Edit Address
When editing a vendor page, you can update an existing address.
1. Locate the address in the Addresses table.
2. Click the `Edit` (”pencil”) button in the `Actions` column and a window will pop up.
3. Update the fields as needed.
4. Click `Save` to apply changes or `Cancel` to discard them.
### Delete Address
When editing a vendor page, you can delete an address.
1. Locate the address in the Addresses table.
2. Click the `Delete` (”red X”) button in the `Actions` column and a window will pop up.
3. Click `YES, delete` to remove the address, or `Cancel` to keep it.
## Price Lists
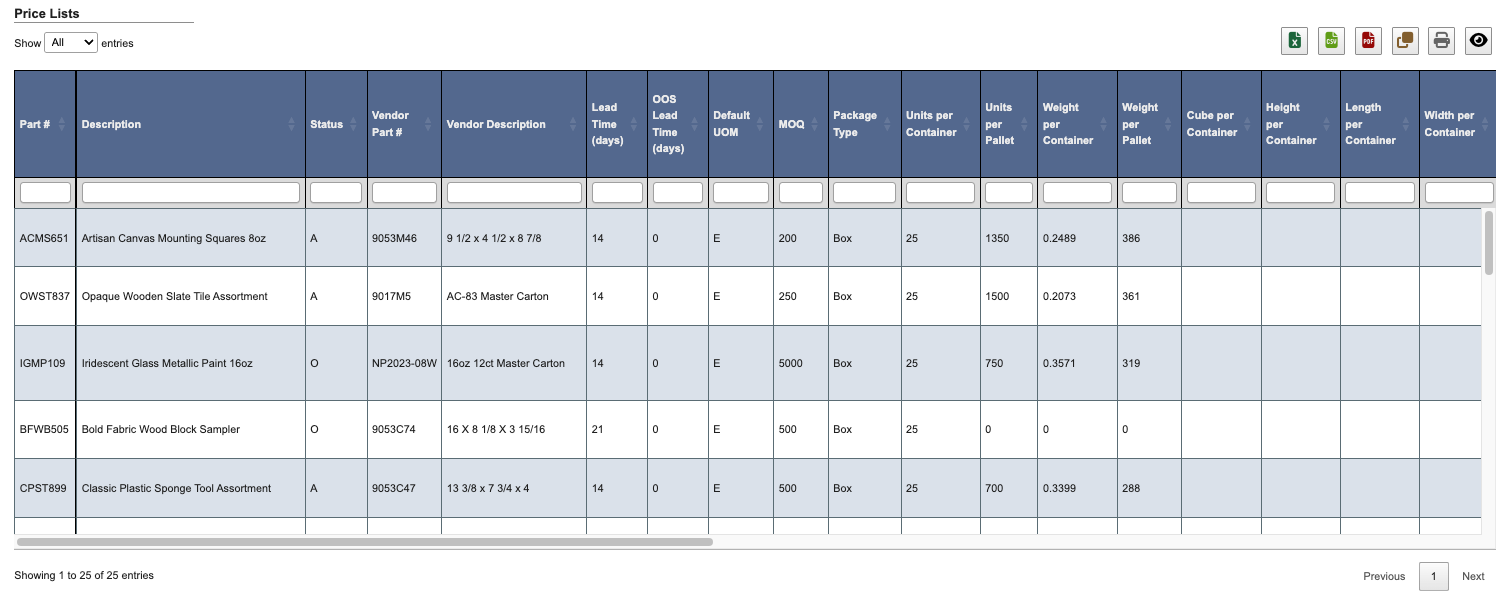
This section lists the price lists associated with the vendor record. Price lists define the parts, pricing, and related terms used when purchasing from the vendor.
### View Price Lists
When viewing a vendor record, the price lists appear in a read-only format. To display the table, click `Show Price Lists`.
### Edit Address
When editing a vendor page, you can update an existing address.
1. Locate the address in the Addresses table.
2. Click the `Edit` (”pencil”) button in the `Actions` column and a window will pop up.
3. Update the fields as needed.
4. Click `Save` to apply changes or `Cancel` to discard them.
### Delete Address
When editing a vendor page, you can delete an address.
1. Locate the address in the Addresses table.
2. Click the `Delete` (”red X”) button in the `Actions` column and a window will pop up.
3. Click `YES, delete` to remove the address, or `Cancel` to keep it.
## Price Lists
This section lists the price lists associated with the vendor record. Price lists define the parts, pricing, and related terms used when purchasing from the vendor.
### View Price Lists
When viewing a vendor record, the price lists appear in a read-only format. To display the table, click `Show Price Lists`.
 To expand the details, click the `View` (magnifying glass) button under `Actions`.
 ### Add Price Lists
When editing a vendor page, you can add new price lists.
### Add Price Lists
When editing a vendor page, you can add new price lists.
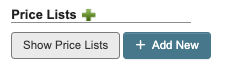 1. Click `+ Add New` button.
2. Fill in the required and optional fields in the form. For a full list of field definitions, see the [Vendor Fields reference page](/purchase-orders/purchase-orders-vendor-reference).
1. Click `+ Add New` button.
2. Fill in the required and optional fields in the form. For a full list of field definitions, see the [Vendor Fields reference page](/purchase-orders/purchase-orders-vendor-reference).
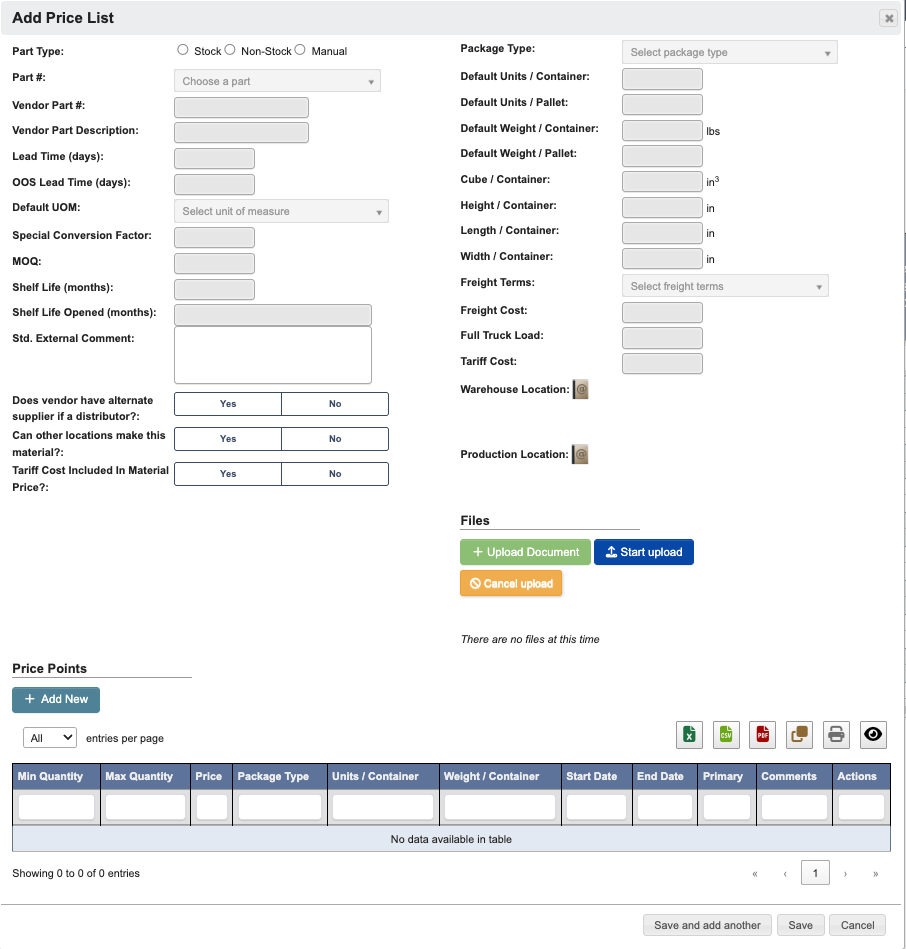 3. Click `Save and add another` to add another Price List, Click `Save` to confirm, or `Cancel` to exit without saving.
### Add Price Points
1. From the Add Price List window, click the `+ Add New` button under Price Points.
2. Fill in the required and optional fields in the form. For a full list of field definitions, see the [Vendor Fields reference page](/purchase-orders/purchase-orders-vendor-reference).
3. Click `Save and add another` to add another Price List, Click `Save` to confirm, or `Cancel` to exit without saving.
### Add Price Points
1. From the Add Price List window, click the `+ Add New` button under Price Points.
2. Fill in the required and optional fields in the form. For a full list of field definitions, see the [Vendor Fields reference page](/purchase-orders/purchase-orders-vendor-reference).
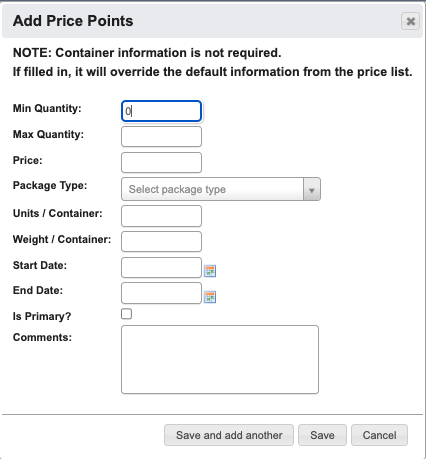 3. Click `Save and add another` to add another Price Point, Click `Save` to confirm, or `Cancel` to exit without saving.
You can also add a Price Point without editing or creating a new Price List. When editing a vendor page, look at the Price Lists table, find the Price List you want to add Price Points to, then in the `Actions` column click the `Price Lists` button (”Stacked paper”) to get the Add Price Points popup window.
### Edit Price Lists
When editing a vendor page, you can update an existing Price List.
1. Locate the list in the Price Lists table.
2. Click the `Edit` (”pencil”) button in the `Actions` column and a window will pop up.
3. Update the fields as needed.
4. Click `Save` to apply changes or `Cancel` to discard them.
### Delete Price Lists
When editing a vendor page, you can delete a Price List.
1. Locate the list in the Price Lists table.
2. Click the `Delete` (”red X”) button in the `Actions` column and a window will pop up.
3. Click `YES, delete` to remove the address, or `Cancel` to keep it.
## Files
This section shows relevant documents that have been uploaded to this vendor such as, vendor quotes or email correspondence.
3. Click `Save and add another` to add another Price Point, Click `Save` to confirm, or `Cancel` to exit without saving.
You can also add a Price Point without editing or creating a new Price List. When editing a vendor page, look at the Price Lists table, find the Price List you want to add Price Points to, then in the `Actions` column click the `Price Lists` button (”Stacked paper”) to get the Add Price Points popup window.
### Edit Price Lists
When editing a vendor page, you can update an existing Price List.
1. Locate the list in the Price Lists table.
2. Click the `Edit` (”pencil”) button in the `Actions` column and a window will pop up.
3. Update the fields as needed.
4. Click `Save` to apply changes or `Cancel` to discard them.
### Delete Price Lists
When editing a vendor page, you can delete a Price List.
1. Locate the list in the Price Lists table.
2. Click the `Delete` (”red X”) button in the `Actions` column and a window will pop up.
3. Click `YES, delete` to remove the address, or `Cancel` to keep it.
## Files
This section shows relevant documents that have been uploaded to this vendor such as, vendor quotes or email correspondence.
 ### Add Files
When editing a vendor page, you can upload supporting documents to a vendor or a vendor price list item.
### Add Files
When editing a vendor page, you can upload supporting documents to a vendor or a vendor price list item.
 1. Click `+ Upload Document` under “Files” to open a file browser and select the document you want to attach.
2. Click `Start upload` to begin uploading.
3. Click `Cancel upload` if you need to cancel the upload.
## Open PO Line Items
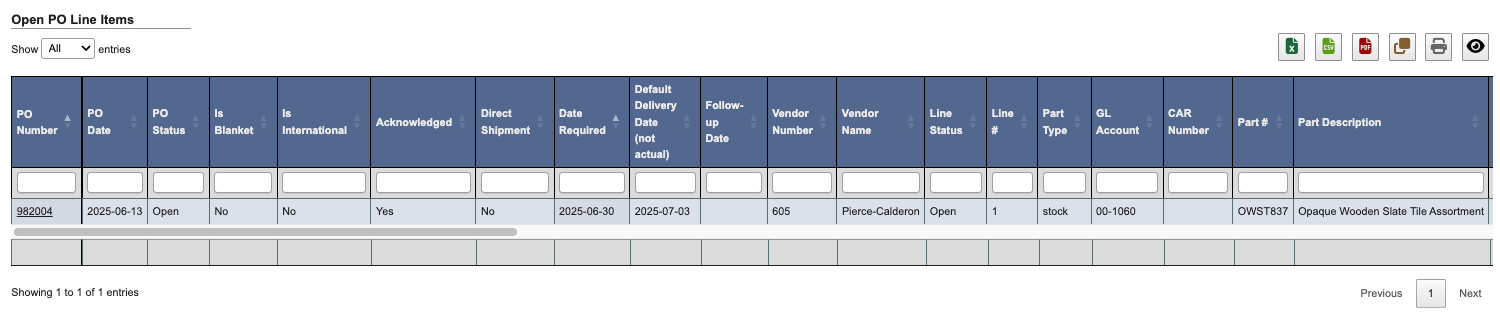
This section lists the open purchase order (PO) line items associated with the vendor record. Open PO line items show parts or services that have been ordered but not yet received or fully invoiced, helping track outstanding commitments with the vendor.
When viewing a vendor record, Open PO Line Items appears in a read-only format. To expand the details, click the `PO Number`.
1. Click `+ Upload Document` under “Files” to open a file browser and select the document you want to attach.
2. Click `Start upload` to begin uploading.
3. Click `Cancel upload` if you need to cancel the upload.
## Open PO Line Items
This section lists the open purchase order (PO) line items associated with the vendor record. Open PO line items show parts or services that have been ordered but not yet received or fully invoiced, helping track outstanding commitments with the vendor.
When viewing a vendor record, Open PO Line Items appears in a read-only format. To expand the details, click the `PO Number`.
 ## All PO’s
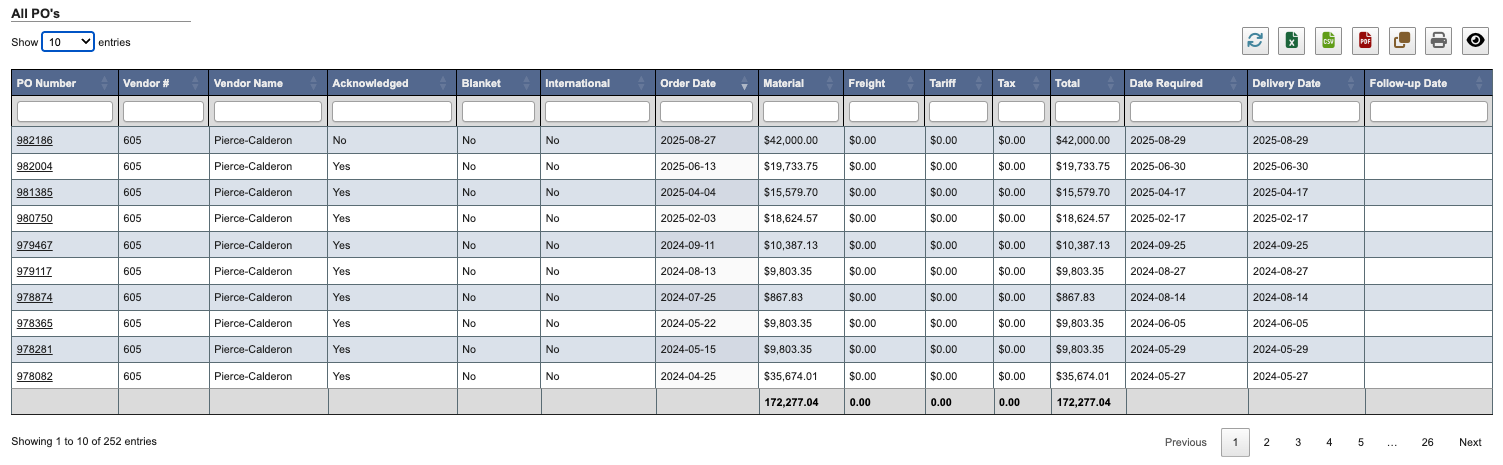
This section lists all purchase orders (POs) associated with the vendor record. It provides a complete view of past and current POs, including status, dates, and amounts, to help track ordering history and vendor activity.
When viewing a vendor record, All PO’s appears in a read-only format. To display the table, click `Show All PO's`.
## All PO’s
This section lists all purchase orders (POs) associated with the vendor record. It provides a complete view of past and current POs, including status, dates, and amounts, to help track ordering history and vendor activity.
When viewing a vendor record, All PO’s appears in a read-only format. To display the table, click `Show All PO's`.
 To expand the details, click the `PO Number`.
 ## Open Accounts Payable
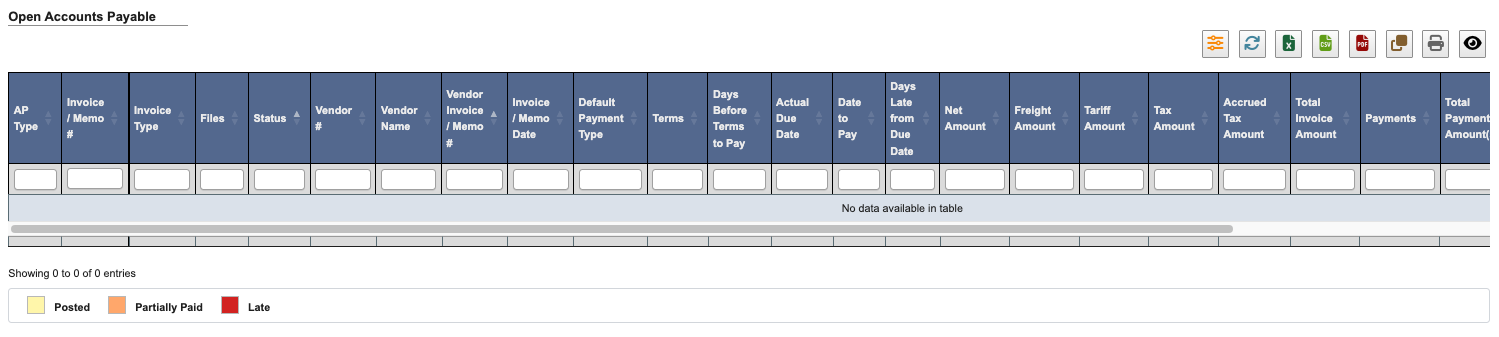
This section lists the open accounts payable (AP) items associated with the vendor record. Open AP shows unpaid invoices and outstanding balances, helping track what is currently owed to the vendor and ensuring timely payment management.
## Open Accounts Payable
This section lists the open accounts payable (AP) items associated with the vendor record. Open AP shows unpaid invoices and outstanding balances, helping track what is currently owed to the vendor and ensuring timely payment management.
 ## AP History (since 2018)
This section lists the Accounts Payable (AP) history associated with the vendor record. AP history provides a record of invoices, payments, and adjustments since 2018, helping track financial transactions and vendor payment activity.
### View AP History (since 2018)
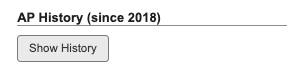
When viewing a vendor record, AP History (since 2018) appears in a read-only format. To display the table, click `Show History`.
## AP History (since 2018)
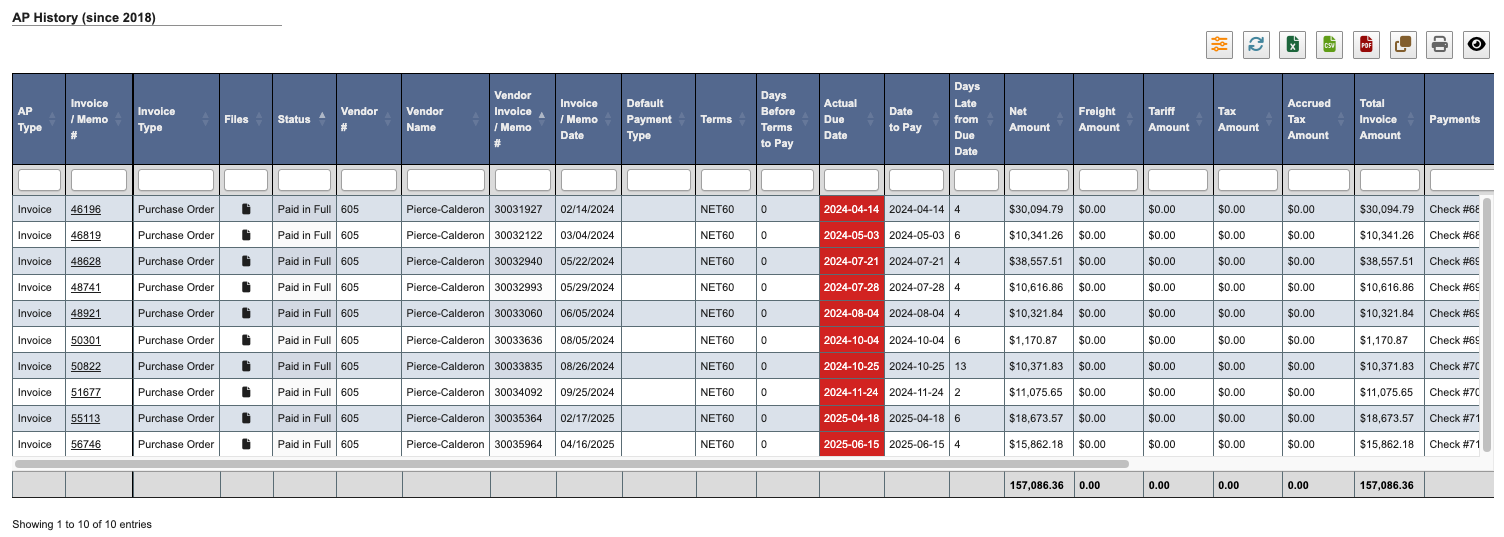
This section lists the Accounts Payable (AP) history associated with the vendor record. AP history provides a record of invoices, payments, and adjustments since 2018, helping track financial transactions and vendor payment activity.
### View AP History (since 2018)
When viewing a vendor record, AP History (since 2018) appears in a read-only format. To display the table, click `Show History`.
 To expand the details, click the `Invoice/Memo #` on the AP Invoice.
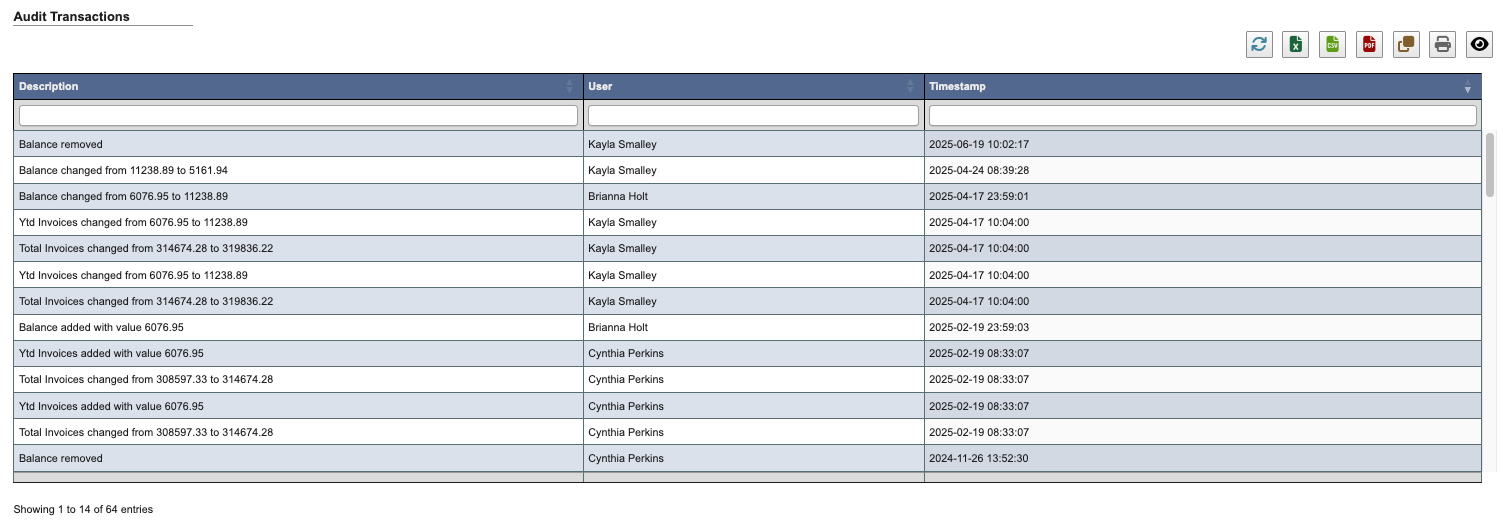
 ## Audit Transactions
The section shows all changes, who made them, and when.
## Audit Transactions
The section shows all changes, who made them, and when.