> ## Documentation Index
> Fetch the complete documentation index at: https://docs.decoart.com/llms.txt
> Use this file to discover all available pages before exploring further.
# Reports Submodule
## Overview
The **Purchase Orders → Reports** submodule helps you track what’s open and when it’s due, spot late/missing dates, and plan upcoming buys using recent usage.
Buyers use these reports frequently to triage risk (expedite, push out, or follow up on unacknowledged lines), and to prepare for approvals.
## How to Generate a Report
The Purchase Order reports give you different ways to look at open and past purchase activity. Here are the main report tabs you’ll see in this module:
* **PO Detail Info:** The most detailed view. This report shows all open or closed PO lines with full information and color-coded status indicators. Buyers use this report to monitor past-due deliveries, missing dates, and follow-up items.
* **Delivery Calendar:** A month calendar of acknowledged scheduled delivery dates. Buyers use it to see acknowledged stock-part PO deliveries by day without exporting the PO Detail report into another calendar.
* **Open PO Schedule Details:** A more condensed version of the PO schedule. It has fewer columns and is easier to scan and share with teams outside of Purchasing who just need a simple status update on upcoming receipts.
* **MPV Report:** (Material Price Variance) A financial view of purchase price variance. It shows where costs are higher or lower than standard, helping Finance and Purchasing understand savings, increases, and variance across the year.
* **Purchasing Forecast:** A report that combines incoming POs with usage history. It helps you see when supply will arrive, how much you’ll consume, and when you might run out. This supports planning the timing and size of your next order.
* **Vendor Locations:** A quick lookup of vendor addresses and ship-from locations. Useful when you need to confirm where a supplier is shipping from or identify alternatives for urgent orders.
* **Vendor 1099:** A year-end summary of 1099-reportable payments by vendor, used to prepare 1099-MISC and 1099-NEC filings. It totals only the payments that posted to 1099-flagged expense accounts, excludes voided payments, and lets you review and fine-tune each vendor’s detail before exporting.
Each report is designed for a slightly different audience or need. Together, they help you answer questions such as “What’s outstanding?”, “What’s late?”, “When will we run out?”, and “Are we paying more or less than expected?”.
## PO Detail Info
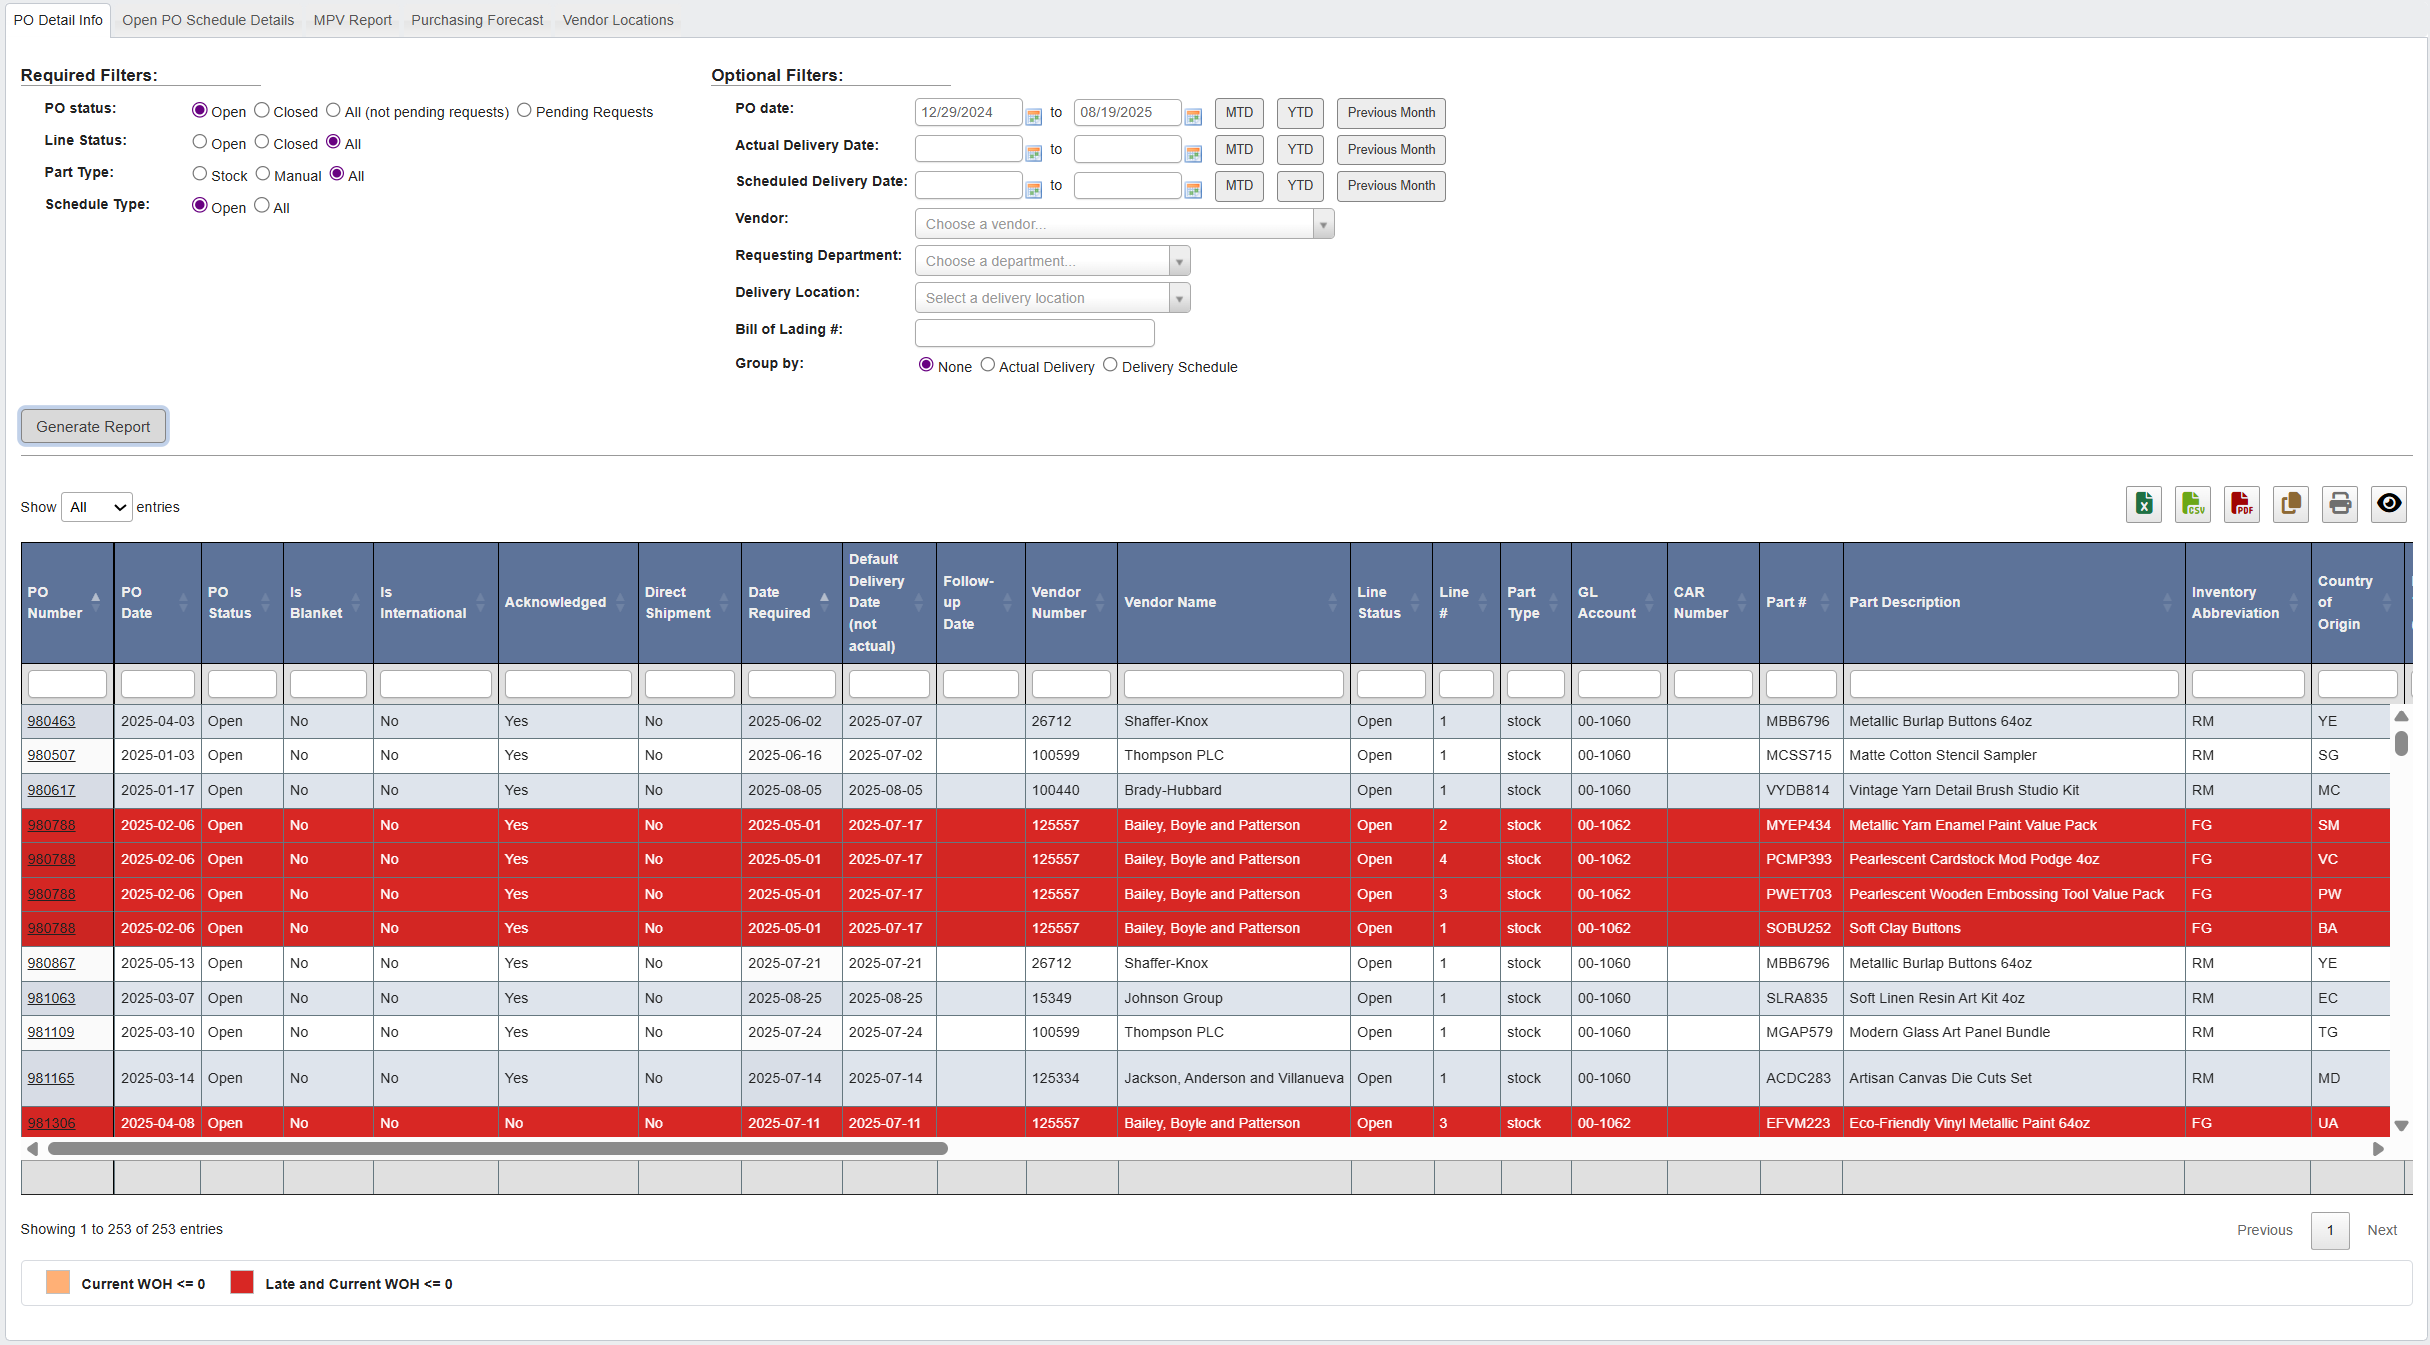 Use the **PO Detail Info** tab to triage open POs, spot late/missing dates, and plan expedites/push-outs.
**This report is useful for:** Daily buyer huddles to identify risk (late/undated lines), decide what to expedite or push out, and follow-up with suppliers and operations.
1. Click the `PO Detail Info` tab.
2. Set **PO Status**/**Line Status**/**Part Type**/**Schedule Type** (buyers typically use **Open / Open / All / Open**).
3. Add any date filters (**PO Date / Actual Delivery Date / Scheduled Delivery Date**).
4. (Optional) Narrow scope by **Vendor**, **Department**, **Delivery Location**, or **Bill of Lading #**.
5. Choose **Group By** → **Delivery Schedule** (the date you expect receipt).
6. Click `Generate Report`.
7. Review the grid and take action:
* Look for **missing Scheduled Delivery Dates**.
* Use the color legend at the bottom: **Red = Late & current WOH ≤ 0**; **Orange = current WOH ≤ 0**.
* Use **Follow-up Date** to drive daily check-ins.
* If needed, verify **Acknowledged** or flag **Rush Order** (adds “Urgent—please expedite” on the vendor PDF).
## Delivery Calendar
Use the **PO Detail Info** tab to triage open POs, spot late/missing dates, and plan expedites/push-outs.
**This report is useful for:** Daily buyer huddles to identify risk (late/undated lines), decide what to expedite or push out, and follow-up with suppliers and operations.
1. Click the `PO Detail Info` tab.
2. Set **PO Status**/**Line Status**/**Part Type**/**Schedule Type** (buyers typically use **Open / Open / All / Open**).
3. Add any date filters (**PO Date / Actual Delivery Date / Scheduled Delivery Date**).
4. (Optional) Narrow scope by **Vendor**, **Department**, **Delivery Location**, or **Bill of Lading #**.
5. Choose **Group By** → **Delivery Schedule** (the date you expect receipt).
6. Click `Generate Report`.
7. Review the grid and take action:
* Look for **missing Scheduled Delivery Dates**.
* Use the color legend at the bottom: **Red = Late & current WOH ≤ 0**; **Orange = current WOH ≤ 0**.
* Use **Follow-up Date** to drive daily check-ins.
* If needed, verify **Acknowledged** or flag **Rush Order** (adds “Urgent—please expedite” on the vendor PDF).
## Delivery Calendar
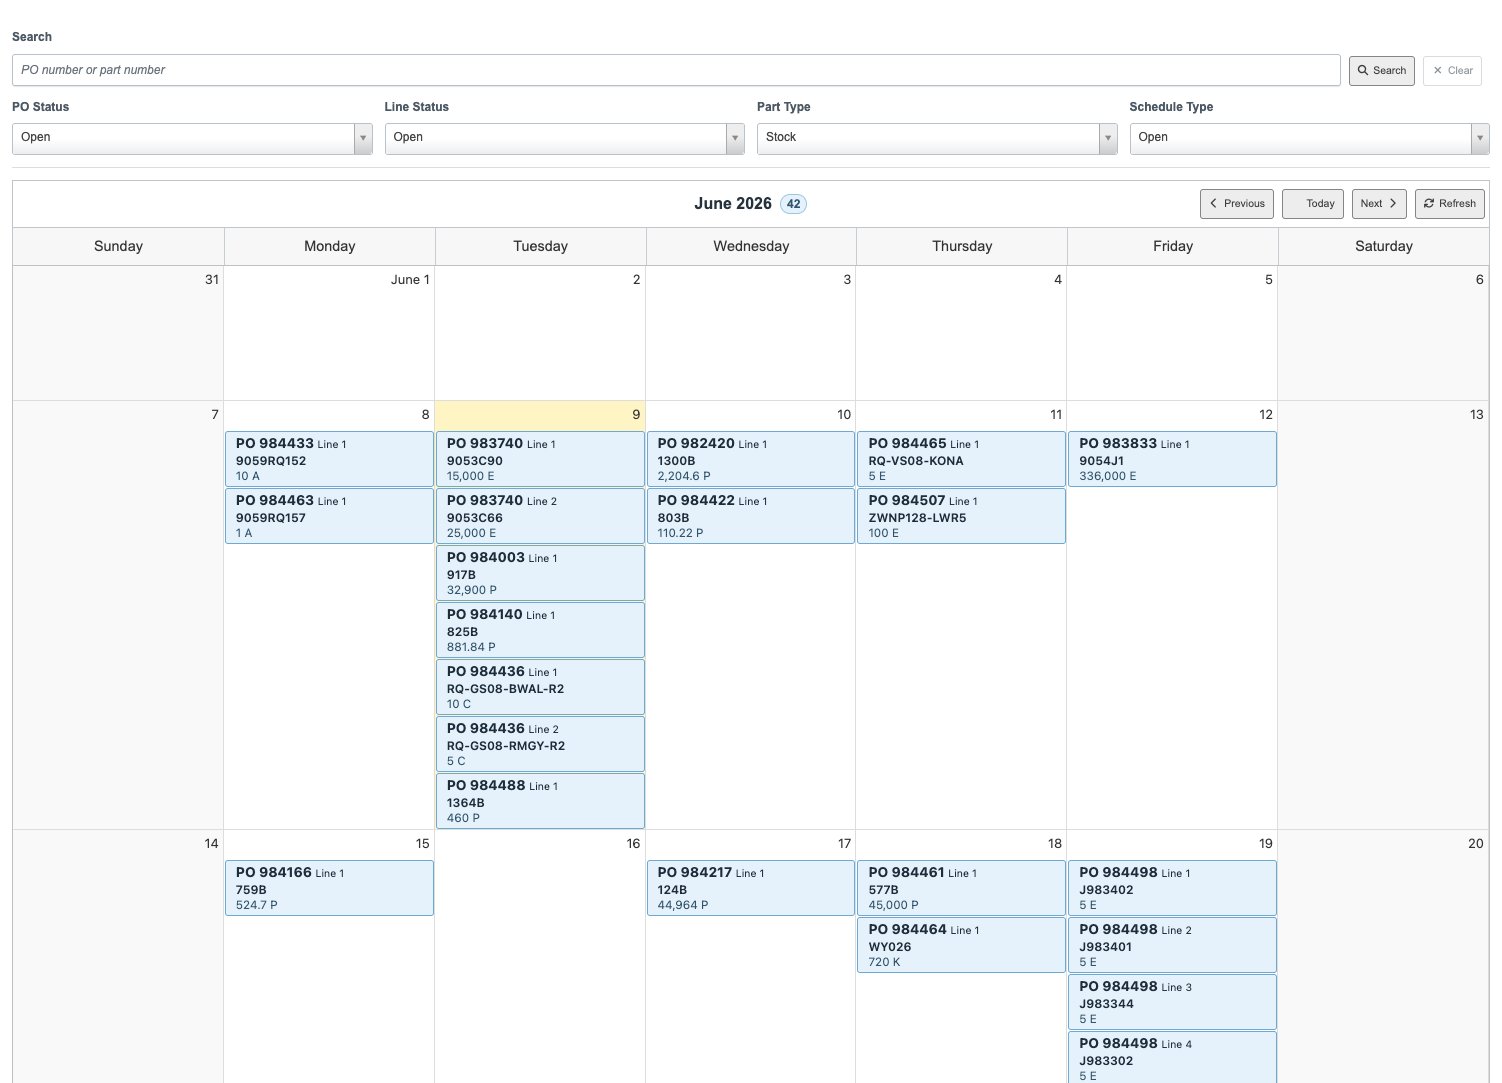 Use the **Delivery Calendar** tab to review acknowledged scheduled deliveries by calendar day.
**This view is useful for:** Daily or weekly buyer planning when you need to see acknowledged inbound deliveries grouped by delivery date instead of scanning a grid.
1. Click the `Delivery Calendar` tab.
2. Use `Previous`, `Today`, and `Next` to move between months.
3. Search by PO number or part number to jump to the first matching delivery. If there are multiple matches, use the match controls to move through them.
4. Adjust **PO Status**, **Line Status**, **Part Type**, or **Schedule Type** if you need to widen or narrow the calendar. The calendar defaults to **Open / Open / Stock / Open**.
5. Click a PO delivery on the calendar to open the purchase order.
Only delivery schedules with **Scheduled Delivery Date Acknowledged = Yes** appear on the calendar.
## Open PO Schedule Details
Use the **Delivery Calendar** tab to review acknowledged scheduled deliveries by calendar day.
**This view is useful for:** Daily or weekly buyer planning when you need to see acknowledged inbound deliveries grouped by delivery date instead of scanning a grid.
1. Click the `Delivery Calendar` tab.
2. Use `Previous`, `Today`, and `Next` to move between months.
3. Search by PO number or part number to jump to the first matching delivery. If there are multiple matches, use the match controls to move through them.
4. Adjust **PO Status**, **Line Status**, **Part Type**, or **Schedule Type** if you need to widen or narrow the calendar. The calendar defaults to **Open / Open / Stock / Open**.
5. Click a PO delivery on the calendar to open the purchase order.
Only delivery schedules with **Scheduled Delivery Date Acknowledged = Yes** appear on the calendar.
## Open PO Schedule Details
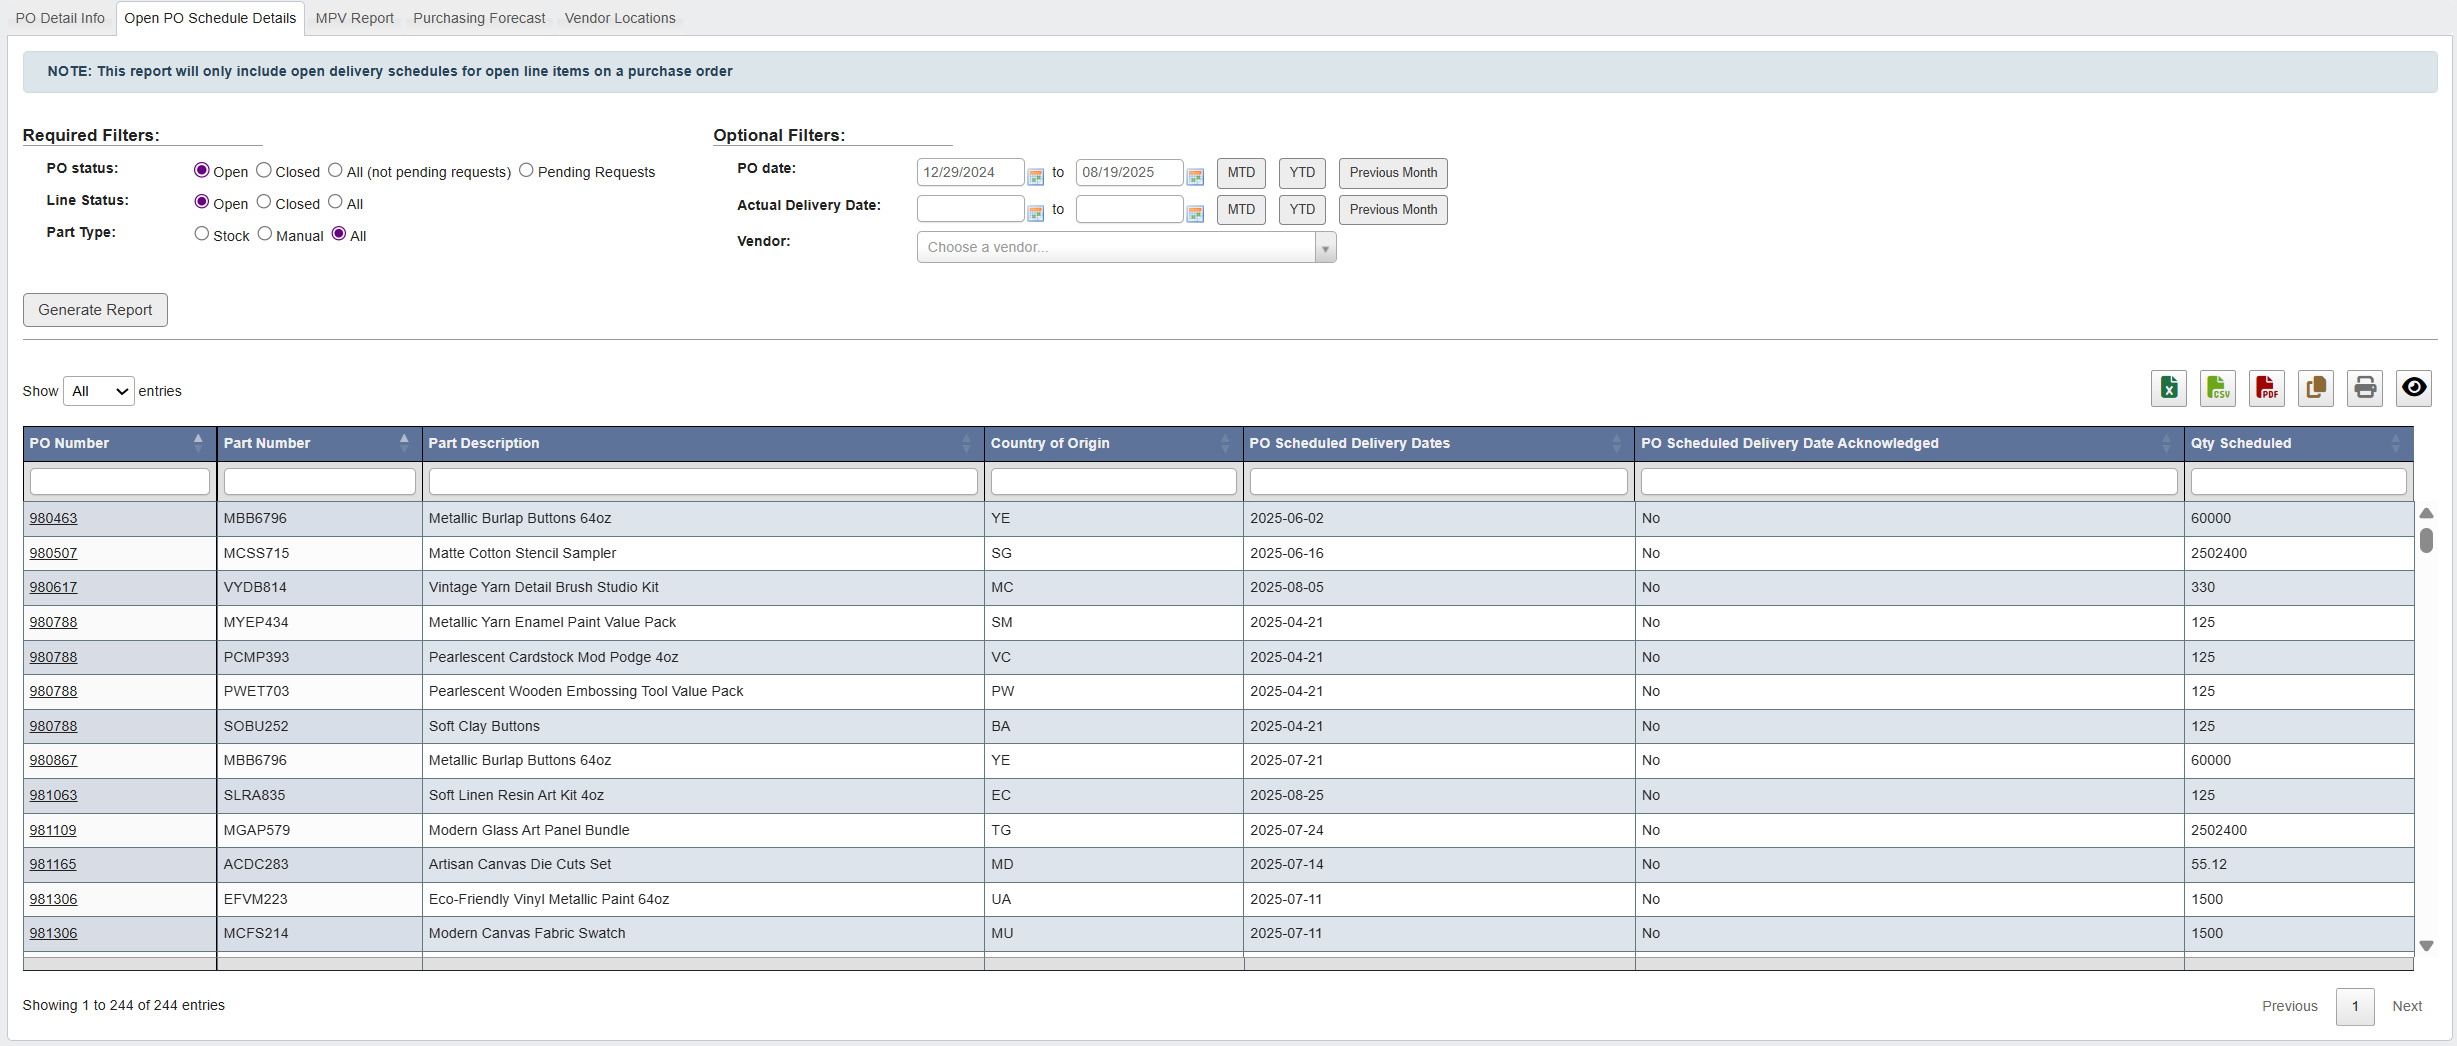 **This report is useful for:** Quick status checks and sharing; it’s a smaller version of the detailed report with \~7 columns, so non-purchasing teams can scan it without getting overwhelmed.
To share a simple, seven-column view of what’s scheduled to arrive:
1. Click the `Open PO Schedule Details` tab.
2. Set the same high-level filters you use for PO Detail (buyers commonly use **Open / Open / All**).
3. Click `Generate Report`.
## MPV Report
**This report is useful for:** Quick status checks and sharing; it’s a smaller version of the detailed report with \~7 columns, so non-purchasing teams can scan it without getting overwhelmed.
To share a simple, seven-column view of what’s scheduled to arrive:
1. Click the `Open PO Schedule Details` tab.
2. Set the same high-level filters you use for PO Detail (buyers commonly use **Open / Open / All**).
3. Click `Generate Report`.
## MPV Report
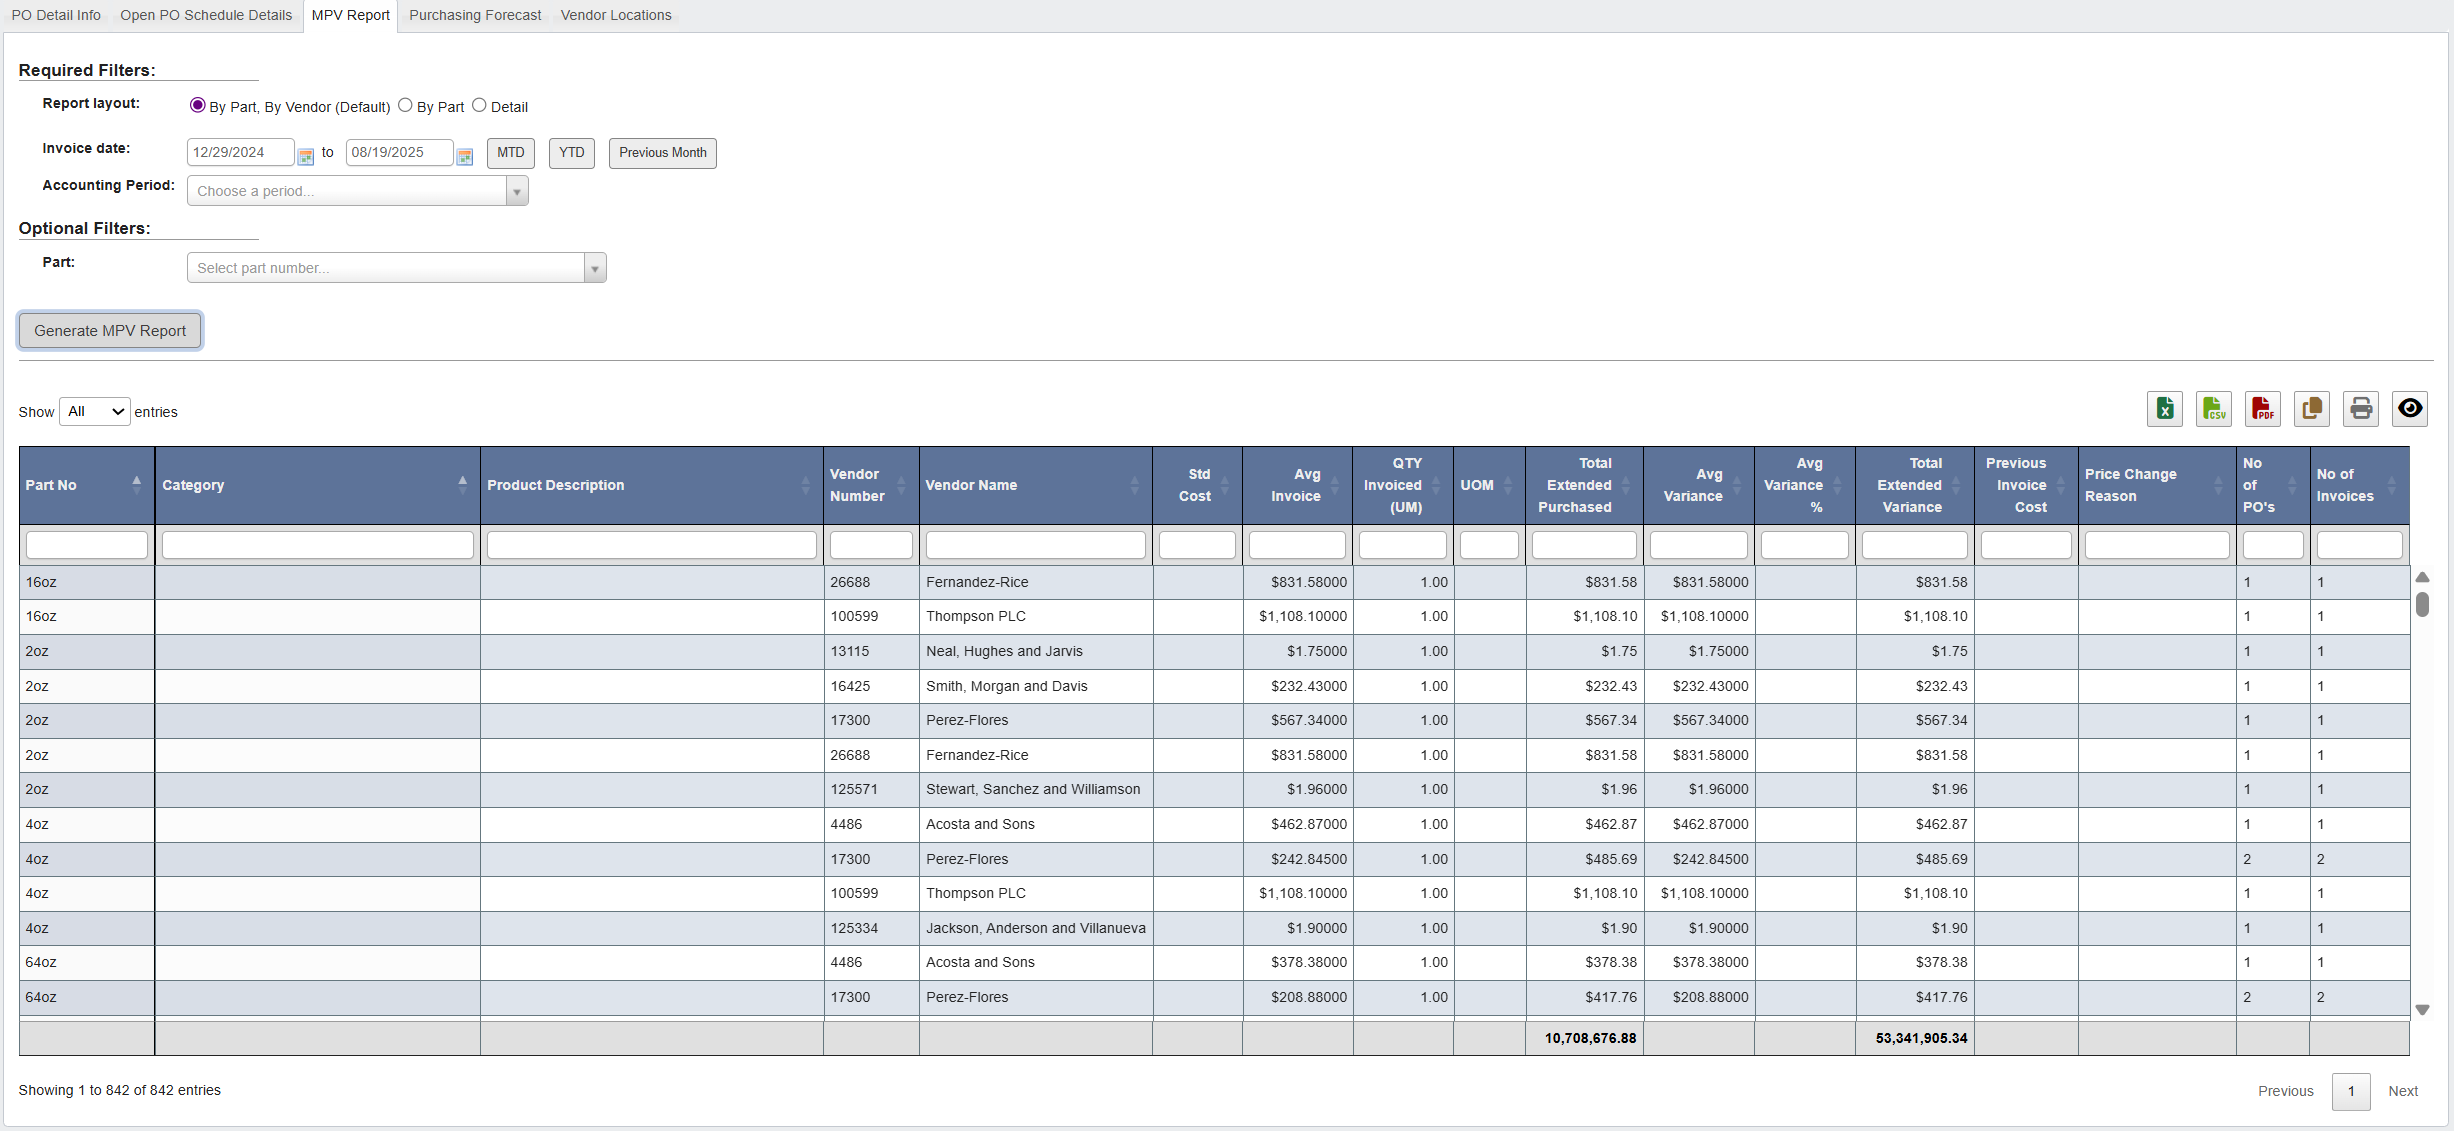 **This report is useful for:** Purchasing teams to monitor cost increases or savings at the part/vendor level.
To review purchase price variance by part, vendor, or category and see how actual costs compare to standard costs:
1. Click the `MPV Report` tab.
2. Choose a **Report Layout**:
* **By Part, By Vendor (Default):** Groups parts under each vendor for a balanced view.
* **By Part:** Focuses on part-level variance across all vendors.
* **By Vendor:** Focuses on vendor-level totals across all purchased parts.
* **Detail:** Full line-level detail for audits.
3. Set the **Invoice Date** range (use **MTD/YTD/Previous Month** shortcuts for quick selection).
4. (Optional) Select an **Accounting Period** or filter for a specific **Part**.
5. Click `Generate MPV Report`.
6. Review the grid columns, which show:
* **Std Cost vs. Avg Invoice Cost:** highlights price differences.
* **Total Extended Purchased** and **Total Extended Variance:** impact across volume.
* **Previous Invoice Cost:** last cost baseline for comparison.
* **Price Change Reason** (if logged): why cost changed.
* **No. of POs / Invoices:** how widespread the variance is.
7. Use the totals at the bottom to see overall variance impact (positive = cost higher than standard, negative = savings).
## Purchasing Forecast
**This report is useful for:** Purchasing teams to monitor cost increases or savings at the part/vendor level.
To review purchase price variance by part, vendor, or category and see how actual costs compare to standard costs:
1. Click the `MPV Report` tab.
2. Choose a **Report Layout**:
* **By Part, By Vendor (Default):** Groups parts under each vendor for a balanced view.
* **By Part:** Focuses on part-level variance across all vendors.
* **By Vendor:** Focuses on vendor-level totals across all purchased parts.
* **Detail:** Full line-level detail for audits.
3. Set the **Invoice Date** range (use **MTD/YTD/Previous Month** shortcuts for quick selection).
4. (Optional) Select an **Accounting Period** or filter for a specific **Part**.
5. Click `Generate MPV Report`.
6. Review the grid columns, which show:
* **Std Cost vs. Avg Invoice Cost:** highlights price differences.
* **Total Extended Purchased** and **Total Extended Variance:** impact across volume.
* **Previous Invoice Cost:** last cost baseline for comparison.
* **Price Change Reason** (if logged): why cost changed.
* **No. of POs / Invoices:** how widespread the variance is.
7. Use the totals at the bottom to see overall variance impact (positive = cost higher than standard, negative = savings).
## Purchasing Forecast
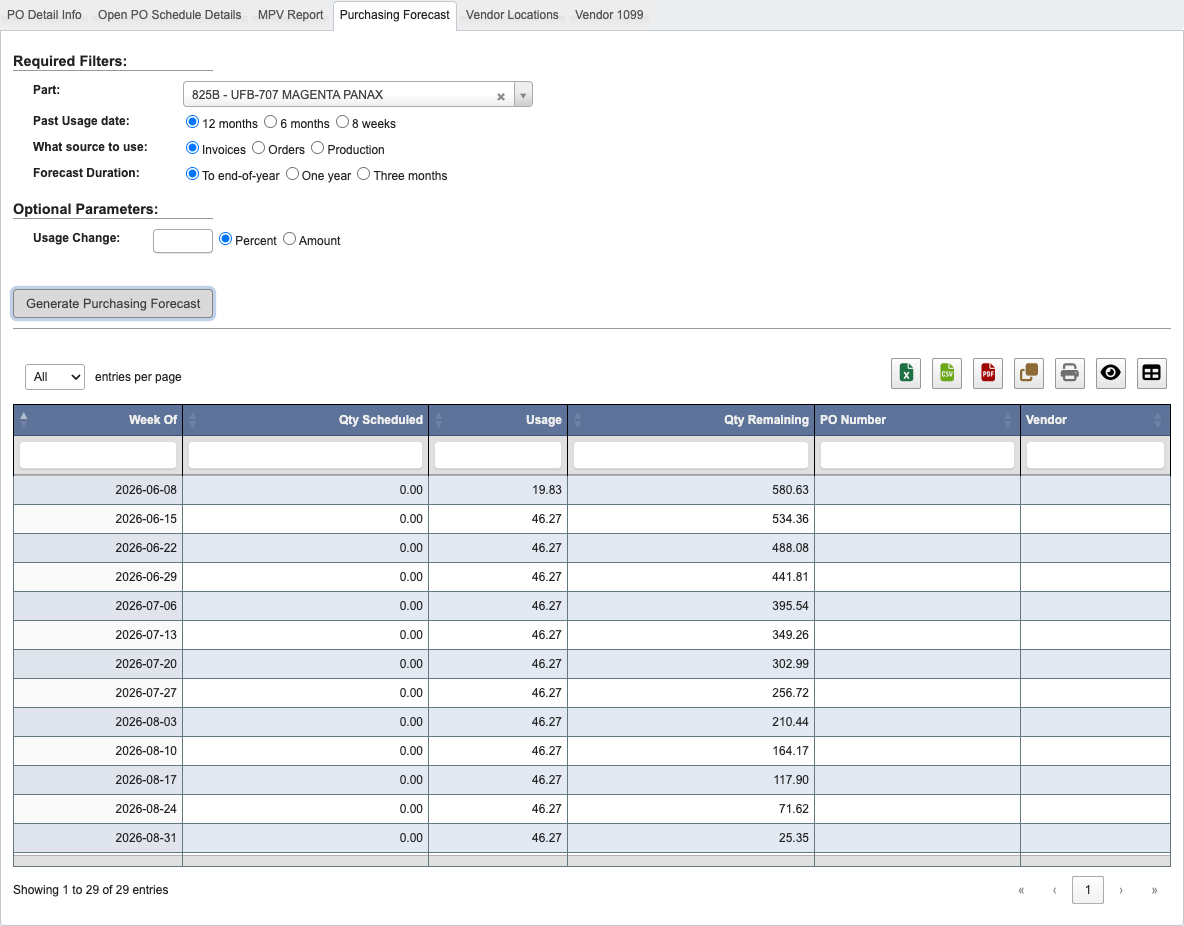 **This report is useful for:** Responding to spikes/drops in demand, aligning buys to the week you’ll run out, and communicating vendor/PO coverage at a glance.
To see weekly inbound vs. usage for a part and pick the next order week:
1. Click the `Purchasing Forecast` tab.
2. Select the **Part** from the dropdown; scroll or type in the dropdown to find.
3. Choose **Past Usage** window: **12 months / 6 months / 8 weeks**.
4. Choose **What source to use** for usage: **Invoices** (default), **Orders**, or **Production**. This controls which usage history drives the projected weekly consumption.
5. Click **`Generate Purchasing Forecast`**.
6. Read the grid: **Week Of**, **Qty Scheduled**, **Usage**, **Qty Remaining**, **PO Number**, **Vendor**.
7. Interpret **Usage**: for an 8-week view, usage is **evenly prorated** across the eight weeks (consistent fill).
8. Decide the **next order week/quantity** (e.g., “we’ll need another PO the **week of 10/27**”).
## Vendor Locations
**This report is useful for:** Responding to spikes/drops in demand, aligning buys to the week you’ll run out, and communicating vendor/PO coverage at a glance.
To see weekly inbound vs. usage for a part and pick the next order week:
1. Click the `Purchasing Forecast` tab.
2. Select the **Part** from the dropdown; scroll or type in the dropdown to find.
3. Choose **Past Usage** window: **12 months / 6 months / 8 weeks**.
4. Choose **What source to use** for usage: **Invoices** (default), **Orders**, or **Production**. This controls which usage history drives the projected weekly consumption.
5. Click **`Generate Purchasing Forecast`**.
6. Read the grid: **Week Of**, **Qty Scheduled**, **Usage**, **Qty Remaining**, **PO Number**, **Vendor**.
7. Interpret **Usage**: for an 8-week view, usage is **evenly prorated** across the eight weeks (consistent fill).
8. Decide the **next order week/quantity** (e.g., “we’ll need another PO the **week of 10/27**”).
## Vendor Locations
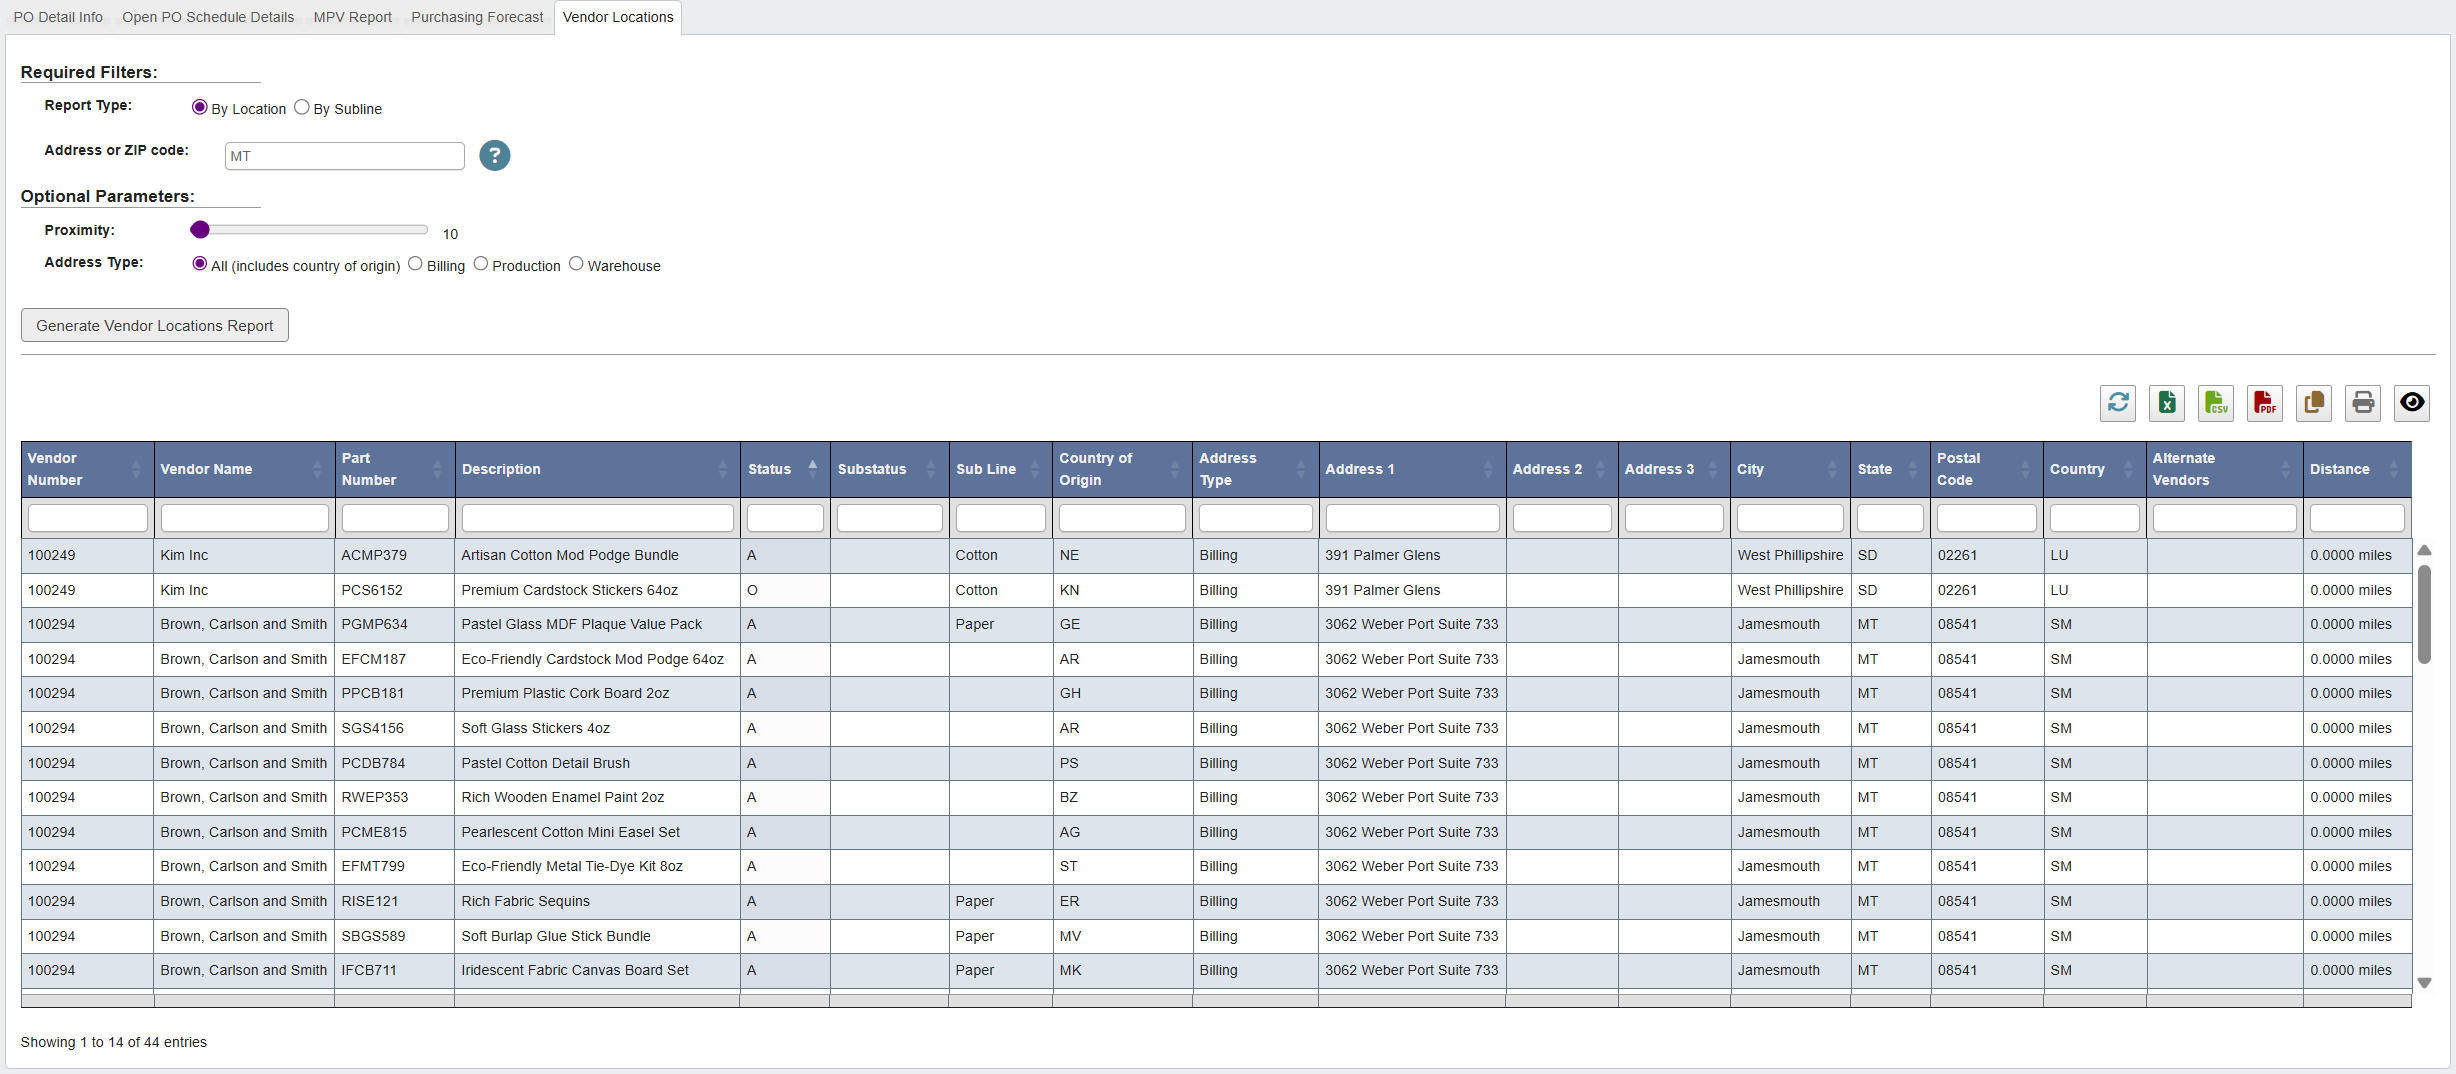 **This report is useful for:** Confirming where suppliers are shipping from, identifying alternate vendors when expediting is needed, and reviewing vendor proximity to reduce freight time or cost. It’s especially helpful when you need a quick answer to “Where is this vendor located, and do we have another option nearby?”.
To look up vendor addresses, ship-from details, and alternate suppliers:
1. Click the `Vendor Locations` tab.
2. Choose a **Report Type**:
* **By Location:** Shows vendors by address/ZIP.
* **By Subline:** Groups vendors by part subline.
3. Enter an **Address or ZIP code** to anchor your search.
4. (Optional) Adjust search parameters:
* **Proximity:** Set a mileage radius around the entered address/ZIP.
* **Address Type:** Show **All** addresses (includes country of origin) or limit to **Billing**, **Production**, or **Warehouse**.
5. Click `Generate Vendor Locations Report`.
6. Review the results, which display:
* Vendor names and numbers.
* Associated parts and descriptions.
* Subline, country of origin, and address type.
* Full address details (street, city, state, postal code, country).
* Alternate vendors and **distance** from the entered address/ZIP.
## Vendor 1099
**This report is useful for:** Confirming where suppliers are shipping from, identifying alternate vendors when expediting is needed, and reviewing vendor proximity to reduce freight time or cost. It’s especially helpful when you need a quick answer to “Where is this vendor located, and do we have another option nearby?”.
To look up vendor addresses, ship-from details, and alternate suppliers:
1. Click the `Vendor Locations` tab.
2. Choose a **Report Type**:
* **By Location:** Shows vendors by address/ZIP.
* **By Subline:** Groups vendors by part subline.
3. Enter an **Address or ZIP code** to anchor your search.
4. (Optional) Adjust search parameters:
* **Proximity:** Set a mileage radius around the entered address/ZIP.
* **Address Type:** Show **All** addresses (includes country of origin) or limit to **Billing**, **Production**, or **Warehouse**.
5. Click `Generate Vendor Locations Report`.
6. Review the results, which display:
* Vendor names and numbers.
* Associated parts and descriptions.
* Subline, country of origin, and address type.
* Full address details (street, city, state, postal code, country).
* Alternate vendors and **distance** from the entered address/ZIP.
## Vendor 1099
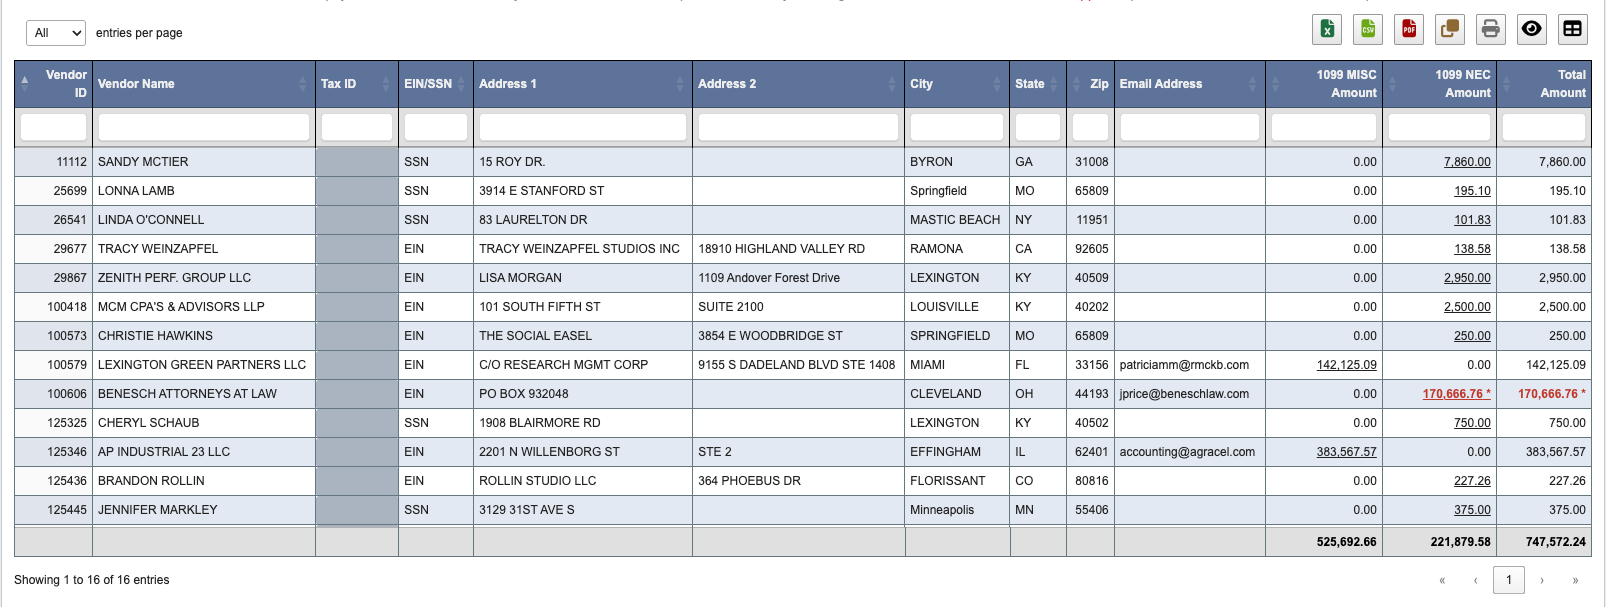
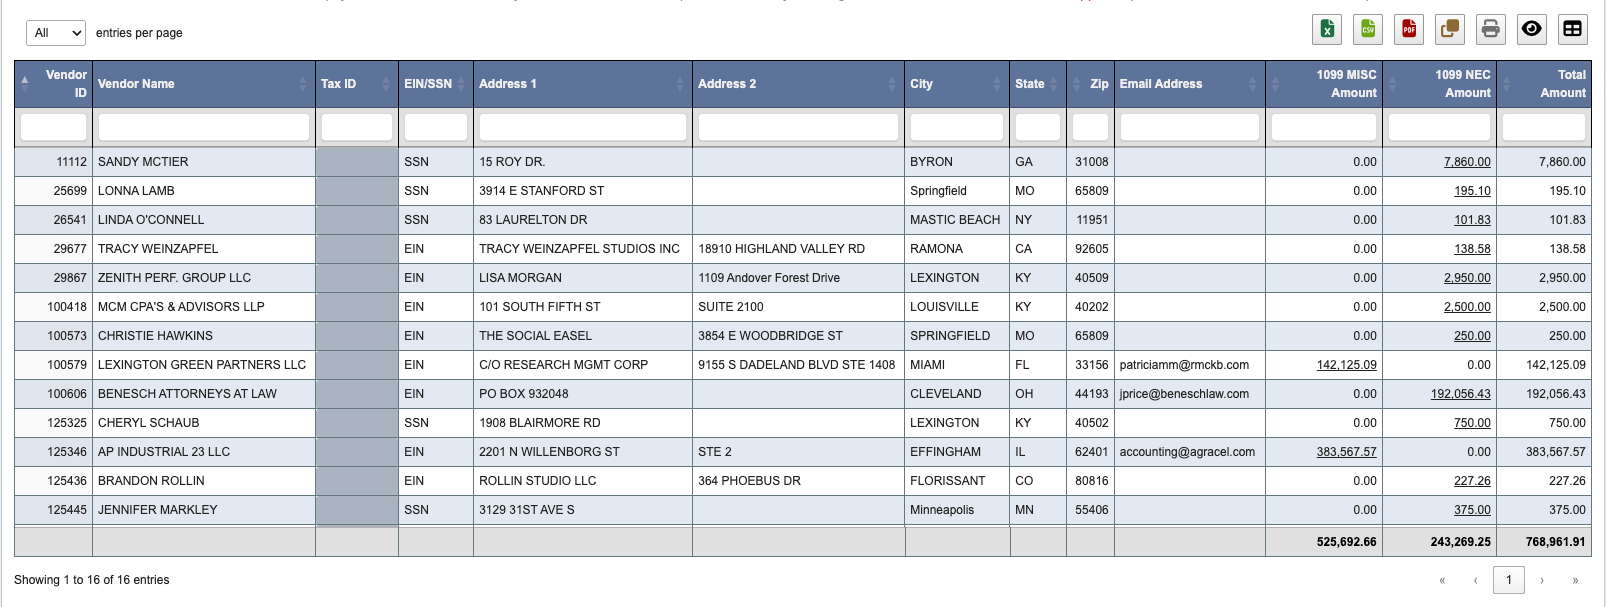 **This report is useful for:** Accounting and AP teams preparing year-end 1099-MISC and 1099-NEC filings. It lists each 1099 vendor with the amounts paid against 1099-flagged expense accounts for the tax year, ready to review and export for your 1099 software.
The report counts only payments made during the selected year (by check date) that posted to expense accounts flagged for 1099 reporting, and splits each into the correct **MISC** or **NEC** box. Voided payments are excluded automatically, so a voided-and-reissued check is never counted twice.
To generate and review the report:
1. Click the `Vendor 1099` tab.
2. Select the **Year** (the tax year, based on each payment’s check date).
3. Choose a **Type**: **All**, **1099-MISC**, or **1099-NEC**.
4. Click `Generate Vendor 1099 Report`.
5. Review the grid. Each row is one 1099 vendor and includes:
* **Tax ID** and an **EIN/SSN** indicator showing which kind of number it is.
* Mailing **Address** and **Email Address** (the vendor’s remittance email, for emailing 1099s).
* **1099 MISC Amount**, **1099 NEC Amount**, and **Total Amount**.
### Review and adjust a vendor’s detail
Click any underlined **1099 MISC** or **1099 NEC** amount to open the payment detail behind it.
**This report is useful for:** Accounting and AP teams preparing year-end 1099-MISC and 1099-NEC filings. It lists each 1099 vendor with the amounts paid against 1099-flagged expense accounts for the tax year, ready to review and export for your 1099 software.
The report counts only payments made during the selected year (by check date) that posted to expense accounts flagged for 1099 reporting, and splits each into the correct **MISC** or **NEC** box. Voided payments are excluded automatically, so a voided-and-reissued check is never counted twice.
To generate and review the report:
1. Click the `Vendor 1099` tab.
2. Select the **Year** (the tax year, based on each payment’s check date).
3. Choose a **Type**: **All**, **1099-MISC**, or **1099-NEC**.
4. Click `Generate Vendor 1099 Report`.
5. Review the grid. Each row is one 1099 vendor and includes:
* **Tax ID** and an **EIN/SSN** indicator showing which kind of number it is.
* Mailing **Address** and **Email Address** (the vendor’s remittance email, for emailing 1099s).
* **1099 MISC Amount**, **1099 NEC Amount**, and **Total Amount**.
### Review and adjust a vendor’s detail
Click any underlined **1099 MISC** or **1099 NEC** amount to open the payment detail behind it.
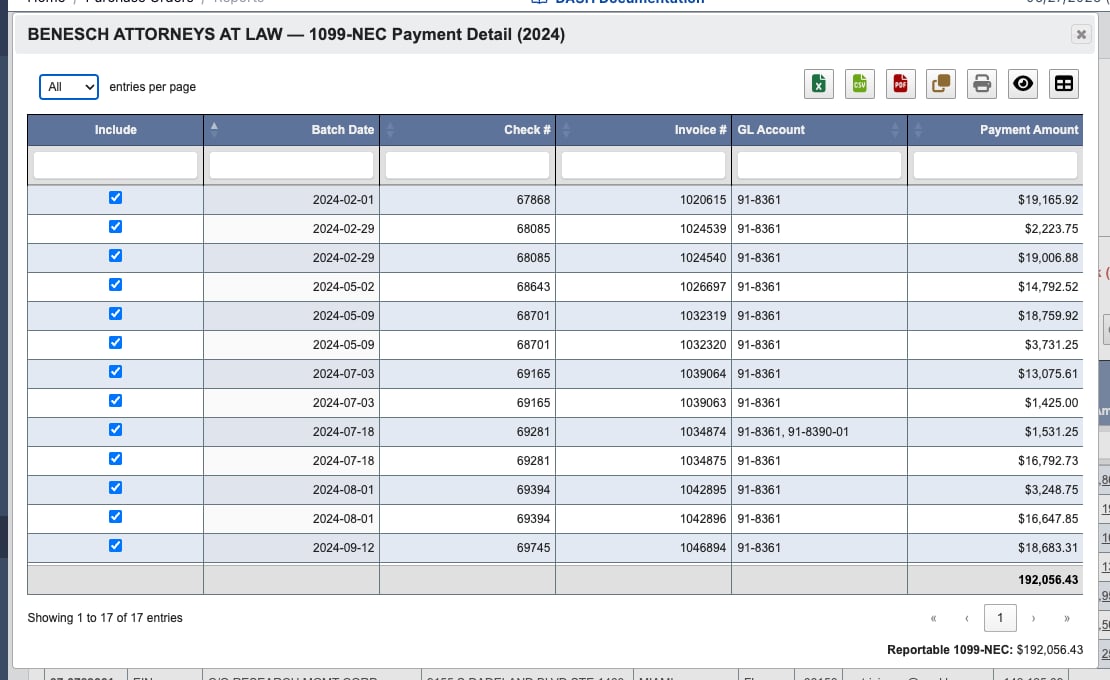 The dialog lists every payment that makes up that amount — **Batch Date**, **Check #**, **Invoice #**, **GL Account**, and **Payment Amount** — with a running **Reportable** total at the bottom.
* Uncheck the **Include** box on any line to leave it out of the vendor’s reported total; the **Reportable** total updates immediately.
* Re-checking a line adds it back.
Excluding lines is a temporary, on-screen adjustment for the current session — it changes the totals you see and export, but is not saved. Re-running the report resets every vendor to its full amounts.
When you exclude lines, the vendor’s amount on the report turns **red with an asterisk (\*)**, and hovering it shows the original amount. The downloaded report reflects the adjusted totals.
The dialog lists every payment that makes up that amount — **Batch Date**, **Check #**, **Invoice #**, **GL Account**, and **Payment Amount** — with a running **Reportable** total at the bottom.
* Uncheck the **Include** box on any line to leave it out of the vendor’s reported total; the **Reportable** total updates immediately.
* Re-checking a line adds it back.
Excluding lines is a temporary, on-screen adjustment for the current session — it changes the totals you see and export, but is not saved. Re-running the report resets every vendor to its full amounts.
When you exclude lines, the vendor’s amount on the report turns **red with an asterisk (\*)**, and hovering it shows the original amount. The downloaded report reflects the adjusted totals.
 ### Export
Use the toolbar buttons above the grid (**Excel**, **CSV**, **PDF**, **Copy**, **Print**) to download the report — including any on-screen adjustments — for upload into your 1099 software.
### Export
Use the toolbar buttons above the grid (**Excel**, **CSV**, **PDF**, **Copy**, **Print**) to download the report — including any on-screen adjustments — for upload into your 1099 software.