Overview
The Order Processing → QC Orders submodule is where warehouse/quality control (QC) teams review outbound orders before they ship. From here you can claim an order, QC pallets/cartons, print packing lists and pallet labels, add notes, and jump to related tools (Material Handling, LTL Picking, Small Batch). This page outlines the QC Order submodule’s features, and how to QC an order effectively within DASH.What You Can Do
The QC Orders submodule contains several following button-tabs across the top of your screen.
QC Home: Displays all orders awaiting or in-progress for quality control. This is your main workspace within the QC Orders submodule.Info: Reviews an order’s information for quality control review.- You must first click on an order in the QC Home window, then click Info to review it’s information.
Home: Takes you to the Inventory → Material Handler submodule. Learn more about this submodule here: Material Handler.- You can click on the Material Handler’s QC Orders button to return to the QC Orders submodule
Material Handling: Lets you view and manage material inventory associated with an order.- The functionality is the same as in the Inventory → Material Handler submodule; learn how to manage inventory here: Material Handler.
DASH LTL Picking: Takes you to the Order Processing → Order Picking submodule. Learn more about this submodule here: Order Picking.DASH Small Batch: Takes you to the Shipping → Online Orders New submodule.
QC Home
QC Home is the landing page showing all orders awaiting or in progress for QC. Orders can be sorted by column attributes, and color-coded based on order progress and order type.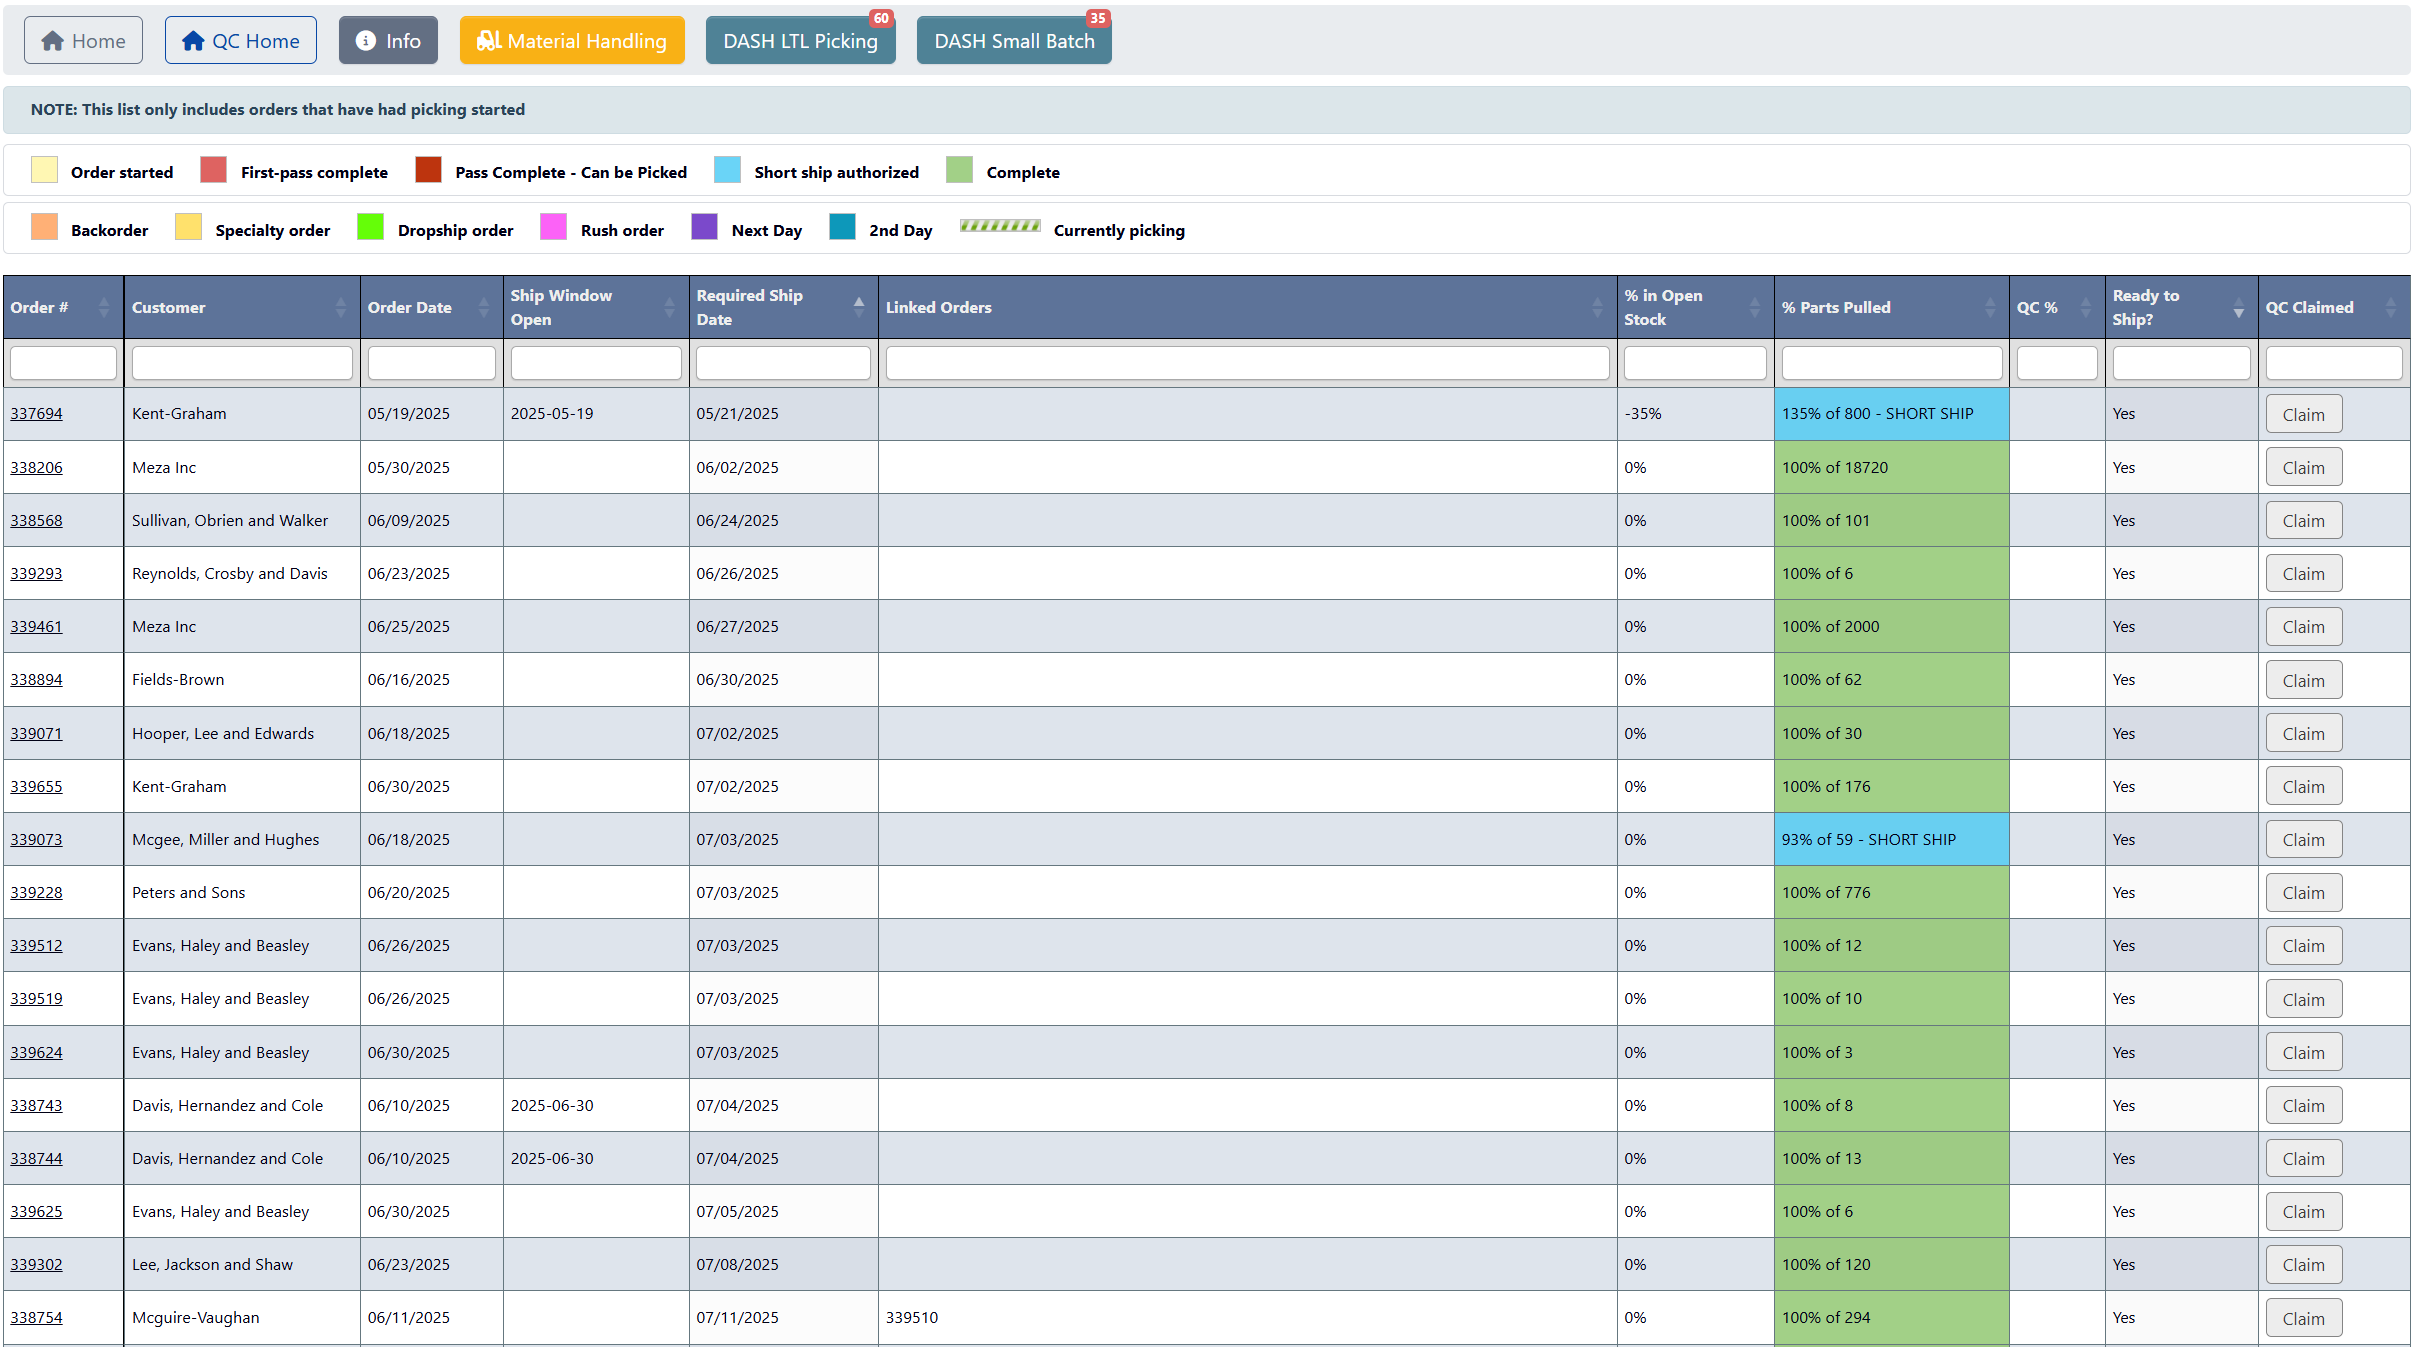
Order Attributes
Each order has the following attributes, displayed in sortable columns:Order #: The order’s ID number. Click to open the QC detail screen for that order.Customer: The customer associated with this order.Order Date: The date when the order was placed.Ship Window Open: The earliest date the order can ship.Required Ship Date: The customer-requested ship date.Linked Orders: Displays any directly associated orders (if applicable).% in Open Stock: Percent of order parts still in open stock (may be negative if overallocated).% Parts Pulled: Picking progress, showing number of pieces pulled against order total. Flags shortages if not fully picked.QC %: What percentage of the order has passed QC checks.Ready to Ship?: Quick “Yes/No” readiness indicator once all requirements are satisfied.QC Claimed: Shows whether an order has been assigned for QC. Click Claim to assign the order to yourself and prevent duplicate work.
Order Color Coding
The QC Home screen uses two types of color coding, applied to different parts of the table:
- % Parts Pulled Column Coloring: Indicates the picking and shipping progress for that order, corresponding to the first set of colors presented. Options include:
- Order Started
- First-pass complete
- Pass Complete
- Short Ship Authorized
- Complete
- Row Highlighting (Background Color): Indicates unique order details or requirements. Options include:
- Backorder
- Speciality order
- Dropship order
- Rush order
- Next Day
- 2nd Day
How to QC an Order
Step 1: Open the order’s QC workspace
- Go to Order Processing → QC Orders, and click on QC Home.
- Find the order you want to perform a QC pass on. You can click on column headers to sort alphabetically and find your desired order quicker.
- Click
Claimin the QC Claimed column to claim the order as your responsibility to QC. - Click the
Order #to open its QC workspace. This workspace lets you view basic order information, along with a table of each associated pallet.
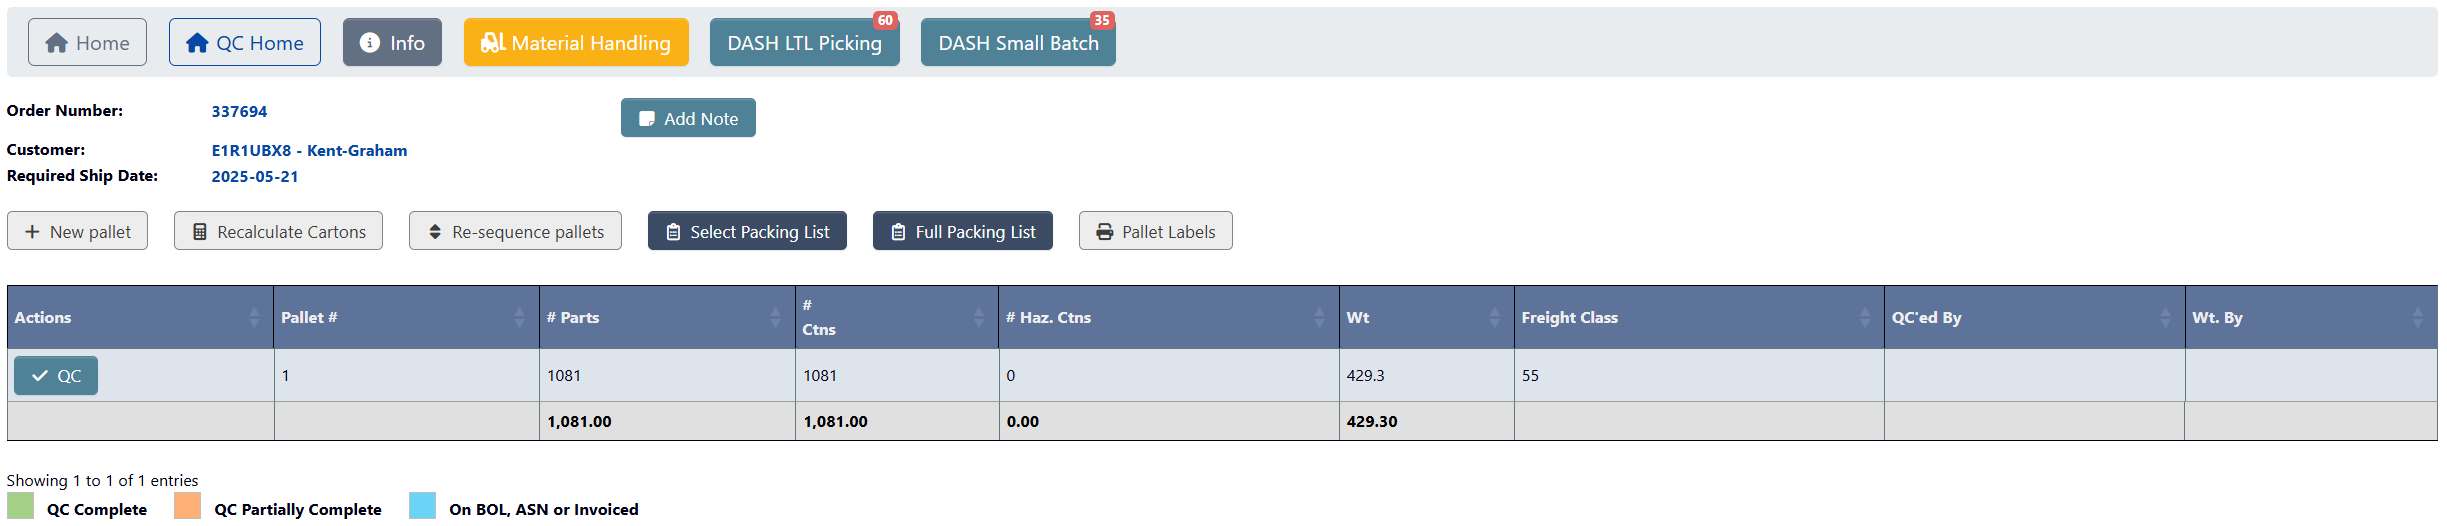
Step 2: QC an order pallet
-
Choose a Pallet # to QC, then in the Actions column click the corresponding
QC buttonto open the Pallet Info view for that pallet.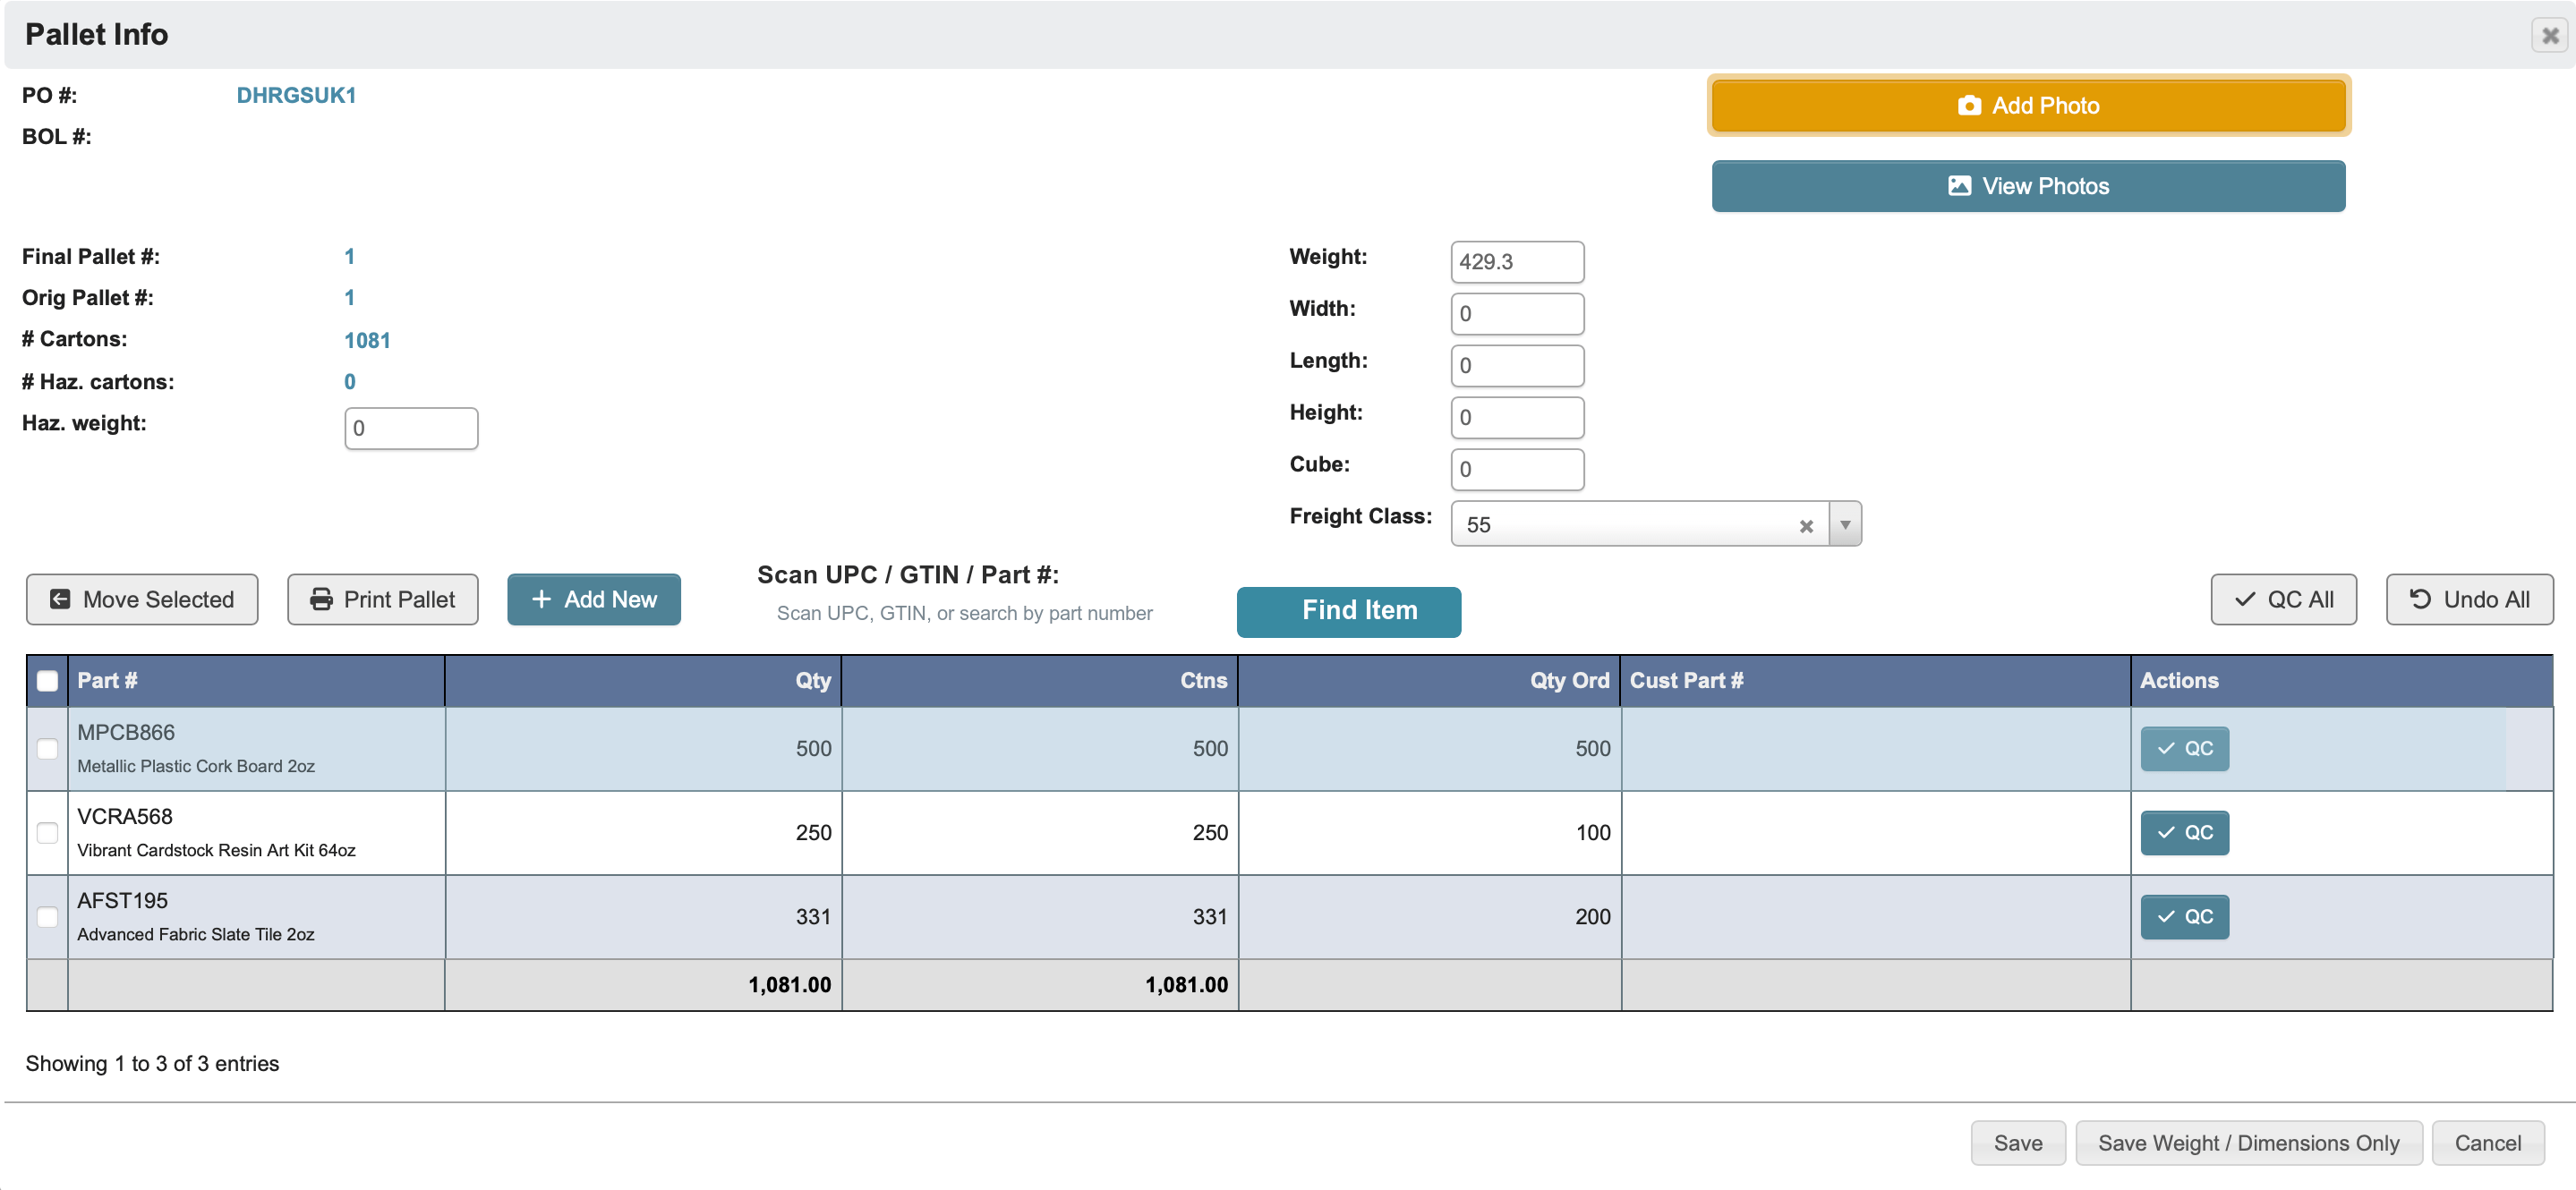
-
Confirm that each Part #, quantity (Qty), and counts (Ctns) are accurate.
- Click the associated
QC buttonto approve an accurate part, or clickQC Allabove the table to approve all parts. - Use the
Scan UPC / GTINfield to jump directly to a pallet line when you scan a barcode.- The scan lookup accepts the part’s UPC, alternate UPC, GTIN, or alternate GTIN.
- When DASH finds a match, it scrolls the pallet details table to the matching row so you can QC it immediately.
- To move a part to another pallet, click
Move Selectedabove the table to open the Move License Plate Details Window, then select the destination pallet and clickMoveto finish. - To add a new part to this pallet, click
+ Add Newto add a row and begin filling in its information. - Click
Undoin the Actions column to undo a part’s QC approval. - Click
Undo Allto start again. - Click
Print Palletto print the pallet contents and label summary
- Click the associated
- Confirm that general pallet information such as PO # and BOL # (if assigned), measurements such as Weight and Width, and Freight Class are accurate.
-
Confirm that pallet photos are accurate or update pallet photos using the following buttons:
Add Photo: opens the device camera to capture pallet images.View Photos: review any photos stored for this pallet.
-
If counts change, click
Recalculate Cartonsand/orRe-sequence Pallets. -
If you are satisfied with the pallet’s information, go to the bottom of the window and click
Saveto mark this pallet as QC reviewed (color-coded in green) and return to the order’s QC workspace.- If you are not satisfied, you can either just save any updated weights or measurements with
Save Weight / Dimensionsonly, or clickCancelto exit the pallet information without QC approval.
- If you are not satisfied, you can either just save any updated weights or measurements with
-
If you saved the pallet as QC approved, it will be highlighted in green on the order’s QC workspace. Pallets are color-coded according to their QC status.

Step 3 (Optional): Manage pallets associated with the order
From the order’s QC workspace, you can use the following features to manage pallet information associated with the order:
+ New pallet: Adds a new pallet row to the table.Recalculate Cartons: Opens a confirmation to recompute carton counts.Re-sequence Pallets: Renumbers/reorders pallets on the order.Select Packing List: Opens Print Packing List with a Pallet(s) input. You can choose a specific pallet or leave blank to print all pallets. Click Print to print the result.Full Packing List: Generates the full packing list document for the order, with Bill-To, Ship-To, order information, and line details.Pallet Labels: Choose Printer and Label Stock (2”×4” or 4”×6”), then print.
Add Note to attach a note to this order, containing the following attributes:
- Note Type: Either Sales or Shipping.
- Content: Free text entry for QC comments or notes.
- Optional Expiration (or check Never Expires): Date when this note will be automatically deleted.
Step 4 (Optional): Manage inventory associated with pallets you are QCing.
If you need to view or manage material inventory associated with a pallet you are QCing (such as updating its quantity, or moving it to another pallet):- Click Material Handling to open License Plate Actions.
- Scan a Plate # (default) or switch to Location to perform moves/adjustments tied to license plates while you’re QC’ing.
- Manage inventory according to this tutorial: Manage a License Plate.
Step 5: Review summarized info and complete the order QC
- When you have QC’d all pallets, click
Infoin the submodule toolbar to open the Order Information window. This is a read-only checkpoint where you confirm details before finalizing QC. - (Optional) Add a note to this order.
- Once you have reviewed all order information for accuracy, click
Confirm Order Info Reviewedto acknowledge down your review and exit this window. If you click Info again, you will see that acknowledgement noted in place of the confirmation button.
QC Home and begin this workflow again for another order that requires QC.